Commodore 64
L'ordinateur le plus vendu de l'histoire (1982) : 6510, vidéo VIC-II, et surtout la puce son SID — culte des musiciens et de la démoscene. Réparation : ⚠️ l'alim tueuse, les puces sur support (PLA/SID/VIC), le recap. La version console = la C64GS.
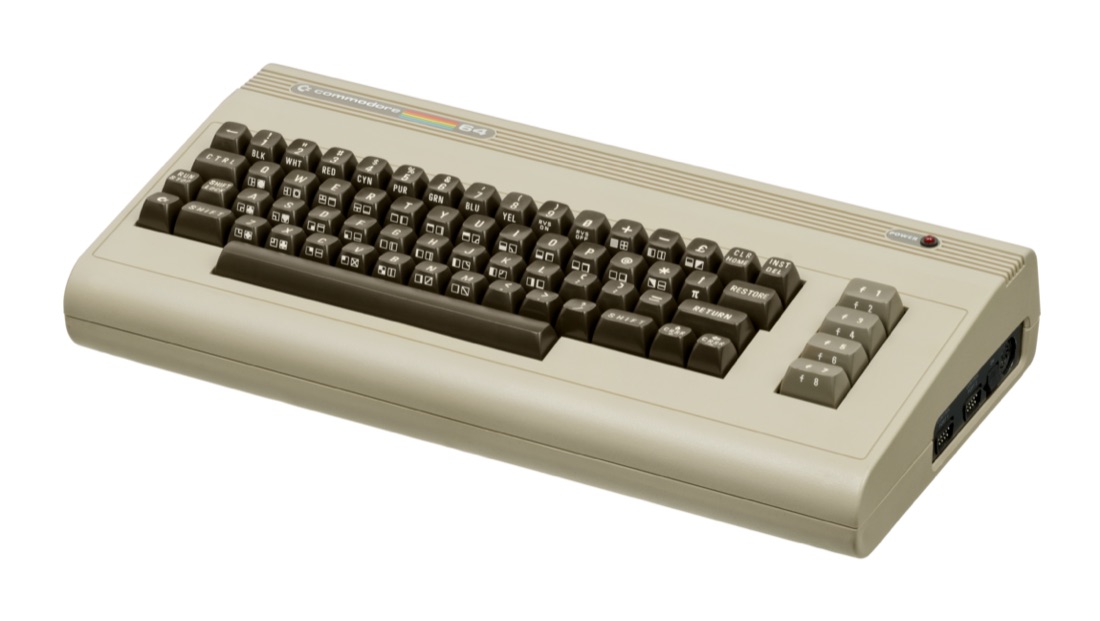
Commodore 64 — photo Evan-Amos, domaine public (Wikimedia Commons).
Identification / modèles
| Modèle | Année | Note |
|---|---|---|
| C64 (« breadbox ») | 1982 | le classique, carte « long board » |
| C64C | 1986 | boîtier fin + carte short board (puces 85xx) |
| SX-64 | 1984 | version portable à écran + lecteur intégré |
| C64 Games System | 1990 | console → page dédiée |
Architecture
| Bloc | Puce | Rôle |
|---|---|---|
| CPU | MOS 6510 (8500) | ~1 MHz |
| Vidéo | VIC-II (6567/6569 · 8565) | 320×200, 16 couleurs, sprites matériels |
| Son | SID (6581 12 V · 8580 5 V) | 3 voix + filtres analogiques (la puce culte) |
| Logique | PLA (906114 · 8721), CIA 6526 ×2, RAM 64 Ko | glue, I/O, mémoire |
Réparation (technicien)
Alimentation C64 (la brique tueuse)
L'alim d'origine vieillit mal : quand le régulateur 5 V lâche, il survolte et grille les puces (RAM, PLA, SID, VIC). Ne pas se fier à une brique d'époque : mesurer le 5 V, ou passer à une alim moderne à protection de surtension. C'est LA cause de C64 morts. → Recap.
- Puces sur support : diagnostic par substitution (RAM, PLA 906114, SID, VIC, 6510, CIA) ; PLA et SID = pannes fréquentes.
- SID : 8580 (5 V) ou 6581 (12 V) selon carte — attention à la tension au remplacement croisé.
- Contacts cartouche (expansion port) / série (IEC) : nettoyage IPA.
- Recap si son (SID) ou vidéo dégradés.
- Sortie vidéo : DIN A/V (Luma/Chroma/composite) → S-Video/RVB propre (mods vidéo).
Manuel de service d'origine ✅
Manuel constructeur archivé localement. Contient typiquement les schémas, le synoptique, les tensions et formes d'onde attendues, la nomenclature et les procédures de dépose — c'est la référence quand un symptôme ne colle à aucune panne connue.
-
C64 — manuel de service 314001-02 (1985) — PDF
-
C64 / C64C — manuel de service 314001-03 (1992) — PDF
- C64 — PDF
Statut
Document constructeur sans licence explicite, conservé à titre de préservation (machine hors production depuis des décennies) — même position que pour les manuels de bornes et d'arcade déjà archivés ici. Source : Internet Archive.
Avant d'ouvrir
Débranche l'alimentation et attends. Le bloc d'alimentation externe du C64 est réputé pour tuer les puces en vieillissant — si la machine a un défaut d'affichage ou de RAM, suspecte l'alimentation avant de déposer quoi que ce soit. Les circuits sont sur supports sur beaucoup de cartes : ils se déposent sans fer à souder, mais un extracteur évite de tordre les broches.
Procédures de démontage pas-à-pas ✅
5 procédures traduites depuis les guides iFixit, avec leur difficulté et leur durée estimée. Le titre d'origine est rappelé sous chaque procédure, pour retrouver le guide et ses photos.
| Procédure | Difficulté | Durée |
|---|---|---|
| Ouverture du boîtier (guide préalable) | 🟡 moyen | 1 minute |
| Remplacement du fusible 3AG | 🟢 très facile | 1 minute |
| Remplacement du processeur (CPU) | 🟢 facile | 1 minute |
| Dépose de la touche Shift-Lock | 🟡 moyen | 5 minutes |
| Remplacement de la puce VIC | 🟢 très facile | 1 minute |
Ouverture du boîtier — guide préalable
Le Commodore 64, aussi appelé C64, C-64, C= 64, ou parfois CBM 64 ou VIC-64, est un ordinateur familial 8 bits lancé en janvier 1982 par Commodore International.
- Retire les trois vis à tête cruciforme PH2 de 6,75 mm du boîtier.
- Ouvre le boîtier du C64 en soulevant la partie supérieure vers toi.
- Ne tire pas trop fort, tu casserais les clips.
Titre d'origine : « Commodore 64 Opening the Case Prerequisite Guide ».
Remplacement du fusible 3AG
Un fusible 3AG est un fusible à corps de verre, destiné à couper le circuit si le courant dépasse le seuil de sécurité dans un Commodore 64.
- Retire les trois vis à tête cruciforme PH2 de 6,75 mm du boîtier.
- Ouvre le boîtier du C64 en soulevant la partie supérieure vers toi.
- Ne tire pas trop fort, tu casserais les clips.
- Débranche les faisceaux de fils multicolores reliés à la carte mère.
- Sur la photo d'origine, la LED de mise sous tension (fils noir et rouge) n'est pas fixée au bloc clavier ; sur ta machine, ce peut être différent.
- Repère le fusible 3AG, situé près des ports joystick et de l'interrupteur marche/arrêt.
- À l'aide d'un spudger, extrais le fusible 3AG de son clip.
- Mets le nouveau fusible en place en l'enfonçant jusqu'à ce qu'il s'encliquette dans le clip.
Titre d'origine : « Commodore 64 3AG fuse Replacement ».
Remplacement du processeur (CPU)
Le Central Processing Unit (CPU), ou Micro Processing Unit (MPU), est le processeur 8 bits du Commodore 64.
- Retire les trois vis à tête cruciforme PH2 de 6,75 mm du boîtier.
- Ouvre le boîtier du C64 en soulevant la partie supérieure vers toi.
- Ne tire pas trop fort, tu casserais les clips.
- Débranche les faisceaux de fils multicolores reliés à la carte mère.
- Repère la puce du processeur, marquée « MOS 6510 3782 ».
- Décolle le processeur à l'aide d'un tournevis cruciforme, puis soulève-le à la main pour l'extraire de la carte mère.
Titre d'origine : « Commodore 64 Central Processing Unit (CPU) Replacement ».
Dépose de la touche Shift-Lock
Le Commodore 64, aussi appelé C64, C-64, C=64, ou parfois CBM 64 ou VIC-64, est un ordinateur familial 8 bits lancé en janvier 1982 par Commodore International.
- Retire les trois vis à tête cruciforme PH2 de 6,75 mm du boîtier.
- Ouvre le boîtier du C64 en soulevant la partie supérieure vers toi.
- Ne tire pas trop fort, tu casserais les clips.
- Retire les huit vis cruciformes PH2 de 6,75 mm qui tiennent le bloc clavier sur la coque avant. (Deux vis restent sur le côté droit.)
- Retire les vingt-trois vis cruciformes PH2 de 3,38 mm à l'arrière du support de clavier.
- Débranche les faisceaux de fils multicolores reliés à la carte mère.
- Coupe ensuite avec précaution les deux petits fils qui relient la touche Shift-Lock au clavier.
- Retourne le clavier face contre table et pousse la touche Shift-Lock depuis l'arrière.
- Tu peux retirer la pièce grise fixée au ressort de la touche en écartant légèrement son clip, puis en la séparant du bouton.
- Détache le bouton du ressort en faisant levier avec un tournevis cruciforme.
Titre d'origine : « Commodore 64 Removing the Shift-Lock Key ».
Remplacement de la puce VIC
Le Video Interface Controller (VIC) est la puce graphique du C64.
- Retire les trois vis à tête cruciforme PH2 de 6,75 mm du boîtier.
- Ouvre le boîtier du C64 en soulevant la partie supérieure vers toi.
- Ne tire pas trop fort, tu casserais les clips.
- Débranche les faisceaux de fils multicolores reliés à la carte mère.
- Sans outil, soulève à deux mains la plaque métallique du VIC pour dégager la puce.
- Fais levier sous la puce VIC avec un tournevis cruciforme, puis dégage-la de la carte mère à la main, en exerçant une pression modérée.
- La puce neuve se remet en place en l'encliquetant sur la carte.
Titre d'origine : « Commodore 64 VIC Chip Replacement ».
Source, licence et portée
Guides iFixit (catégorie « Commodore 64 »), sous Creative Commons BY-NC-SA — attribution, usage non commercial, partage à l'identique. Le texte est traduit de l'anglais ; le titre d'origine est rappelé sous chaque procédure et les photos d'étapes restent sur iFixit. ⚠️ Ces guides visent le modèle nommé dans le titre : sur une autre révision, la visserie et l'ordre de dépose peuvent différer.
Procédure — ordinateur mort, dans l'ordre ✅
Ce que cette procédure ajoute
Un ordre pensé pour un micro familial : ce qui tue ces machines, c'est leur alimentation, leur pile, leurs condensateurs, leur RAM sur support et leur clavier — à peu près dans cet ordre, et bien avant le CPU. → Diagnostic PCB
1. L'alimentation — mesurée avant d'être branchée. C'est l'étape qu'il ne faut pas intervertir. Sur une machine de cet âge, une alimentation ne s'arrête pas simplement : un régulateur 5 V qui lâche haut envoie 7, 9, 12 V sur le bus et emporte la RAM et les puces custom avec lui. Mesurer chaque rail hors machine, sous charge factice si possible, et seulement ensuite la brancher.
2. La pile, si la machine en a une. Toute pile d'horloge ou de sauvegarde soudée sur une carte est une fuite à venir. Si la tienne en a une et qu'elle n'a jamais été changée, la sortir avant qu'elle n'emporte les pistes. → Piles de sauvegarde
3. Les condensateurs. Le recap est la norme sur ces machines, pas le dernier recours — et sur l'alimentation d'abord, puisque c'est elle qui protège le reste. → Recap
4. La RAM, sur ses supports. Ces machines ont été conçues pour être réparées : la RAM, et souvent la logique, sont sur supports. Tout ré-enficher d'abord — trente ans d'oxyde, c'est un no-boot classique. Puis échanger les puces : une RAM morte donne en général un motif de caractères parasites reproductible, ou un écran figé sur un caractère fixe.
5. Le clavier. Une console n'en a pas ; celui d'un ordinateur est une pièce d'usure. Un clavier à membrane lâche par lignes ou colonnes entières mortes — c'est la membrane, pas la machine. Un clavier mécanique demande un nettoyage de contacts, pas un remplacement. Voir cette page : le mode de panne est souvent documenté par modèle.
6. Le support — cassette ou disquette. Les deux se ramènent souvent aux mêmes choses : une tête sale, et pour la cassette l'azimut et une courroie devenue goudron. ⚠️ Côté disquette, vérifier que la mécanique a bien une courroie avant d'en chercher une : beaucoup en ont, mais certains lecteurs sont à entraînement direct, et démonter pour trouver une pièce qui n'existe pas ne sert qu'à user le lecteur. Une machine qui démarre mais ne charge rien est une panne de lecteur, pas de logique — inutile de la chercher sur la carte.
7. La sortie vidéo. RF, composite, RGB ou moniteur dédié selon la machine (voir Identification). Tester avec autre chose avant de conclure : un modulateur d'époque et un téléviseur moderne se fâchent bien plus souvent que l'un des deux n'est en panne.
8. Toujours rien. Maintenant la logique : rails sur la carte, reset, horloge, bus. → Diagnostic PCB
Pannes fréquentes
| Symptôme | Cause probable | Piste |
|---|---|---|
| Console morte après un temps | alim qui a survolté le 5 V | Remplacer alim ; tester puces |
| Écran de garbage / ne boote pas | PLA ou RAM HS | Substituer PLA, RAM |
| Pas de son / son faux | SID | Remplacer SID (bonne tension) |
| Ports morts | CIA 6526 | Substituer la/les CIA |
| Cartouche non lue | contacts expansion port | Nettoyage |
Modernisation & mods — quoi acheter, comment
L'alim « tueuse » : à remplacer AVANT de rebrancher
L'alim d'origine surtension le 5 V quand sa régulation lâche → grille CPU/PLA/RAM/SID d'un coup. Alim moderne régulée à protection surtension indispensable (ou protecteur 5 V type fusible/crowbar) avant toute mise sous tension.
Stockage moderne (bus IEC) - SD2IEC 🟢 (SD bon marché), Pi1541 🟢 (émule un vrai 1541, compat max), 1541 Ultimate II+ 🟢 (disque + cartouche + REU) ; Kung Fu Flash / EasyFlash 🟢 (cartouche SD) ; JiffyDOS 🟡 (ROM à remplacer/support) accélère les accès. Tout se branche sur le port cartouche ou l'IEC — 0 soudure. - Ultimate 64 🟢 : recréation FPGA complète (carte de remplacement) → ajoute une sortie HDMI.
Vidéo - Mods S-Video/composite (Lumafix & cie) 🟡 pour une image propre sur le C64 d'origine.
Fiabilisation - Recap 🟠 ; PLA et SID souvent sur support → substitution facile par rééditions modernes (ARMSID/SwinSID, PLAnkton) 🟢 ; nettoyage des contacts cartouche/clavier.
⚠️ Ne pas héberger de ROMs/jeux — méthode uniquement.
Voir aussi
- C64GS (version console) · Amiga · Recap · Diagnostic PCB.
Sources & attribution
- Photo Commodore 64 — Evan-Amos, domaine public, Wikimedia Commons — https://commons.wikimedia.org/wiki/File:Commodore-64-Computer-FL.jpg
- Wikipédia — Commodore 64 (6510, VIC-II, SID, PLA, modèles) — CC-BY-SA — https://en.wikipedia.org/wiki/Commodore_64
- Savoir communautaire C64 établi (alim tueuse, PLA/SID socketés, substitution) — synthèse.

Relecture & corrections
À quoi sert cet espace
Une valeur fausse, une procédure dépassée, une référence de puce qui ne colle pas à ta carte ? Signale-le ici, avec ce que tu as constaté (modèle, révision de carte, numéro de série, mesure). Chaque signalement est recoupé avec une source avant toute modification — une correction invérifiable est publiée en tant que « signalé par …, non recoupé » plutôt qu'appliquée en silence.
La lecture est ouverte à tous ; écrire demande une connexion Discord. Les signalements des relecteurs déclarés du wiki sont traités en priorité ; les autres sont lus aussi, mais passent par un humain avant toute modification.