Nintendo DS
Portable à double écran (tactile) de Nintendo (2004), énorme succès. Rétrocompatible GBA (DS / DS Lite). Décliné en DS Lite, DSi. Grand terrain de homebrew via flashcart.
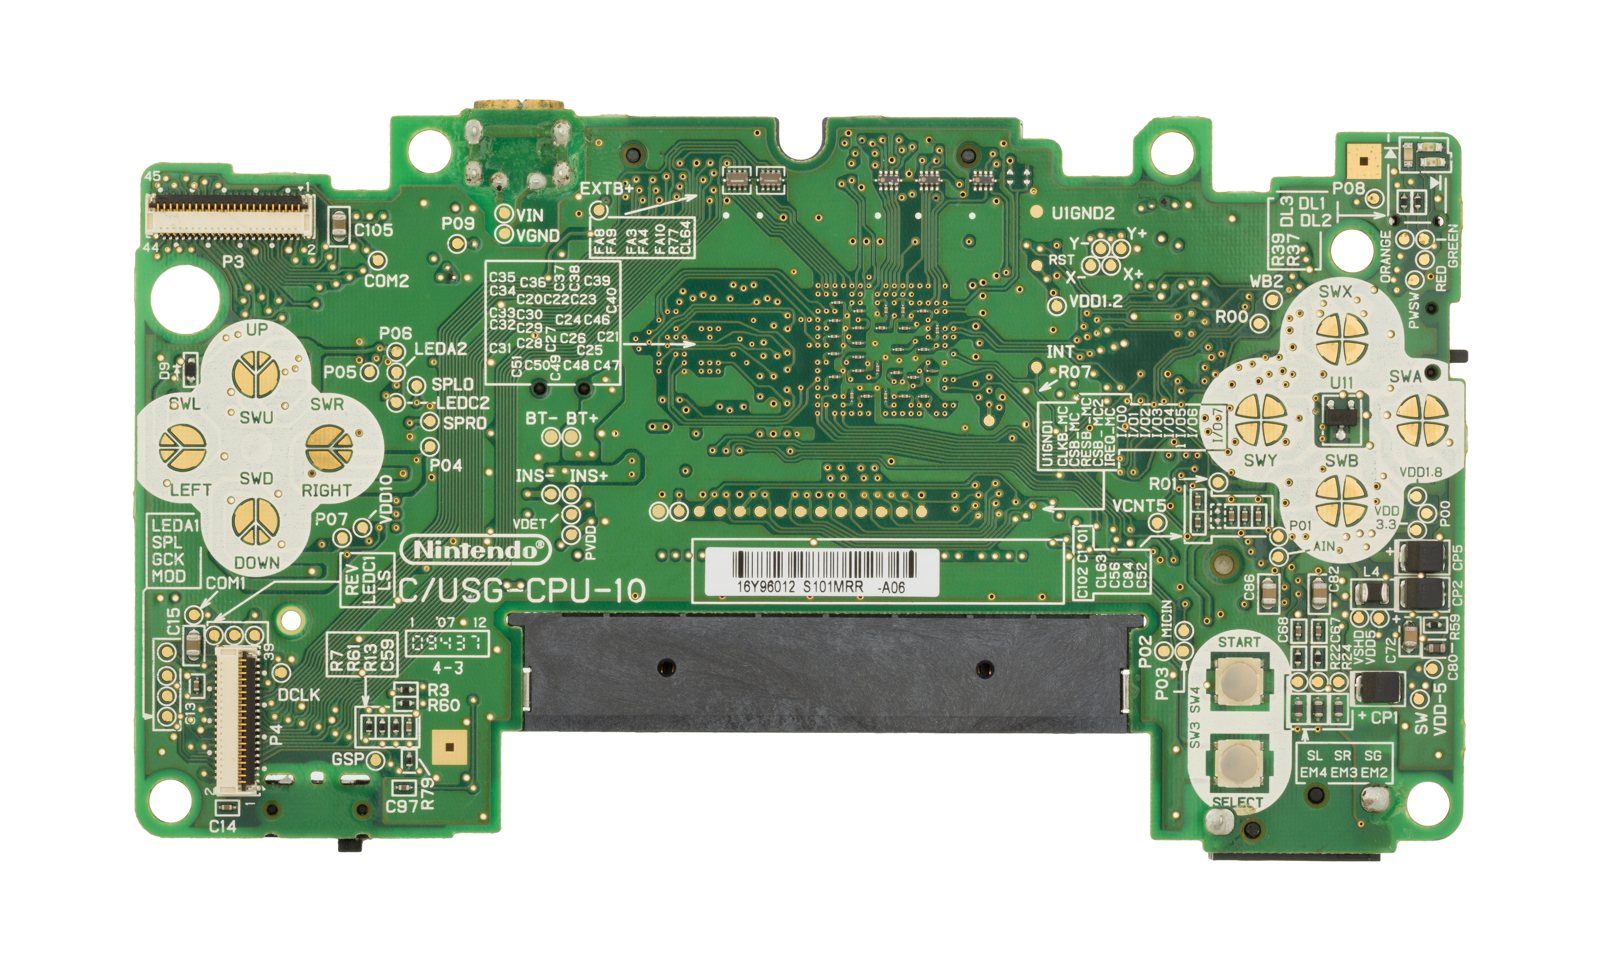
Identification
| Champ | Valeur |
|---|---|
| Fabricant | Nintendo |
| Sorties | DS (2004) · DS Lite (2006) · DSi (2008) |
| Écrans | 2 (dont un tactile) |
| Rétrocompat | GBA (DS / DS Lite ; pas la DSi) |
| CPU | ARM946E-S @ 67 MHz (ARM9) + ARM7TDMI @ 33 MHz (ARM7) |
| Écrans | 2 × 256×192 (l'inférieur tactile résistif) |
| RAM | 4 Mo (DS/Lite) · 16 Mo (DSi) ; WiFi intégré |
Architecture (2D + 3D)
La DS combine deux moteurs : un moteur 2D (héritier du GBA, deux couches par écran) et un moteur 3D matériel (rendu de polygones texturés, ~120 k polygones/s) partagé entre les deux écrans. L'ARM9 gère le jeu et le 3D, l'ARM7 s'occupe du son, du tactile, du WiFi et de la rétrocompat GBA (c'est lui, un ARM7TDMI, qui exécute les jeux GBA). D'où les deux slots : carte DS (en haut) et cartouche GBA (en bas, DS/DS Lite uniquement).
DS vs DSi & rétrocompat
| Modèle | Slot GBA | Nouveautés | Verrou région |
|---|---|---|---|
| DS / DS Lite | oui | Lite : écrans plus lumineux, plus fine | region-free |
| DSi / DSi XL | non | 2 caméras, carte SD, DSiWare, navigateur | jeux DSi-enhanced verrouillés par région ; jeux DS classiques region-free |
Slot GBA & connectivité
Le slot 2 (cartouche GBA) sert aussi d'extension sur DS/DS Lite : - Rumble Pak (vibreur), Memory Expansion Pak (RAM pour le navigateur Opera), grip Guitar Hero: On Tour, capteurs de certains jeux (Pokémon Pokéwalker à part). La DSi abandonne ce slot. - Sans-fil intégré : Download Play (un seul jeu partagé à plusieurs), PictoChat, jeu en ligne Nintendo Wi-Fi Connection (service fermé), connectivité avec la Wii et des jeux GameCube/Wii.
Préservation & homebrew
- Flashcarts : R4 & clones (slot 1), DSTwo/SuperCard (avec CPU pour émulation) — grande scène homebrew ; la DSi/3DS durcit la sécurité (mais exploits Unlaunch, Memory Pit). → voir Softmods.
- Émulation : melonDS (précis), DeSmuME.
Pannes fréquentes
| Symptôme | Cause probable | Piste |
|---|---|---|
| Charnière cassée (DS Lite) | Fragilité coque/charnière | Remplacer coque/charnière |
| Écran (lignes/tactile) | Nappe / dalle | Remplacer dalle ou nappe |
| Boutons L/R capricieux | Switches usés | Remplacer/nettoyer |
| Contacts / lecteur carte | Usure | Nettoyage |
Procédures de démontage pas-à-pas ✅
5 procédures traduites depuis les guides iFixit, avec leur difficulté et leur durée estimée. Le titre d'origine est rappelé sous chaque procédure, pour retrouver le guide et ses photos.
| Procédure | Difficulté | Durée |
|---|---|---|
| Dépose de la coque arrière | 🟢 facile | 5 minutes |
| Remplacement de la batterie | 🟢 très facile | 1 minute |
| Dépose de l'écran tactile (bas) | 🟢 facile | 10 minutes |
| Dépose de la carte mère | 🟢 facile | 10-15 minutes |
| Dépose de l'écran du haut | 🟢 facile | 5 minute |
Dépose de la coque arrière
Retirer la coque arrière est simple, à condition d'avoir le bon tournevis : Nintendo utilise un embout Tri-wing propriétaire. Procure-t'en un avant de commencer.
- Retire les 7 vis Tri-wing à l'arrière.
- Sortir la dragonne de son passage facilite l'accès à la vis en haut à gauche.
Titre d'origine : « Repairing Nintendo DS Back Panel ».
Remplacement de la batterie
Extrêmement simple : un petit tournevis cruciforme suffit.
- Avec un tournevis cruciforme n° 00, retire la vis qui tient la trappe de batterie sur la coque arrière.
- Retire la trappe.
- Fais levier sous la batterie par le bas avec un outil en plastique. À défaut, l'ongle fait aussi bien l'affaire.
Titre d'origine : « Repairing Nintendo DS Battery ».
Dépose de l'écran tactile (bas)
Une fois la carte mère déposée, l'écran du bas se retire facilement.
- Décolle la mousse au dos de l'écran tactile pour dégager la nappe.
- Soulève doucement l'écran hors de sa base.
Titre d'origine : « Repairing Nintendo DS Bottom LCD Screen ».
Dépose de la carte mère
La dépose de la carte mère est le passage obligé pour accéder aux écrans et remplacer les autres composants.
- Avec un tournevis cruciforme n° 00, retire les 4 vis de la carte.
- Ne dérape pas avec le tournevis : tu abîmerais la carte.
- Déverrouille les deux grandes nappes en relevant le clip noir.
- Tire doucement les nappes vers le bas puis vers l'extérieur, aux doigts.
- N'utilise pas de pince : les nappes s'abîment très facilement.
- Repère les deux petites nappes, sous la grande nappe de droite.
- Fais glisser leurs verrous sur le côté, puis retire les nappes.
- Une pince à épiler peut aider pour les petites nappes.
- Prends garde à ne pas abîmer ces nappes, qui sont fragiles.
- Repère le connecteur de l'antenne Wi-Fi (queue de cochon).
- Retire l'antenne en la saisissant par la tête à la pince à épiler. Tire vers le haut avec un léger mouvement de bascule pour déclipser le connecteur.
Titre d'origine : « Repairing Nintendo DS Main Circuit Board ».
Dépose de l'écran du haut
L'écran du haut se retire facilement une fois le reste de la coque et la carte mère déposés.
- Soulève les 4 pastilles de caoutchouc avec un tournevis plat ou un outil de dentiste.
- Avec un tournevis cruciforme n° 00, retire les 4 vis situées sous les pastilles.
- Avec un outil en plastique souple, écarte les bords de la coque au niveau de la jointure.
- Sépare le capot supérieur du corps.
- Avec un tournevis cruciforme n° 00, retire la vis qui maintient le cache-charnière.
- Retire le cache-charnière et mets-le de côté.
- Fais passer les nappes et le câble d'antenne Wi-Fi par l'ouverture du cache-charnière.
- Retire l'entretoise jaune et mets-la de côté.
- Avec un tournevis cruciforme n° 00, retire les deux vis qui tiennent les cartes des haut-parleurs.
- Relève le verrou noir des deux grandes nappes avec un outil de levier, puis retire-les doucement.
- Pour la petite nappe, tire le verrou vers le bas.
- Dégage doucement la petite nappe de son connecteur.
- Mets les deux petites cartes de côté.
- Prends garde à ne pas abîmer les deux nappes fragiles pendant la dépose.
Titre d'origine : « Repairing Nintendo DS Top LCD Screen ».
Source, licence et portée
Guides iFixit, sous Creative Commons BY-NC-SA — attribution, usage non commercial, partage à l'identique. Le texte est traduit de l'anglais ; le titre d'origine est rappelé sous chaque procédure et les photos d'étapes restent sur iFixit. ⚠️ Ces guides visent le modèle nommé dans le titre : sur une autre révision, la visserie et l'ordre de dépose peuvent différer.
Procédure — console morte, dans l'ordre ✅
Rétroéclairage et batterie
L'inverseur de rétroéclairage porte une haute tension, sous tension, sur une carte qu'on tient en main. Et un accu lithium gonflé ne se perce ni ne se plie — le sortir d'abord et le mettre à l'écart.
Ce que cette procédure ajoute
Un ordre pensé pour une console, pas pour une carte arcade : ce qui tue ces machines n'est presque jamais le CPU. C'est, dans l'ordre réel, l'alimentation, les condensateurs, le lecteur ou le slot de cartouche, et la logique seulement ensuite. → Diagnostic PCB
1. L'alimentation. Deux cas selon la machine. Bloc externe : ⚠️ lire le marquage sur la machine, à côté de la prise, et vérifier l'adaptateur en face — tension et polarité. Une machine à centre négatif alimentée en centre positif y laisse son fusible, parfois son régulateur ; ne pas se fier à l'étiquette d'un bloc tiers ni à un embout universel. Alimentation interne (la machine se branche directement au secteur) : le secteur est dans le boîtier. Débrancher, attendre, et vérifier que les gros condensateurs sont déchargés avant de toucher la carte. Dans les deux cas, mesurer en charge : un bloc fatigué tient sa tension jusqu'à ce qu'on lui demande du courant.
1b. La batterie et ses contacts. Sur cette machine, avant tout le reste : des contacts de pile corrodés, ou un accu qui tient hors charge et s'effondre en charge, donnent exactement les symptômes d'une machine morte.
2. Le fusible. Beaucoup de ces machines en ont un juste derrière la prise — c'est la pièce faite pour mourir. Le tester en continuité, hors circuit. Un fusible qui resaute est un court-circuit, pas un problème de fusible.
3. Les condensateurs. Sur la plupart des machines de cet âge, c'est le suspect par défaut et non le dernier recours — les électrolytiques CMS qui fuient rongent les pistes dessous avant de donner le moindre autre signe. ⚠️ Toutes n'en sont pas là : certaines en portent très peu et ne se recappent pas par principe. Lire ce que cette page en dit avant de sortir le fer. → Recap
4. Le connecteur de cartouche. Contacts de la cartouche à l'alcool isopropylique, jamais à la gomme abrasive : elle enlève la dorure et le problème revient en pire. Côté machine, inspecter les broches du slot — écartées, tordues ou oxydées — et vérifier la continuité entre le slot et la carte.
5. L'écran. Lignes, moitié éteinte, image qui s'efface : c'est presque toujours la nappe et ses soudures, pas la dalle. Ré-enficher avant de commander quoi que ce soit. Si la machine a une sortie TV — toutes ne l'ont pas — la tester aussi : elle sépare l'écran de ce qui l'alimente.
6. Toujours rien. Maintenant, et seulement maintenant, la logique : rails sur la carte, reset, horloge, bus. → Diagnostic PCB
Mods populaires — quoi acheter, comment
- Flashcart : R4 & dérivés (DS/DS Lite, slot-1) ou flashcart de préservation → homebrew et ludothèque sur microSD, plug-and-play 🟢.
- Softmod DSi : Unlaunch (via une carte SD DSi + exploit) débloque le homebrew sans matériel — 0 soudure 🟢. Faire une sauvegarde NAND avant.
- Écran / coque (DS Lite surtout) : dalles IPS de remplacement, coques neuves, nappes ; réparation fréquente = charnière/nappe supérieure cassée. Install 🟠 (démontage complet, nappes fragiles).
- Batterie : cellule Li-ion neuve (les DS d'origine ont ~20 ans) ; contacts et connecteurs stylet/écran.
Photos / assets
(À ajouter : DS Lite, écrans, carte.)
Réparation avancée
Charnière / nappe d'écran (rupture), lecteur de carte, écran tactile. Méthodes : Diagnostic PCB · Pistes & vias · Recap.
Documentation constructeur archivée ✅
Documentation constructeur archivée localement. ⚠️ Ce sont des manuels d'utilisation et de référence, pas des manuels de service : ils donnent les caractéristiques, les connecteurs et le fonctionnement attendu, mais pas les schémas ni les tensions de dépannage.
- Nintendo DS — PDF
Statut
Documents constructeur sans licence explicite, conservés à titre de préservation (machines hors production depuis des décennies).
Sources & attribution
- Wikipédia — Nintendo DS — CC-BY-SA — https://fr.wikipedia.org/wiki/Nintendo_DS
Image :
-
ds-board.jpg— Evan-Amos, domaine public — https://commons.wikimedia.org/wiki/File:Nintendo-DS-Lite-Motherboard-Top.jpg

Relecture & corrections
À quoi sert cet espace
Une valeur fausse, une procédure dépassée, une référence de puce qui ne colle pas à ta carte ? Signale-le ici, avec ce que tu as constaté (modèle, révision de carte, numéro de série, mesure). Chaque signalement est recoupé avec une source avant toute modification — une correction invérifiable est publiée en tant que « signalé par …, non recoupé » plutôt qu'appliquée en silence.
La lecture est ouverte à tous ; écrire demande une connexion Discord. Les signalements des relecteurs déclarés du wiki sont traités en priorité ; les autres sont lus aussi, mais passent par un humain avant toute modification.