Sony PlayStation 2 (PS2)
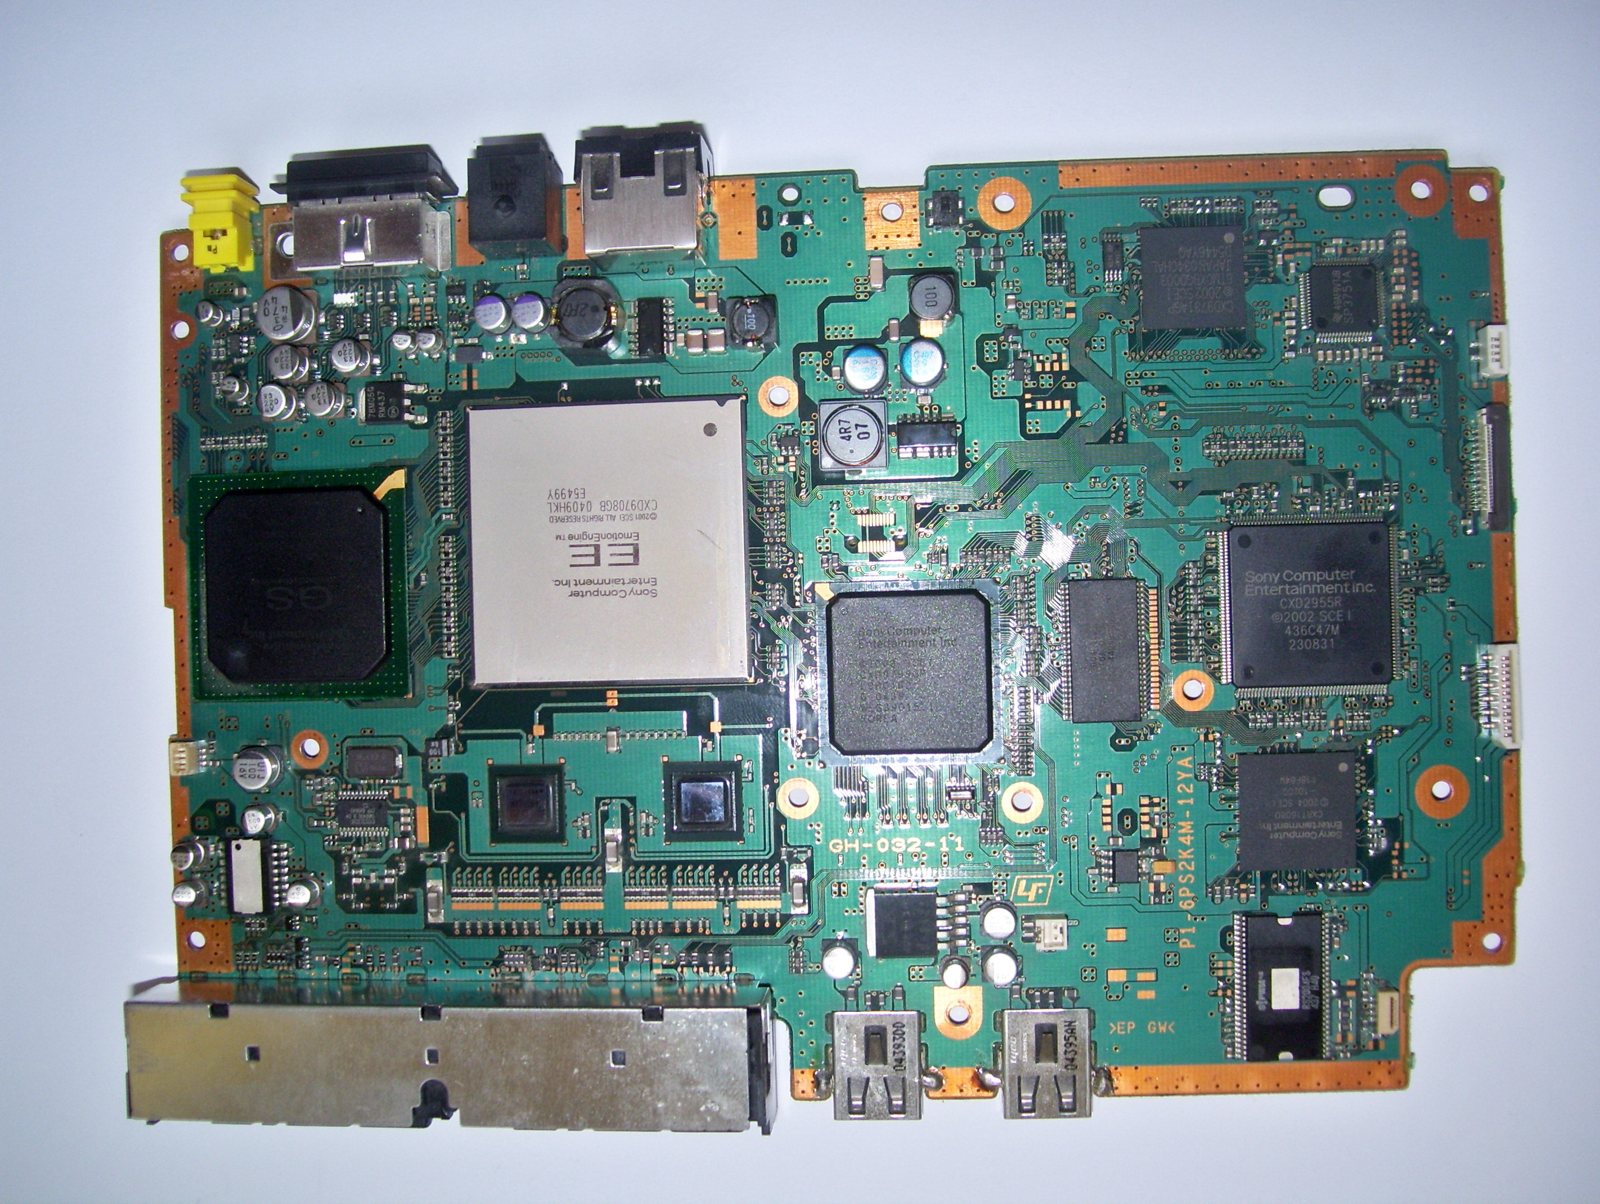
La console la plus vendue de l'histoire (2000). Rétrocompatible PS1, à DVD, CPU Emotion Engine. Points préservation : le lecteur optique (fat) et surtout la scène softmod (FreeMcBoot) qui ouvre USB/HDD/réseau sans matériel.
Identification
| Champ | Valeur |
|---|---|
| Fabricant | Sony |
| Sortie | 2000 |
| Génération | 6e |
| Modèles | Fat (SCPH-30000→50000, baie d'extension) · Slim (70000+) |
| Rétrocompat | PS1 |
| Sortie vidéo | Composite, S-Video, RGB, Component (480p/1080i selon jeu) |
| Média | DVD / CD |
Architecture
| Bloc | Puce | Fréquence | Rôle |
|---|---|---|---|
| CPU | Emotion Engine (MIPS R5900, 128 bits) | ~294/299 MHz | + 2 unités vectorielles VU0/VU1 (géométrie), FPU |
| GPU | Graphics Synthesizer | ~147 MHz | 4 Mo eDRAM à très haute bande passante (fillrate massif) |
| Son | SPU2 | 48 voies ADPCM | |
| I/O | IOP (= le CPU R3000 de la PS1) | gère l'I/O et la rétrocompat PS1 | |
| Mémoire | 32 Mo RDRAM principale + 4 Mo eDRAM (GS) + 2 Mo son | ||
| Média | DVD-ROM (+ CD) | lecteur = point faible (voir pannes) |
La rétrocompatibilité PS1 est matérielle : l'IOP est le processeur de la PS1. Les modèles Slim (SCPH-7000x+) intègrent tout et un port réseau natif.
Modèles & révisions (fat → slim)
| Génération | Modèles (SCPH) | À retenir |
|---|---|---|
| Fat — early | 30000 / 3000x | baie d'extension PCMCIA + i.Link ; EE et GS séparés |
| Fat — bay | 3500x / 3900x / 5000x / 500xx | baie d'extension arrière (Network Adaptor + HDD IDE 3,5″) → OPL/HDD Loader |
| Slim | 70000 (2004) / 7500x / 7700x | très fine, réseau intégré, plus de baie ni HDD ; certaines cartes « Deckard » |
| Slim — late | 90000 | alim intégrée, dernière révision, rétrocompat PS1 en partie logicielle (Deckard) |
- La baie d'extension (fat 3000x-5000x) accueille l'adaptateur réseau + un disque IDE 3,5″ — base de OPL/HDD Loader. Les Slim n'ont plus de baie (chargement HDD via l'astuce MX4SIO/USB/SMB à la place).
- Au fil des révisions, EE + GS finissent fusionnés (réduction de coûts, moins de chaleur) — les slim tardives chauffent moins que les fat early.
Manettes & accessoires
- DualShock 2 : comme la DS1 mais boutons analogiques sensibles à la pression.
- Multitap (SCPH-10090) : 4 joueurs (attention : incompatible avec certaines slim tardives sans adaptateur).
- EyeToy (caméra USB), Buzz! (buzzers quiz), SingStar (micros USB), contrôleurs Guitar Hero / Rock Band, télécommande DVD, volants.
- Network Adaptor + HDD : jeu en ligne (FFXI, SOCOM) et HDD Loader (fat). Le disque 40 Go officiel était fourni pour Final Fantasy XI.
- Lecteur DVD vidéo grand public (argument de vente majeur en 2000).
- PS2 Linux Kit (officiel) : kit clavier/souris/HDD/Linux — pièce de collection.
- PSX (Japon) : PS2 + enregistreur DVR dans un boîtier tout-en-un.
Lecteur optique & « Disc Read Error »
Le lecteur double laser CD/DVD est le point faible des fat :
- Bloc KHS-400B (early) → KHS-400C. Le potentiomètre de gain laser et le rail/engrenage plastique s'usent → Disc Read Error (surtout DVD, dont la couche exige plus de puissance).
- Réglage/remplacement du laser possible, mais la voie moderne est de charger sans disque (FMCB + USB/HDD/réseau) → le lecteur ne sert plus.
MechaCon & compatibilité softmod
La puce système MechaCon gère l'alim, le lecteur et la sécurité ; sa version détermine quelles méthodes de softmod fonctionnent :
- Sur la plupart des modèles, FreeMcBoot (FMCB) s'installe sur carte mémoire.
- Sur les slim très tardives (MechaCon récent, ex. SCPH-90000 v18+), FMCB classique ne prend pas → utiliser FMCB 1.9x adapté ou l'exploit FreeDVDBoot (via un DVD piégé) / FreeHDBoot. Identifier sa version MechaCon avant de choisir.
Pannes fréquentes
| Symptôme | Cause probable | Piste |
|---|---|---|
| Disc Read Error (fat) | Laser / rail / gears usés | Régler/remplacer le laser, ou charger sans disque (FMCB + USB/HDD) |
| Fat : lecture DVD KO | Laser KHS-400 fatigué | Remplacer le laser |
| Slim : alim | Bloc alim interne | Diagnostic / remplacement |
| Ventilo / surchauffe (fat) | Poussière / pâte | Nettoyage |
Manuel de service d'origine ✅
Manuel constructeur archivé localement. Contient typiquement les schémas, le synoptique, les tensions et formes d'onde attendues, la nomenclature et les procédures de dépose — c'est la référence quand un symptôme ne colle à aucune panne connue.
- PS2 SCPH-30000 — manuel de service (6ᵉ éd.) — PDF
- PS2 SCPH-50000 — manuel de service (2ᵉ éd.) — PDF
- PlayStation 2 — PDF
Statut
Document constructeur sans licence explicite, conservé à titre de préservation (machine hors production depuis des décennies). Source : Internet Archive.
Procédures de démontage pas-à-pas ✅
8 procédures traduites depuis les guides iFixit, avec leur difficulté et leur durée estimée. Le titre d'origine est rappelé sous chaque procédure, pour retrouver le guide et ses photos.
| Procédure | Difficulté | Durée |
|---|---|---|
| Ouverture de la coque supérieure | 🟢 facile | 10 à 15 minutes |
| Remplacement du bloc lecteur | 🟡 moyen | 60 à 75 minutes |
| Remplacement du ventilateur | 🟡 moyen | 45 à 60 minutes |
| Remplacement du laser | 🟡 moyen | 20 à 30 minutes |
| Dépose de la carte d'alimentation | 🟡 moyen | 45 à 60 minutes |
| Nettoyage de la lentille | 🟢 facile | 15 à 20 minutes |
| Démontage intégral (teardown) | 🟡 moyen | non estimée |
| Démontage intégral (teardown) | — | — |
Ouverture de la coque supérieure
Étape préalable au nettoyage de la lentille et au remplacement du laser.
- Retourne la PS2, dessous vers le haut.
- Avec un spudger métallique, fais sauter les 8 caches de vis plats.
- Retire les 8 vis suivantes :
- Quatre vis cruciformes de 55,4 mm.
- Quatre vis cruciformes de 18 mm.
- Décolle l'étiquette de garantie située près de l'interrupteur principal.
Titre d'origine : « Disassembling PlayStation 2 Top Cover ».
Remplacement du bloc lecteur
S'il faut remplacer le bloc lecteur entier, voici la marche à suivre — une fois la pièce de rechange trouvée.
- Sous l'emplacement de l'alimentation se trouve une pièce plastique transparente : c'est l'écran thermique, il peut maintenant être retiré.
- Il résiste parfois un peu : il faut le manœuvrer doucement.
- L'écran thermique retiré, on découvre les nombreuses vis qui maintiennent le reste.
- Retire les vis qui fixent le châssis métallique à la carte principale :
- Sept vis cruciformes argentées de 5,8 mm.
- Deux vis cruciformes dorées de 7,4 mm.
- Déclipse les languettes qui tiennent le bloc lecteur — une d'un côté, deux de l'autre. C'est l'étape la plus délicate : prends ton temps.
- Commence à soulever le bloc lecteur avec précaution.
- Attention : des nappes sont encore branchées.
Titre d'origine : « Installing PlayStation 2 Disc Drive ».
Remplacement du ventilateur
Si la PS2 chauffe trop, il est peut-être temps de changer le ventilateur. La même procédure permet de remplacer un interrupteur défaillant.
- Sous l'emplacement de l'alimentation se trouve une pièce plastique transparente : c'est l'écran thermique, il peut maintenant être retiré.
- Il résiste parfois un peu : il faut le manœuvrer doucement.
- L'ensemble ventilateur et interrupteur principal peut alors être déposé.
- Retire le petit morceau d'adhésif blanc qui maintient le fil du ventilateur.
- Débranche le fil de la carte principale.
- Le ventilateur et l'interrupteur sont libres : sors-les par le dessous.
- Le ventilateur coulisse simplement hors de son rail, par le haut.
Titre d'origine : « Installing PlayStation 2 Fan ».
Remplacement du laser
Le remplacement du laser suppose d'avoir un bloc neuf. ⚠️ Sur beaucoup de PS2, un « disc read error » vient d'une lentille encrassée ou d'un rail sec, pas d'un laser mort : nettoie et regraisse avant de remplacer.
- Retire les quatre vis cruciformes de 6,4 mm qui tiennent le capot du bloc lecteur.
- Retire le capot.
Titre d'origine : « Installing PlayStation 2 Laser ».
Dépose de la carte d'alimentation
Étape préalable à la dépose du ventilateur, de l'interrupteur et du bloc lecteur.
- Retire les deux vis cruciformes noires de 6,4 mm qui maintiennent le bloc lecteur.
- Dépose le bloc lecteur entier en inclinant le capot avec précaution et en le faisant coulisser.
- Retire les deux vis cruciformes dorées de 14,6 mm pour libérer le bloc des ports manette.
- Soulève doucement le bloc des ports manette.
- Débranche la nappe du bloc des ports manette.
- Retire les deux vis cruciformes dorées de 14,6 mm qui tiennent le ventilateur.
- Si tu utilises la baie d'extension, retire le composant qui s'y trouve maintenant.
- Retire le cache de la baie d'extension.
- Extrais l'ensemble des organes internes de la coque inférieure.
- Tout le plastique étant hors du chemin, on arrive à l'électronique.
- Commence par retirer les quatre vis cruciformes dorées de 7,6 mm qui tiennent la carte d'alimentation.
- ⚠️ Ne touche ni les pattes des condensateurs ni les soudures nues au dos de la carte d'alimentation. Manipule-la par les bords : un condensateur de filtrage peut rester chargé longtemps après le débranchement.
Titre d'origine : « Installing PlayStation 2 Power Board ».
Nettoyage de la lentille
Le « Disc Read Error » est l'erreur la plus fréquente, et sans doute la plus agaçante. Elle vient le plus souvent d'un dépôt de poussière sur la lentille.
- Nettoie la lentille avec un coton-tige légèrement imbibé d'alcool isopropylique. ⚠️ Sans appuyer : la lentille est montée sur suspension et se dérègle si on force.
Titre d'origine : « Cleaning the lens ».
Démontage intégral (teardown)
Démontage complet d'une PS2 « fat », depuis l'adaptateur réseau jusqu'à la carte principale.
- La console entièrement assemblée.
- Les ports USB.
- Les ports S400 (FireWire).
- Le lecteur optique.
- Le bouton reset.
- Le bouton d'éjection.
- Les seuls outils nécessaires : quatre tournevis et une pince à épiler.
- La console, la manette, les câbles et une carte mémoire.
- À l'arrière, ici, un adaptateur Ethernet — pour jouer en ligne et utiliser un disque dur.
- Le ventilateur.
- L'interrupteur d'alimentation.
- L'entrée secteur.
- La sortie audio/vidéo.
- Et la sortie numérique optique.
- Le démontage commence : un tournevis plat pour retirer l'adaptateur Ethernet.
- Retire ces 2 vis au tournevis plat.
- L'adaptateur se retire ensuite simplement.
- Toutes les PS2 ne sont pas équipées d'un adaptateur Ethernet ni d'un disque dur.
- Voici la baie d'extension, où prend place le disque dur.
- Retourne la console.
- Avec un petit tournevis plat, retire les caches de vis — huit sur ce modèle.
- Sous chaque cache, une vis.
- Retire les huit vis avec un tournevis cruciforme n° 0.
- Remets la console à l'horizontale et tire la coque supérieure de l'arrière vers l'avant.
- Ce modèle a une nappe reliée aux boutons reset et éjection. Prends garde à ne pas la détruire.
- Dégage le bloc des boutons en tirant avec un petit tournevis plat.
- Le bloc sort du boîtier. Un adhésif le protège — la nappe a déjà été détruite une fois ici.
- Retire les deux vis au cruciforme n° 0 pour détacher le bloc des ports manette.
- Retire les vis du ventilateur et de l'interrupteur principal.
- Tire le ventilateur vers le haut avec précaution pour ne pas casser son fil.
- Soulève le support du ventilateur.
- Le câble d'alimentation s'enfonce plus loin dans le boîtier : mieux vaut le retirer plus tard.
- Le fil du ventilateur va lui aussi plus loin. Il est très fin : prends garde à ne pas le détruire.
- Retourne à nouveau la console, avec précaution : les pièces sont encore verrouillées.
- Retire la coque inférieure.
- Voici la carte d'alimentation. Retire les 4 vis repérées en bleu.
- Vue de l'arrière, soulève la carte pour la dégager des broches de la carte principale.
- Tu peux enfin retirer l'interrupteur d'alimentation.
- Et voici la carte d'alimentation.
- ⚠️ Sur l'alimentation, ne touche ni les pattes des condensateurs ni les soudures nues au dos. Manipule la carte par les bords.
- Retire maintenant la grille de la baie d'extension.
- C'est le moment de débrancher le fil du ventilateur de la carte principale, à la pince de précision.
- Retire le cache isolant du châssis métallique.
- Retire les petites vis avec un tournevis cruciforme fin.
- Libère le châssis métallique du lecteur DVD, avec un petit tournevis plat.
- Le châssis retiré, la carte principale apparaît.
- Les nappes : c'est le moment de les débrancher. Doucement.
- Deux de plus et le lecteur DVD est libre.
- Retourne à nouveau l'ensemble et retire la protection métallique.
- Voici l'autre face de la carte principale.
- Le connecteur du ventilateur, vieilli, a fini soudé en un seul bloc et la soudure a cédé à la dépose.
- Fin du démontage.
- De haut en bas, à partir de la gauche : adaptateur Ethernet, coque, disque dur, ventilateur, grille de ventilateur, protection métallique inférieure, caches de vis, vis, carte des ports manette, interrupteur, carte d'alimentation, cache isolant de l'alimentation, châssis métallique supérieur, lecteur DVD, cache de baie d'extension, carte principale, bloc reset/éjection.
Titre d'origine : « PlayStation 2 Teardown ».
Démontage intégral (teardown)
Démontage complet d'une PS2 « fat », depuis l'adaptateur réseau jusqu'à la carte principale.
- La console entièrement assemblée.
- Les ports USB.
- Les ports S400 (FireWire).
- Le lecteur optique.
- Le bouton reset.
- Le bouton d'éjection.
- Les seuls outils nécessaires : quatre tournevis et une pince à épiler.
- La console, la manette, les câbles et une carte mémoire.
- À l'arrière, ici, un adaptateur Ethernet — pour jouer en ligne et utiliser un disque dur.
- Le ventilateur.
- L'interrupteur d'alimentation.
- L'entrée secteur.
- La sortie audio/vidéo.
- Et la sortie numérique optique.
- Le démontage commence : un tournevis plat pour retirer l'adaptateur Ethernet.
- Retire ces 2 vis au tournevis plat.
- L'adaptateur se retire ensuite simplement.
- Toutes les PS2 ne sont pas équipées d'un adaptateur Ethernet ni d'un disque dur.
- Voici la baie d'extension, où prend place le disque dur.
- Retourne la console.
- Avec un petit tournevis plat, retire les caches de vis — huit sur ce modèle.
- Sous chaque cache, une vis.
- Retire les huit vis avec un tournevis cruciforme n° 0.
- Remets la console à l'horizontale et tire la coque supérieure de l'arrière vers l'avant.
- Ce modèle a une nappe reliée aux boutons reset et éjection. Prends garde à ne pas la détruire.
- Dégage le bloc des boutons en tirant avec un petit tournevis plat.
- Le bloc sort du boîtier. Un adhésif le protège — la nappe a déjà été détruite une fois ici.
- Retire les deux vis au cruciforme n° 0 pour détacher le bloc des ports manette.
- Retire les vis du ventilateur et de l'interrupteur principal.
- Tire le ventilateur vers le haut avec précaution pour ne pas casser son fil.
- Soulève le support du ventilateur.
- Le câble d'alimentation s'enfonce plus loin dans le boîtier : mieux vaut le retirer plus tard.
- Le fil du ventilateur va lui aussi plus loin. Il est très fin : prends garde à ne pas le détruire.
- Retourne à nouveau la console, avec précaution : les pièces sont encore verrouillées.
- Retire la coque inférieure.
- Voici la carte d'alimentation. Retire les 4 vis repérées en bleu.
- Vue de l'arrière, soulève la carte pour la dégager des broches de la carte principale.
- Tu peux enfin retirer l'interrupteur d'alimentation.
- Et voici la carte d'alimentation.
- ⚠️ Sur l'alimentation, ne touche ni les pattes des condensateurs ni les soudures nues au dos. Manipule la carte par les bords.
- Retire maintenant la grille de la baie d'extension.
- C'est le moment de débrancher le fil du ventilateur de la carte principale, à la pince de précision.
- Retire le cache isolant du châssis métallique.
- Retire les petites vis avec un tournevis cruciforme fin.
- Libère le châssis métallique du lecteur DVD, avec un petit tournevis plat.
- Le châssis retiré, la carte principale apparaît.
- Les nappes : c'est le moment de les débrancher. Doucement.
- Deux de plus et le lecteur DVD est libre.
- Retourne à nouveau l'ensemble et retire la protection métallique.
- Voici l'autre face de la carte principale.
- Le connecteur du ventilateur, vieilli, a fini soudé en un seul bloc et la soudure a cédé à la dépose.
- Fin du démontage.
- De haut en bas, à partir de la gauche : adaptateur Ethernet, coque, disque dur, ventilateur, grille de ventilateur, protection métallique inférieure, caches de vis, vis, carte des ports manette, interrupteur, carte d'alimentation, cache isolant de l'alimentation, châssis métallique supérieur, lecteur DVD, cache de baie d'extension, carte principale, bloc reset/éjection.
Titre d'origine : « PlayStation 2 Teardown ».
Source, licence et portée
Guides iFixit, sous Creative Commons BY-NC-SA — attribution, usage non commercial, partage à l'identique. Le texte est traduit de l'anglais ; le titre d'origine est rappelé sous chaque procédure et les photos d'étapes restent sur iFixit. ⚠️ Ces guides visent le modèle nommé dans le titre : sur une autre révision, la visserie et l'ordre de dépose peuvent différer.
Procédure — console morte, dans l'ordre ✅
Ce que cette procédure ajoute
Un ordre pensé pour une console, pas pour une carte arcade : ce qui tue ces machines n'est presque jamais le CPU. C'est, dans l'ordre réel, l'alimentation, les condensateurs, le lecteur ou le slot de cartouche, et la logique seulement ensuite. → Diagnostic PCB
1. L'alimentation. Deux cas selon la machine. Bloc externe : ⚠️ lire le marquage sur la machine, à côté de la prise, et vérifier l'adaptateur en face — tension et polarité. Une machine à centre négatif alimentée en centre positif y laisse son fusible, parfois son régulateur ; ne pas se fier à l'étiquette d'un bloc tiers ni à un embout universel. Alimentation interne (la machine se branche directement au secteur) : le secteur est dans le boîtier. Débrancher, attendre, et vérifier que les gros condensateurs sont déchargés avant de toucher la carte. Dans les deux cas, mesurer en charge : un bloc fatigué tient sa tension jusqu'à ce qu'on lui demande du courant.
2. Le fusible. Beaucoup de ces machines en ont un juste derrière la prise — c'est la pièce faite pour mourir. Le tester en continuité, hors circuit. Un fusible qui resaute est un court-circuit, pas un problème de fusible.
3. Les condensateurs. Sur la plupart des machines de cet âge, c'est le suspect par défaut et non le dernier recours — les électrolytiques CMS qui fuient rongent les pistes dessous avant de donner le moindre autre signe. ⚠️ Toutes n'en sont pas là : certaines en portent très peu et ne se recappent pas par principe. Lire ce que cette page en dit avant de sortir le fer. → Recap
4. Le lecteur. Sur cette machine, c'est le poste de panne dominant. Dans l'ordre : le plateau/tiroir bouge-t-il, le disque tourne-t-il, la lentille est-elle propre (coton-tige, alcool isopropylique, sans appuyer), les rails coulissent-ils librement. Un laser qui ne lit plus se remplace ; le potentiomètre de gain ne se retouche pas à l'aveugle, c'est le geste qui achève un laser encore bon.
5. La sortie vidéo. Isoler la machine de l'affichage : un autre câble, une autre télé, une autre entrée. Une part non négligeable des « consoles mortes » est un câble mort, ou un afficheur qui n'accroche pas ce que la machine sort — voir la section vidéo de cette page pour savoir quoi.
6. Toujours rien. Maintenant, et seulement maintenant, la logique : rails sur la carte, reset, horloge, bus. → Diagnostic PCB
Mods populaires — quoi acheter, où, procédures
La PS2 se modde surtout en LOGICIEL (0 soudure)
La quasi-totalité passe par du softmod — pas de puce à souder sur les modèles récents. Procédures d'après ConsoleMods (CC-BY-SA). Soudure : 🟢 aucune · 🟡 · 🟠 · 🔴.
Débloquer la console — softmod (le cœur)
- Mechapwn : patche le MECHACON (la puce de contrôle) → active FMCB sur (presque) tous les modèles, slim comprises, et rend la console region-free / FreeDVDBoot. 0 soudure 🟢 (se fait par un disque/exploit). La clé pour les slim où l'ancien FMCB ne prenait pas.
- FreeMcBoot (FMCB) : exploit sur carte mémoire → menu homebrew au boot. FreeHDBoot (FHDB) = même chose depuis le HDD ; FreeDVDBoot = depuis un DVD gravé (sans carte pré-faite). → Softmods.
Lancer ses jeux — Open PS2 Loader (OPL) + stockage
- OPL lance les jeux depuis : USB, HDD interne (fat, baie d'extension), réseau (SMB), ou carte SD via MX4SIO / SD2PSX (SD dans le port memory card). ESR Launcher pour les DVD backups patchés. → fiche MX4SIO / OPL.
- HDD : sur fat, adaptateur SATA (ATA Express / caddy SATA) dans la baie ; sur slim, privilégier MX4SIO / USB / réseau.
Vidéo
- Component / RGB natif (câble Sony ou péritel selon jeu — beaucoup de jeux PS2 sont 480p/component). ⚠️ si écran noir en component : réinitialiser le réglage Component Video Out (guide ConsoleMods). HDMI : via un convertisseur component→HDMI ou un Retro GEM.
Fiabilité
- Fan Replacement (ventilo bruyant/faible), remplacement du laser (lecteur qui n'accroche plus), Replacing Capacitors (rare, selon état). Modchip = obsolète (le softmod fait tout).
Émulation
- PCSX2 (mûre, rendu HD/widescreen, packs de textures).
Photos / assets
(À ajouter : fat vs slim, lecteur, baie HDD, sorties AV.)
Réparation avancée
Laser + réglage « Disc Detect »/tilt (fat) = panne n°1 ; alternative ODE ; recap alim. Méthodes : ODE (lecteur optique) · Recap · Diagnostic PCB.
Sources & attribution
- Wikipédia — PlayStation 2 — CC-BY-SA — https://fr.wikipedia.org/wiki/PlayStation_2
- ConsoleMods — PS2 (FMCB, ODE) — à référencer — https://consolemods.org/wiki/PlayStation_2
Image :
-
ps2-board.jpg— Sillent DX, CC BY 3.0 — https://commons.wikimedia.org/wiki/File:PlayStation_2_slim's_motherboard_(top).png
.png)
Relecture & corrections
À quoi sert cet espace
Une valeur fausse, une procédure dépassée, une référence de puce qui ne colle pas à ta carte ? Signale-le ici, avec ce que tu as constaté (modèle, révision de carte, numéro de série, mesure). Chaque signalement est recoupé avec une source avant toute modification — une correction invérifiable est publiée en tant que « signalé par …, non recoupé » plutôt qu'appliquée en silence.
La lecture est ouverte à tous ; écrire demande une connexion Discord. Les signalements des relecteurs déclarés du wiki sont traités en priorité ; les autres sont lus aussi, mais passent par un humain avant toute modification.