Sega X-Board
Sega's super scaler evolution (1987): 2× 68000 + very fast scaled sprites, for AM2's "sensation" games — After Burner, Thunder Blade, Super Monaco GP… Often in motion cabinets (After Burner's hydraulic cockpit). The successor to the Super Scaler, before the Y-Board.
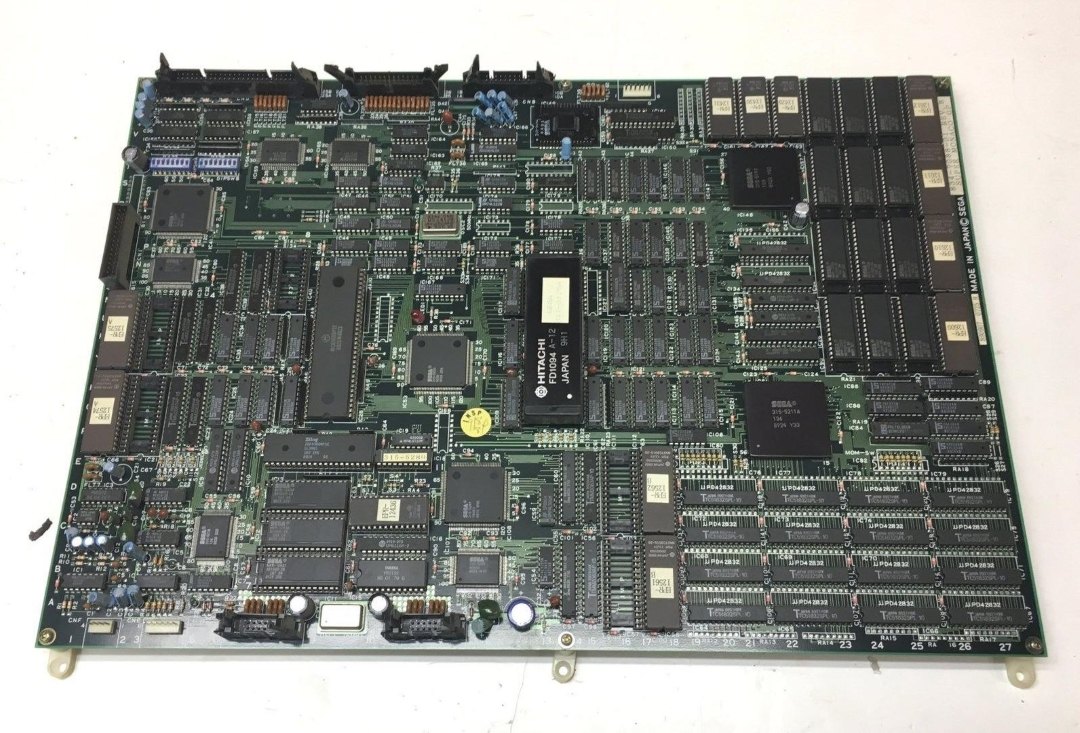
Identification
| Field | Value |
|---|---|
| Manufacturer | Sega (AM2) |
| Year | 1987 |
| Type | super-scaler pseudo-3D (scaled sprites) |
| Cabinets | often motion / deluxe (cockpit) |
Architecture
| Block | Chip | Clock | Role |
|---|---|---|---|
| CPU ×2 | Motorola 68000 | ~12.5 MHz | master (game) + slave (objects/road) |
| Sound CPU | Zilog Z80 | drives the sound | |
| Sound | Yamaha YM2151 (FM) + SegaPCM | FM music + samples | |
| Video | Sega sprite-zoom ASIC | hundreds of scaled sprites |
Protection & de-suicide
The X-Board catalogue is mixed:
- Unencrypted: After Burner, After Burner II, Thunder Blade (bare 68000).
- FD1094-encrypted (battery module): Super Monaco GP, Line of Fire, GP Rider, Racing Hero → dead battery = suicide. De-suicide = decrypted ROM / re-key. → Sega X / Y-Board (converts) · System 16 FD1094.
EPROM repair: 68000 program in 27C010 (program in 27C010, FD1094-encrypted on many X-Boards) → game-by-game EPROM table.
Notable games
After Burner / After Burner II (1987), Thunder Blade (1987), Last Survivor, Line of Fire (1989), Racing Hero, Super Monaco GP (1989), GP Rider (1990).
Common faults
| Symptom | Likely cause | Lead |
|---|---|---|
| Black screen / stuck boot | FD1094: dead key battery (encrypted games) | De-suicide (decrypted ROM / re-key) |
| Sprites no longer zoom | zoom ASIC / sprite RAM | Video diagnosis |
| No sound | Z80 / YM2151 / SegaPCM | Sound-stage diagnosis |
| Cabinet motion dead | motion board / actuators | Mechanical diagnosis |
| No image | Power, dual 68000, contacts | Base diagnosis |
Modernisation & mods
The common ground for every JAMMA board
Video, power, control panel and upscalers depend on the cabinet rather than the board: everything is centralised in Modernising a cabinet. To run the board outside a cabinet (at home, on a display): supergun.
- Anti-suicide 🟠: some games/variants of this platform do suicide (battery-backed key) — see the dedicated section above to find out whether yours is affected. If so, the durable route is de-suiciding → conversions and de-suiciding, not merely replacing the battery → save batteries.
- Storage 🟡: the game lives in EPROM/mask ROM on the board. Changing or restoring a game means reprogramming the EPROMs (and, for a mask ROM, using a pinout adapter) → EPROM method.
- Media preservation: replacing the original storage, multicarts, ODEs and modern options by family → PCB preservation hub.
- Scan rate 📺: ~15.62 kHz / 59.6 Hz — standard resolution, a classic 15 kHz chassis is fine — the most common JAMMA case → tri-sync and upscalers.
(Computed from the MAME sources —
sega/segaxbd.cpp— pixel clock ÷ htotal.) - FPGA / emulation: see the Emulation & FPGA section below.
Repair (technician)
- FD1094 (battery module) on some (Super Monaco GP, Line of Fire, GP Rider…): flat battery = suicide (dead game, healthy hardware). Replace the battery without cutting the key (piggyback); otherwise de-suicide — backup batteries.
- Dual 68000 (game + objects/road): a freeze = one of the CPUs / its RAM → separate diagnosis.
- Sound: Z80 + YM2151 + SegaPCM — diagnose the sound stage.
- Capacitors: recap PSU + audio filtering. Oxidised EPROM sockets: turned-pin socket.
→ Methods: PCB fault-finding · Recap · EPROM · Traces & vias
Expected clocks — measurement table ✅
Values extracted from the MAME sources for this platform. On a scope or frequency counter, a clock that is missing or off-value points straight at the crystal, the divider or the chip at fault — the fastest starting point on a dead board.
| Component | Expected clock | Role |
|---|---|---|
| M68000 | 12.5 MHz | main CPU |
| YM2151 | 4 MHz | FM (sound) |
| Z80 | 4 MHz · 8 MHz | sound CPU (usually) |
How to read this table
Several values for one component = several board variants in this family (or several instances of the chip clocked differently). These frequencies are those of the clock signal at the component's input, not of its original crystal — on many boards the clock is divided down from a single master crystal.
Original manuals for games on this platform ✅
Manufacturer manuals for games running on this board. Beyond the instructions, they very often carry the full DIP settings, the connector pinout, the test procedure, the parts list and the expected voltages.
Thunder Blade — two cabinets, two Sega manuals
All of them carried the same label here. Opened and identified from their title page on 13 August 2026.
| Doc | What the cover carries | Pages |
|---|---|---|
| 420-5861-01 | Sega Thunder Blade DELUXE TYPE — Owner's Manual, Sega Enterprises Ltd. The cover shows the sit-down moving cabinet | 50 |
| 5798-01 | Sega Thunder Blade ECONOMY UPRIGHT TYPE — Owner's Manual. Cover: an ordinary upright cabinet | 34 |
⚠️ The Sega manual numbers are on the covers and they are the only reliable marker: 420-5861-01 for the deluxe, 5798-01 for the upright.
→ Full catalogue: service manuals, wiring & game manuals
DIP settings ✅
11 games on this platform, settings extracted from the MAME sources (INPUT_PORTS_START blocks). The Position column gives the switch's physical reference on the board (SW2:!3,!4 = bank SW2, levers 3 and 4) — which is what lets you set it up without the paper manual. Games are sorted by MAME set name.
DIP settings — MAME set abcop
| Setting | Position | Options (default in bold) |
|---|---|---|
| Credits | SWB:1 | 1 to Start, 1 to Continue · 2 to Start, 1 to Continue |
| Demo Sounds | SWB:2 | Off · On |
| Allow Continue | SWB:3 | No · Yes |
| Time | SWB:5,6 | Easy · Normal · Hard · Hardest |
| Difficulty | SWB:7,8 | Easy · Normal · Hard · Hardest |
DIP settings — MAME set aburner
| Setting | Position | Options (default in bold) |
|---|---|---|
| Cabinet Type | SWB:1,2 | Moving Deluxe · Moving Standard · Upright |
| Demo Sounds | SWB:3 | Off · On |
| Lives | SWB:5 | 3 · 3x Credits |
| Allow Continue | SWB:6 | No · Yes |
| Difficulty | SWB:7,8 | Easy · Normal · Hard · Hardest |
DIP settings — MAME set aburner2
| Setting | Position | Options (default in bold) |
|---|---|---|
| Coin A | SWA:1,2,3,4 | 7C 1C · 6C 1C · 5C 1C · 4C 1C · 3C 1C · 2C 1C · 2 Coins/1 Credit, 3/2, 5/3, 6/4 · 2 Coins/1 Credit, 4/3 · 1C 1C · 1 Coin/1 Credit, 5/6 … |
| Coin B | SWA:5,6,7,8 | 7C 1C · 6C 1C · 5C 1C · 4C 1C · 3C 1C · 2C 1C · 2 Coins/1 Credit, 3/2, 5/3, 6/4 · 2 Coins/1 Credit, 4/3 · 1C 1C · 1 Coin/1 Credit, 5/6 … |
| Cabinet Type | SWB:1,2 | Moving Deluxe · Moving Standard · Upright 1 · Upright 2 |
| Throttle Lever | SWB:3 | No · Yes |
| Lives | SWB:4,5 | 3 · 4 · 3x Credits · 4x Credits |
| Allow Continue | SWB:6 | No · Yes |
| Difficulty | SWB:7,8 | Easy · Normal · Hard · Hardest |
DIP settings — MAME set gprider
| Setting | Position | Options (default in bold) |
|---|---|---|
| Cabinet | SWB:1,2 | Ride On · Upright |
| ID No. | SWB:4 | Main · Slave |
| Demo Sounds | SWB:5 | Off · On |
| Difficulty | SWB:7,8 | Easy · Normal · Hard · Hardest |
DIP settings — MAME set gprider_double
| Setting | Position | Options (default in bold) |
|---|---|---|
| Cabinet | SWB:1,2 | Ride On · Upright |
| ID No. | SWB:4 | Main · Slave |
| Demo Sounds | SWB:5 | Off · On |
| Difficulty | SWB:7,8 | Easy · Normal · Hard · Hardest |
DIP settings — MAME set lastsurv
| Setting | Position | Options (default in bold) |
|---|---|---|
| I.D. No | SWB:1,2 | 1 · 2 · 3 · 4 |
| Network | SWB:3,4 | Off · On (2) · On (4) |
| Difficulty | SWB:5,6 | Easy · Normal · Hard · Hardest |
| Demo Sounds | SWB:7 | Off · On |
| Coin Chute | SWB:8 | Single · Twin |
DIP settings — MAME set loffire
| Setting | Position | Options (default in bold) |
|---|---|---|
| Language | SWB:1 | Japanese · English |
| Cabinet | SWB:2 | Cockpit · Upright |
| 2 Credits to Start | SWB:3 | Off · On |
| Difficulty | SWB:4,5 | Easy · Normal · Hard · Hardest |
| Allow Continue | SWB:6 | No · Yes |
| Demo Sounds | SWB:7 | Off · On |
| Coin Chute | SWB:8 | Single · Twin |
DIP settings — MAME set rachero
| Setting | Position | Options (default in bold) |
|---|---|---|
| Credits | SWB:1 | 1 to Start, 1 to Continue · 2 to Start, 1 to Continue |
| Demo Sounds | SWB:2 | Off · On |
| Allow Continue | SWB:3 | No · Yes |
| Time | SWB:5,6 | Easy · Normal · Hard · Very Hard |
| Difficulty | SWB:7,8 | Easy · Normal · Hard · Very Hard |
DIP settings — MAME set smgp
| Setting | Position | Options (default in bold) |
|---|---|---|
| Machine ID | SWB:1,2,3 | 1 · 2 · 3 · 4 · 5 · 6 · 7 · 8 |
| Number of Machines | SWB:4,5,6 | 1 · 2 · 3 · 4 · 5 · 6 · 7 · 8 |
| Cabinet | SWB:7,8 | Deluxe · Cockpit · Upright |
DIP settings — MAME set thndrbd1
| Setting | Position | Options (default in bold) |
|---|---|---|
| Cabinet Type | SWB:1 | Deluxe · Standing |
| Demo Sounds | SWB:2 | Off · On |
| Time | SWB:3 | 30 sec · 0 sec |
| Lives | SWB:4,5 | 2 · 3 · 4 · 5 |
| Allow Continue | SWB:6 | No · Yes |
| Difficulty | SWB:7,8 | Easy · Normal · Hard · Hardest |
DIP settings — MAME set thndrbld
| Setting | Position | Options (default in bold) |
|---|---|---|
| Cabinet Type | SWB:1 | Econ Upright · Mini Upright |
| Demo Sounds | SWB:2 | Off · On |
| Time | SWB:3 | 30 sec · 0 sec |
| Lives | SWB:4,5 | 2 · 3 · 4 · 5 |
| Allow Continue | SWB:6 | No · Yes |
| Difficulty | SWB:7,8 | Easy · Normal · Hard · Hardest |
Check against your own board
These settings apply to the game and revision described by MAME. One title may have several DIP sets depending on region or revision, and some systems use soft-dips (settings in memory, via the test menu) rather than physical switches. In case of a discrepancy, the board's silkscreen and the test menu are authoritative.
See also: DIP reference · game manuals
Procedure — a dead board, step by step ✅
What this adds
The general method lives in PCB diagnosis. This is its application to this platform: the same order, but with the values actually expected here, so you do not have to go back and forth.
Tools: multimeter, oscilloscope (or frequency counter), current-limited bench supply, desoldering braid. → Tooling
If the board is still in a cabinet
A CRT holds its charge with the machine unplugged. → CRT safety
1. Inspection, power off. Corrosion, cut tracks, oxidised EPROM legs, leaking SMD capacitors, dubious earlier repairs. On this platform the battery is the first suspect: its leakage eats tracks under the holder, and the damage is often hidden by the battery itself. Lift it to look.
2. The connector, before anything else. A large share of "dead boards" are a contact problem, not a fault. Clean the contacts with isopropyl alcohol and reseat — not with an abrasive eraser on a gold edge, which takes the plating off and brings the problem back worse. It costs two minutes and settles the question.
3. Power, measured on the board. Aim for +5.0 V measured as close as possible to where power reaches the board — not at the PSU output: the drop is in the loom, and that is exactly what makes a board boot on the bench and not in the cabinet. Where you probe depends on this board's connector — JAMMA edge, JVS loom or a proprietary harness — plenty of makers kept one long after JAMMA arrived — see Identification above. → Wiring Check −5 V and +12 V too if the sound stage uses them. Suspected short: bring it up current-limited and find the hot spot.
4. /RESET. It must release after power-up. Held low = the CPU never starts. A 1–2 Hz loop is not the reset circuit, it is the watchdog: the CPU is crashing at boot, so look at the bus, not at the reset.
5. Clocks — the values expected on this platform.
- M68000 → 12.5 MHz (Main CPU)
- YM2151 → 4 MHz (FM (sound))
- Z80 → 4 MHz · 8 MHz (Sound CPU (usually))
No clock on the M68000 (12.5 MHz) and there is no point measuring anything else: the fault is the crystal, the divider, or the chip itself. That single measurement splits a dead board in two.
Several values for one component means several board variants in this family, not several readings on the same one: identify yours before calling a clock wrong. That is the mistake that replaces a healthy crystal.
6. Bus. Activity on the main CPU's address lines tells you whether it is running or frozen. Frozen with good clocks and good reset → work RAM, bus buffers, ROMs.
7. It boots but the picture or the sound is wrong — that is another job: see Common faults on this page, then signal tracing.
Procedure — replacing the battery without losing the key ✅
Not every board in this family is concerned
Check on this page whether your game is one of the encrypted ones before touching anything. On the others the battery only holds settings, and losing it costs nothing but a re-setup.
The order is the whole procedure
The decryption key of the FD1094 lives in SRAM held up by that battery. Cutting the old cell before the new one is soldered erases it, instantly and for good: the board goes silent and only a de-suicide brings the game back. So the new cell goes in first, in parallel.
- Board powered off, old battery left in place.
- Measure the old cell in circuit and note it (a CR2032 is 3 V nominal). This is what tells you whether you are ahead of the failure or already behind it.
- Solder the new cell in parallel with the old one — piggyback — watching polarity. A reversed cell discharges the old one through itself and erases the key just as surely.
- Re-measure at the holder: the voltage must have come back up. Do not go on before it has.
- Only now, remove the old cell.
- Power up and check the game boots.
Already dead? This procedure will not bring it back — the key is gone. → de-suicide
Emulation & FPGA
- Emulation: MAME (
sega/segaxbd.cpp) — FD1094 included. - FPGA / MiSTer: no dedicated core (complex super scaler) → MAME.
Lineage
After the Super Scaler (Hang-On/OutRun), before the Y-Board (Galaxy Force). Contemporary with the System 16.
Photos / assets
(To add: X-Board, dual 68000, zoom ASIC, FD1094 module.)
Sources & attribution
- MAME —
sega/segaxbd.cpp(2× 68000, Z80, YM2151 + SegaPCM, sprite zoom, FD1094 on some games) — https://github.com/mamedev/mame - Wikipedia — Sega X Board — CC-BY-SA — https://en.wikipedia.org/wiki/Sega_X_Board
- Internal page: Sega X / Y-Board (converts)
Image:
-
x-board-carte.jpg— uploaded by Merczer0 to Sega Retro (site CC BY 4.0; ⚠️ the file carries no individual licence) — https://segaretro.org/File:Sega_model_X_board.jpg

Review & corrections
How this space is used
Spotted a wrong value, an outdated procedure, a chip reference that does not match your board? Say so here, with what you observed (model, board revision, serial number, measurement). Every report is cross-checked against a source before anything changes — an unverifiable correction is published as “reported by …, not cross-checked” rather than silently applied.
Reading is open to everyone; posting requires signing in with Discord. Reports from the wiki's declared reviewers are handled first; anyone else's are read too, but go through a human before anything is changed.