Capcom cabinets (Mini Cute, Impress, Status)¶
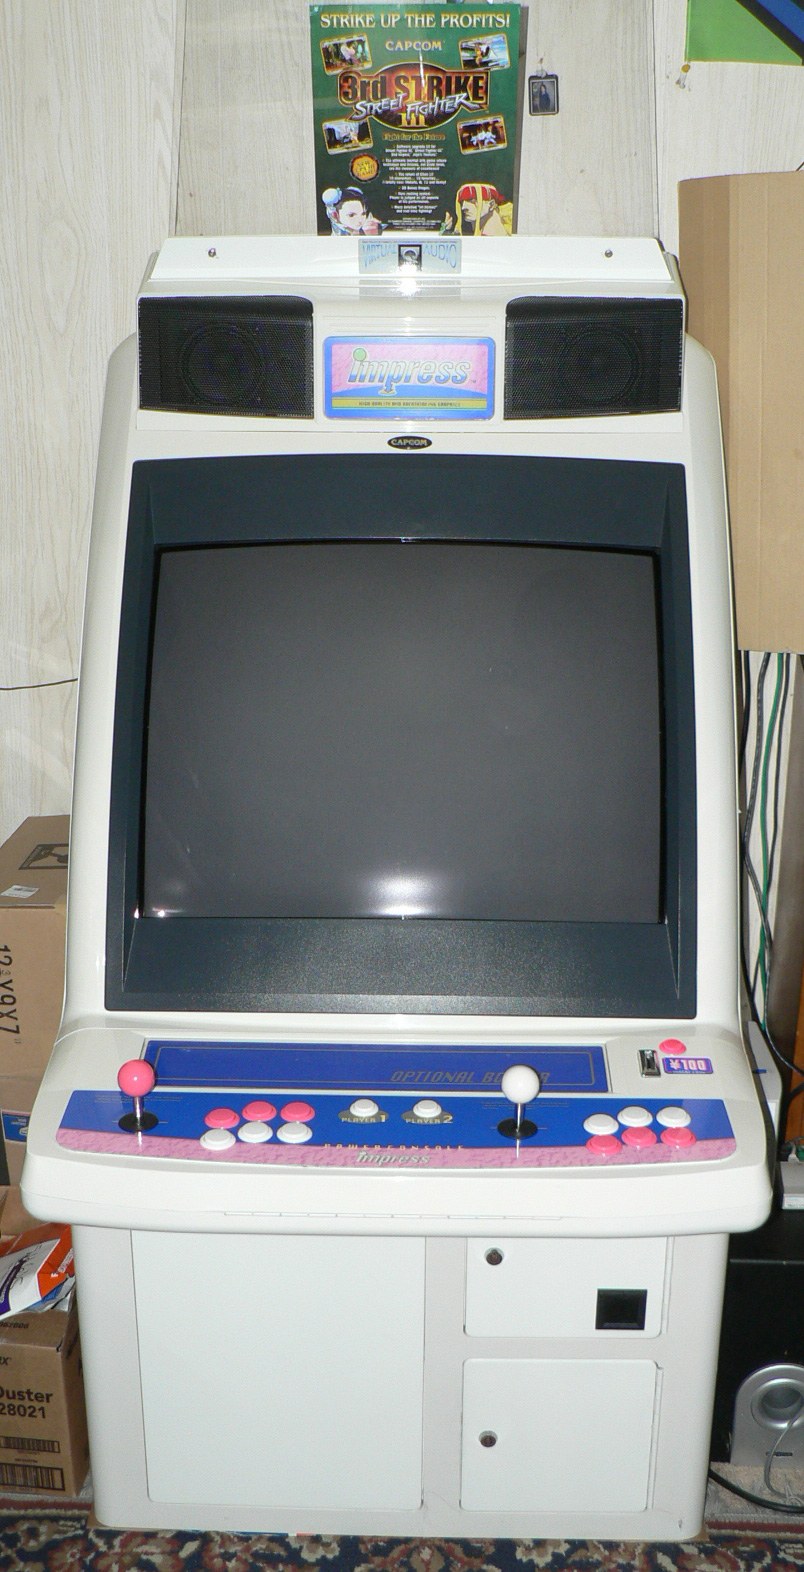
Capcom made its own candy cabs in Japan — from the tiny Mini Cute (a cult ~1.30 m tall) to the big 29″ Impress, plus the Status series. All JAMMA (CPS-1/CPS-2 era), CRT monitor — standard candy cab repair (recap, Nanao/Sanwa chassis per unit).
Overview¶
| Cabinet | Year | Screen | Note |
|---|---|---|---|
| Status (Status 18 / 25) | late 80s | CRT 18″ / 25″ | Capcom's entry candy cab |
| Mini Cute (CAPCOM・MINI CUTE) | 1991 (flyer © Capcom) | CRT 18″ ✅ flyer | 500 × 690 × 1300 mm, 60 kg, 95 W, "coffin" lid, Japan only, rare |
| Impress | 1990s | CRT 29″ | Capcom's big candy cab |
| OOB-50 / CAV System 60 | — | big format (50″+) | projector / giant-screen cabs |
The Mini Cute (the cult one)¶
- Flyer © CAPCOM 1991, demo screen: Street Fighter II. One of the smallest cabs ever made (1,300 mm tall for 500 wide), aimed at kids and Japanese coffee shops. ⚠️ This page said "at the same time as Champion Edition": CE is from 1992, and the flyer archived here is from 1991 and shows the original SF2. The flyer does not date the cabinet's release, only its copyright — but nothing here supports the Champion Edition mention.
- Lid that opens "like a coffin" → easy PCB access and maintenance.
- JAMMA standard → runs most 80s/90s games.
- 18″ monitor, Sanwa chassis — ✅ established from a document, and from two: the flyer's 仕様表 box writes 画面寸法:18インチ, and the manual's wiring diagram (folio 8) labels the monitor block 18inch COLOR MONITOR / SANWA 18V21CP-2. → detail below
Manufacturer figures — Cute¶
The Capcom manual archived here carries its 〈仕様〉 block on the cover:
| Item (manual's kanji) | Value |
|---|---|
| 名称 | CUTE(キュート) |
| 仕様電源 | AC100V – 120V (50/60 Hz) |
| 消費電力 | 95 W |
| 重量 | 60 kg |
| 寸法 | (W) 500 × (D) 690 × (H) 1300 mm |
| 付属部品 | 共通鍵 ×4, 金庫鍵 ×2, アイボルト ×2, インナードア鍵 ×2, 遊び方パネル ×2 |
Two Capcom documents, two names — and the \"Mini\" does come from Capcom
On the morning of 12 August this wiki wrote that "Mini Cute" was a community designation because the manual does not carry it. That went too far, and the flyer found the same evening shows why.
| Capcom document | What it prints |
|---|---|
| Manual, cover and 名称 | CUTE(キュート) |
| Flyer, front | CAPCOM・MINI™ above the CUTE logo |
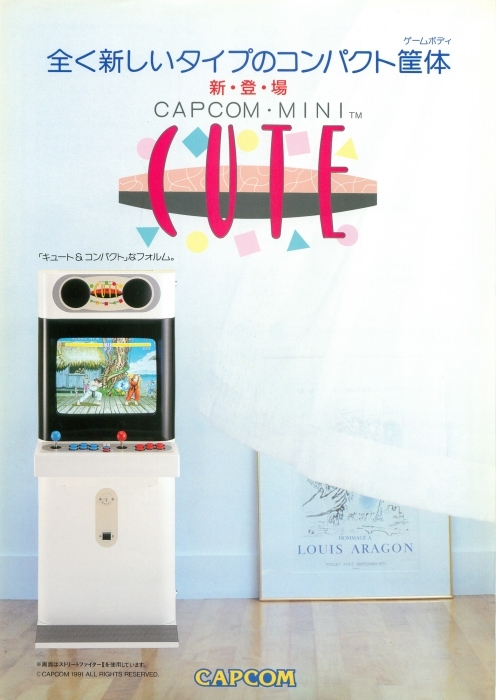
The ™ sits on "CAPCOM・MINI", not on "Mini Cute": Capcom Mini reads as a range name, Cute as the model. The common contraction "Mini Cute" is therefore printed as such on neither — but it joins two Capcom words, and is not a collectors' invention.
This wiki keeps "Mini Cute" as the section title, because that is the name people search for, and gives both manufacturer forms above.
Correction: the manual does give the tube size — just not where I looked
This wiki wrote twice on 12 August that "the manual gives no tube size at all". That is false. The cover's 〈仕様〉 block does not give it, but the wiring diagram on folio 8 labels the monitor block 18inch COLOR MONITOR — and names it.
The lesson is methodological and reaches beyond this cabinet: in a Japanese manual, the specifications sheet is not the only place that specifies. The wiring diagram carries the part references, and often it alone does.
The flyer gives the tube — and confirms the manual item by item
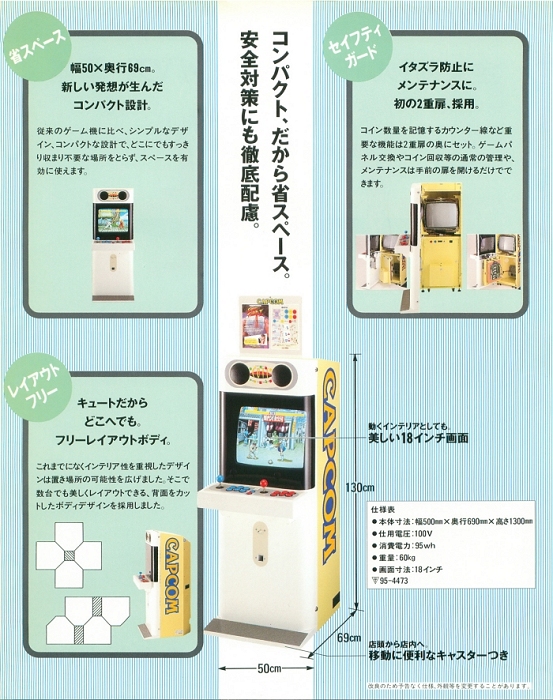
Its 仕様表 box:
| Item | Flyer | Manual |
|---|---|---|
| 本体寸法 | 幅500 × 奥行690 × 高さ1300 mm | identical ✅ |
| 重量 | 60 kg | identical ✅ |
| 画面寸法 | 18インチ | ⚠️ absent from the manual |
| 仕様電圧 | 100V | AC100V–120V ⚠️ |
| 消費電力 | 95wh ⚠️ | 95 W |
Two notes on those last rows. The flyer gives the 100 V of the Japanese market where the manual covers the 100-120 V range — not a contradiction, just a sales document simplifying. And the flyer's "95wh" is a manufacturer's unit typo: watt-hours where watts are meant. It is reproduced here rather than silently fixed.
500 mm wide — the narrowest in this whole wiki
The (W) 500 is labelled; there is nothing to guess. For comparison, among the cabinets for which this wiki holds a figure from a document:
| Cabinet | Width |
|---|---|
| Cute (Capcom) | 500 mm |
| Neo 19 (SNK) | 520 mm |
| Sega City 1986 | 580 mm |
| Status 25 (Capcom, above) | 598 mm |
| Madonna (Irem) | 620 mm |
| Canary (Taito) | 660 mm |
1,300 mm tall for 500 wide and 60 kg: this really is the "for children and cafés" cabinet this page describes, and the manual puts numbers on it.
The power ceiling is published
The same block gives the スイッチング・レギュレーター output, which is rare and directly useful for knowing what board the cabinet can feed:
| Rail | Current |
|---|---|
| +5 V | 10 A |
| +12 V | 3 A |
| −5 V | 1 A |
| −12 V | 1 A |
The −5 V is present — many 80s boards need it, and a modern ATX supply does not provide it. → Cabinet power
The manual also documents the monitor's yoko/tate switch (§5, folio 4), the escutcheon changeover (§6), and publishes the full wiring diagram on folios 8-9.
Manufacturer figures — Impress 29¶
The Capcom manual archived here names the cabinet インプレス29 (Impress 29) and gives, on its folio 7 (§1 仕様, 本体):
| Item (manual's kanji) | Value |
|---|---|
| 外形寸法 | 幅 730 mm × 奥行き 920 mm × 高さ 1460 mm |
| ※最大高さ | 1735 mm(アイキャッチパネル取付時) — with the eye-catch panel fitted |
| 重量 | 約 110 kg |
| 定格電圧 / 定格周波数 | AC100V / 50 – 60 Hz |
| 消費電力 | 150 W |
| 金庫容量 | 約 5000 coins(¥100) |
Two heights, and it is the larger one that has to clear the door
1460 mm bare, 1735 mm with the eye-catch panel: 275 mm apart — exactly the kind of difference that decides whether a cabinet fits through your door. The manual marks the second with a ※ and the condition (アイキャッチパネル取付時).
It is the same trap as on the Vewlix (1,575 / 1,890), the Madonna (1,320, panel excluded) and the Pony Mark IV (1,362 / 1,640). Four manufacturers, four manuals, the same construction: one cabinet figure, one panel-fitted figure — and never the same word for it.
(Manual's note: 注※ 本書に記載されている仕様は予告なく変更される場合がございます — specs subject to change without notice.)
Manufacturer figures — Q-GrandAm 25¶
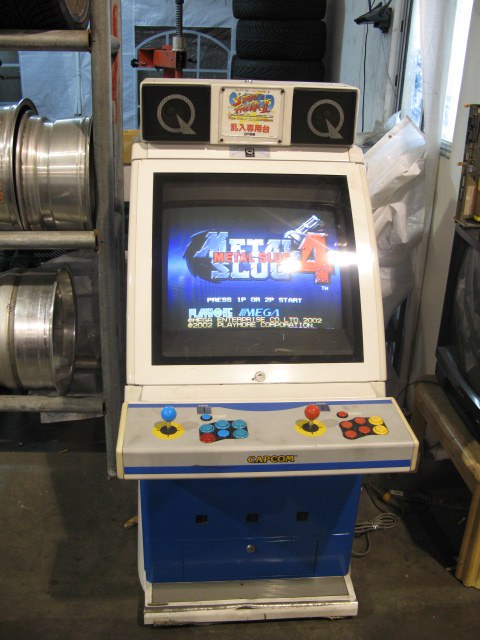
A fourth Capcom candy cab, absent from this page until 12 August. Its archived manual gives, on folio 2 (§1 仕様):
| Item (manual's kanji) | Value |
|---|---|
| 使用電圧 | 100 V (50/60 Hz) |
| 消費電力 | 120 W |
| 外形寸法 | 幅800 × 奥行965 × 高さ1425 |
| ※最大高さ | 1700(タイトルプレートA取付時) |
| 重量 | 118 kg |
Two heights again — and a 10 mm correction
1425 mm bare, 1700 mm with the title plate A fitted: 275 mm apart, exactly as on the Impress 29 below. The plate ships stored inside the cabinet (付属品: タイトルプレートA ×1(筐体内部に収納)), so unfitted — it really is a figure you add yourself.
⚠️ The Hard*Candy entry gives 1435 for the cabinet height, and omits the 1700 entirely. The manual writes 1425.
A candy cab with electronic locks
The §3 外観及び名称 drawing names two 電子ロック (electronic locks) — one on the front door, one on the inner door — plus キャスター ×2 and アジャスター ×2. On a 1990s candy cab that is unusual: every other cabinet on this page closes with a mechanical key.
It is also the only one in the range to carry two title plates: the A (two pieces, on top) and the B (on the front).
⚡ Connectors & power¶
The monitor and the wiring, read off the diagram¶
Folio 8 of the Cute manual is the 全体結線図, and it is the one that carries the part references the spec sheet omits:
| Block on the diagram | Reference |
|---|---|
| Monitor | 18inch COLOR MONITOR — SANWA 18V21CP-2 |
| DC supply | FKA 10030SS-K (DC POWER SUPPLY) |
| Game connector | JAMMA 56P — HRS CR7E-56DA-3.96E |
| Speaker | ATT AT-40H, 8 Ω |
| Coin mech | AD-81P · counter 6X-06P DC 12 V |
| Buttons 4-5-6 (1P and 2P) | to C-BOARD 90631C or 90632C, connector CNIO2 |
The monitor is Sanwa, not Nanao
This page said "per unit, a Nanao (dual-frequency) chassis". The manufacturer's diagram names a SANWA 18V21CP-2.
Where the "Nanao" came from is now identified: Arcade Otaku lists the monitor as "Sanwa PM1723E / Nanao MS8-18", both. A seller of Mini Cute monitors on Arcade-Projects went as far as publicly correcting his own listing — "They are not MS8-18, they are Sanwa 18V21CP-2 as used in the original Capcom Mini Cute". This wiki therefore takes the manual's Sanwa as the factory fitment, and notes that the MS8-18 circulates as an equivalent, with no Capcom document behind it.
The scan rate: 15 kHz, but not from a manufacturer document
Neither Capcom document archived here gives a scan rate — not the manual (whose §10 is a 21-callout adjustment plate) and not the flyer. What is known comes from elsewhere:
| Source | What it says |
|---|---|
| Arcade Otaku | Monitor: 18 in 15 kHz (Sanwa PM1723E / Nanao MS8-18), 47 cm tube, rotatable |
| Forums (Arcade-Museum, WorthPoint) | The PM1723 comes in versions C / D / E, different neckboards, for a Toshiba 470MSB22 18″ tube |
| Read off an actual board | chassis board PM1723D / PM1745 |
| Arcade-Projects (seller) | "chassis is only rated for 100 v" |
The Toshiba tube's 470 mm matches Arcade Otaku's "47 cm", and the PM1723D read off a board falls inside the C/D/E series the forums describe. The convergence is good.
⚠️ The 15 kHz remains a community figure, not a manufacturer's. What the manual supports without stating it points the same way — and that is a deduction, flagged as such: the video input is a 6-way composite-sync connector (R/G/B/GND/SYNC), the cabinet is JAMMA, from 1991, delivered for CPS-1, and the §10 adjustment plate carries no frequency selector — no switch, no mode note. A dual- or tri-sync chassis of that era would have one.
The chassis board carries the references PM1723D / PM1745 — ⚠️ read off an actual board; no document archived here prints them. The diagram's 18V21CP-2 is the monitor's designation, the PM numbers are the board's.
Two wiring details that change a restart
The monitor runs on AC 100 V directly, not off the DC supply: the diagram takes mains AC 100 V to the monitor separately from the +5/+12/−5/−12 V rails. Cutting the DC supply does not switch the tube off.
The video input is a 6-way JST B6P-SHF-1AA wired R / G / B / GND / SYNC — a
composite sync and a single ground. No separate H/V sync, no per-colour ground. →
JAMMA wiring
Buttons 4, 5 and 6 do not run through the JAMMA edge but through a dedicated loom to the C-BOARD 90631C/90632C — the usual CPS-1 arrangement of the period, here wired into the cabinet at the factory.
Manufacturer's figures — Status 25 and Status 18¶
| Aspect | Status 25 | Status 18 |
|---|---|---|
| Voltage | AC 100–120 V (50/60 Hz) | AC 100–120 V (50/60 Hz) |
| Consumption | 110 W | 110 W |
| Width | 598 mm | 560 mm |
| Depth | 785 mm | 660 mm |
| Height | 1133 mm | 1105 mm |
| Weight | 70 kg | 60 kg |
| Screen | 25″ flat | 18″ |
⚠️ Capcom writes height → width → depth
The Capcom flyer archived here lists 寸法: 1133mm(高さ)/598mm(幅)/785mm(奥行) — height first.
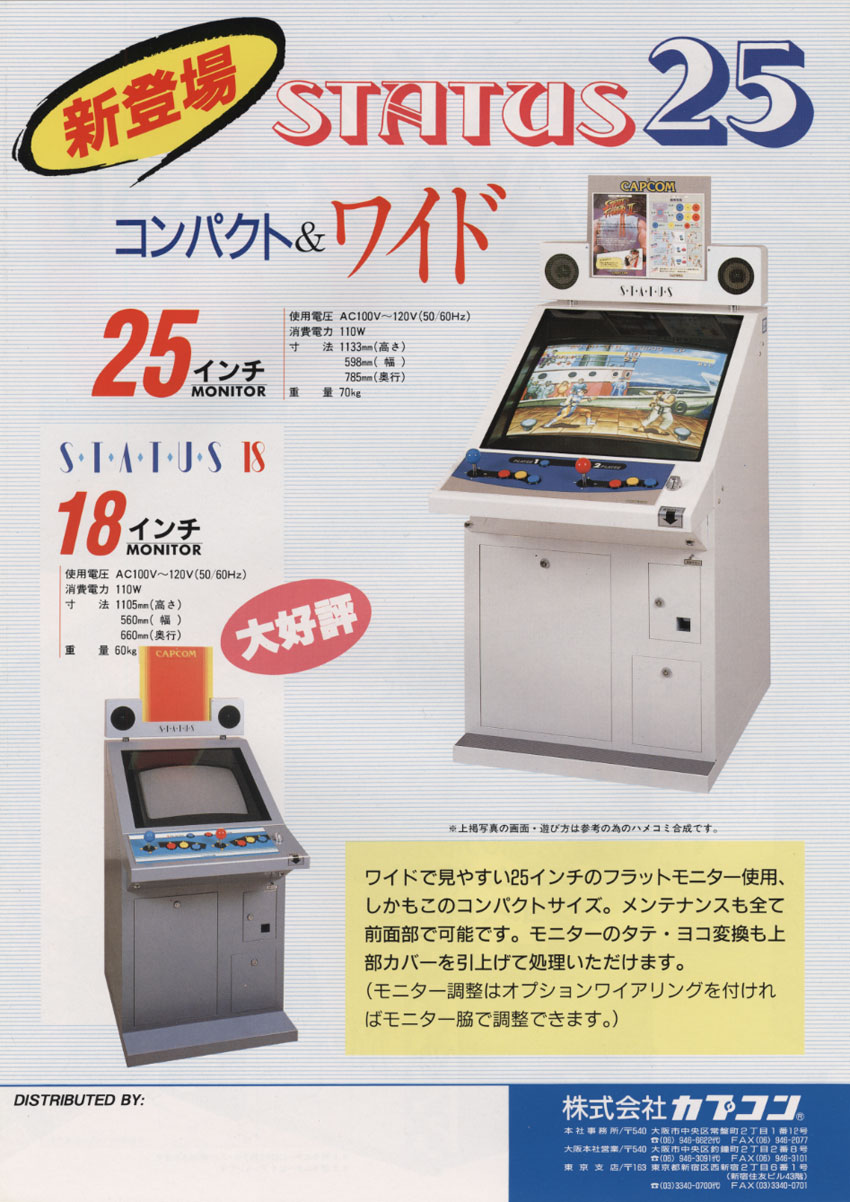
That is a fourth convention met on this wiki, after Sega's 所要面積 (width × depth), the Aero City's 縦×横×奥行 (height × width × depth) and Taito's (W)×(H)×(D). Copying "1133 × 598 × 785" as W×D×H would produce a cabinet 1.13 m wide and 60 cm tall.
The figures are therefore redistributed into named rows above rather than published in the document's order. Read the kanji, always.
The Status 25 is a very small cabinet
598 mm wide for a 25″ tube: narrower than a Madonna (620) and 15 cm less than an Astro City. The flyer makes a point of it ("コンパクト&ワイド"), and notes that the monitor's TATE/YOKO conversion is done by lifting the top cover — while monitor adjustment needs an optional wiring loom to be reachable from the side.
(Sources: the archived Capcom sales flyer for both tables.)
- JAMMA (CRT) → JAMMA wiring, buttons Control panels.
- Candy brick (~100 V AC in Japan) → candy cab PSU.
- ⚠️ A 100 V Japanese cab → step-down transformer on 230 V (see power).
Common faults¶
| Symptom | Likely cause | Lead |
|---|---|---|
| Unstable / washed-out image | CRT chassis / recap | Recap + adjustments |
| No picture | power / harness / chassis | Diagnose power → monitor |
| Dead controls | JAMMA harness / microswitches | Diagnose I/O, clean contacts |
| Nothing powers on | mains / 100 V transformer | Check the mains input |
Repair & maintenance
Modernise (video, PSU, JVS, upscaler, PC/FPGA) → Modernising a cabinet. CRT monitor (discharge HV!) → CRT safety (Nanao MS8/MS9 or equivalent chassis) · recap → Recap · power → candy PSU · diagnosis → PCB fault-finding.
Procedure — a cabinet that will not start ✅¶
There is a CRT in this cabinet
The tube stays charged with the cabinet unplugged, and the anode cap is the first thing your hand meets behind the monitor. Discharge it, work with one hand, and never alone if you can help it. → CRT safety
This cabinet is documented as 100V
It does not go straight onto a European socket. It needs a step-down transformer rated for the whole cabinet, monitor included — not a travel adapter. Feeding 230 V to a cabinet built for 100V destroys the supply, and usually the monitor with it. → Cabinet power
What this adds
Ordered for a cabinet, not for a board: mains, low-voltage supply, loom, monitor, then the game. The overwhelming majority of "dead cabinets" are dead for a reason that has nothing to do with the PCB — which is why the board comes last here.
1. Mains, and what sits between it and the cabinet. The switch, the fuse or breaker, the isolation transformer if there is one. A cabinet that shows no sign of life at all is almost never electronic.
2. The low-voltage supply — measured under load. Aim for +5 V where power reaches the board — the JAMMA edge, or the JVS power connector, depending on the cabinet — with the game running, not on an idle bench. If the supply has an adjustment (most candy and JVS bricks do; the ATX brick in a PC cabinet does not), do it then and not before: set off-load, it leaves a board that boots and then glitches. With no adjustment the measurement still earns its keep — it tells you whether the supply holds. Check +12 V too, and −5 V if the board uses it: many do not, and an ATX brick does not provide it. → Cabinet power
3. The loom and the connector. Reseat, and check the grounds — a cabinet with a poor ground gives rolling picture, phantom inputs and noise, all at once, and none of it looks like a wiring fault. → Wiring
4. The monitor. This page does not give a single monitor spec — it covers several cabinets. Check which one you have before concluding anything. CRT: no picture but the tube is warm and there is EHT — that is sync or video, not the tube. No EHT at all — chassis. A picture that shrinks, wanders or shifts colour is a chassis recap, and on these monitors that is a scheduled job, not a repair.
5. Scan rate — the mismatch that breaks nothing. If the board's rate is not one the monitor accepts, you get no picture and nothing is faulty. Check what this cabinet takes against what the board puts out before opening anything. → Modernising a cabinet
6. The control panel. Microswitches and the loom, in that order. A single dead direction is a switch; a whole player dead is the loom or its ground. → Control panels
7. Coin mech and sound. Last, because they hide nothing: a mech that no longer registers is usually dirty or misadjusted, and silence with a good picture points at the amplifier and its supply rails.
See also¶
- Other Japanese candy cabs (Taito Canary, Irem Madonna, Pony…) · Capcom CPS-1 PCB / CPS-2.
Documents (archived)¶
- 📄 Flyer Capcom — STATUS 25 / STATUS 18 ← the source of this page's figures
Sources & attribution¶
- Capcom — Q-GrandAm 25 取扱説明書, 14 pp., archived here — folio 2 (§1 仕様): 100 V (50/60 Hz), 120 W, 幅800 × 奥行965 × 高さ1425, ※最大高さ 1700 (with title plate A), 118 kg; §2 付属品 and §3 外観及び名称 (two 電子ロック electronic locks, 2 casters, 2 adjusters, title plates A and B). ⚠️ The Hard*Candy entry gives 1435 and omits the 1700. This PDF has no text layer: read off the rendered page. Via Hard*Candy
- Capcom — CUTE(キュート)取扱説明書, 10 pp., archived here — 〈仕様〉 block on the cover: 名称 CUTE(キュート) ⚠️ the manual never says "Mini" — the flyer does, 仕様電源 AC100V–120V (50/60 Hz), 消費電力 95 W, 重量 60 kg, 寸法 (W)500 × (D)690 × (H)1300 mm, and the スイッチング・レギュレーター output (+5 V 10 A, +12 V 3 A, −5 V 1 A, −12 V 1 A). Its folio 8 (全体結線図) carries the part references: monitor 18inch COLOR MONITOR — SANWA 18V21CP-2, supply FKA 10030SS-K, JAMMA 56P HRS CR7E-56DA-3.96E, speaker ATT AT-40H 8 Ω, coin mech AD-81P, and buttons 4-5-6 routed to the C-BOARD 90631C/90632C (CNIO2). ⚠️ The cover's 〈仕様〉 block does not give the tube size — the diagram and the flyer do. ⚠️ No scan rate anywhere. This PDF has no text layer: everything quoted from it was read off the rendered page. Via Hard*Candy
- Capcom — インプレス29 取扱説明書, 32 pp., archived here — folio 7 (§1 仕様): 外形寸法 730 × 920 × 1460 mm, ※最大高さ 1735 mm(アイキャッチパネル取付時), 重量 approx. 110 kg, AC100V 50/60 Hz, 消費電力 150 W, 金庫容量 approx. 5000 coins. ⚠️ This PDF has no text layer: everything quoted from it was read off the rendered pages. Via Hard*Candy
- Capcom — sales flyer STATUS 25 / STATUS 18, archived here : flyer — voltage, consumption, height, width, depth (⚠️ listed in that order by Capcom), weight and tube size for both models. Found via The Arcade Flyer Archive
- Capcom — CAPCOM・MINI CUTE sales flyer, © CAPCOM 1991, archived here (front · back, 仕様表 box) — 画面寸法 18インチ (the only archived source for the tube), 本体寸法 500 × 690 × 1300 mm, 重量 60 kg, 仕様電圧 100V, 消費電力 95wh ⚠️ a manufacturer's unit typo. The front carries CAPCOM・MINI™ above the CUTE logo, and the demo screen is Street Fighter II. Via Hard*Candy
- Arcade Otaku Wiki — Capcom Mini Cute: monitor 18 in 15 kHz (Sanwa PM1723E / Nanao MS8-18), 47 cm tube, rotatable, 60 kg, 95 W — ⚠️ the only source for the scan rate, and a community one; ⚠️ their "690 x 500 x 1300" lists depth first without declaring it, against 幅500 × 奥行690 in both Capcom documents — https://wiki.arcadeotaku.com/w/Capcom_Mini_Cute
- Arcade-Projects — FS - Mini Cute Sanwa 18V21CP-2: a seller of these monitors corrects his own listing — "They are not MS8-18, they are Sanwa 18V21CP-2 as used in the original Capcom Mini Cute" — and notes "chassis is only rated for 100 v" — https://www.arcade-projects.com/threads/mini-cute-sanwa-18v21cp-2-burn-free-socal.22275/
- Scan rate — 15 kHz per Arcade Otaku alone. ⚠️ No manufacturer document gives it. The manual points the same way without stating it (6-way composite sync, no frequency selector in §10): that is a deduction
- Monitor chassis board PM1723D / PM1745 — ⚠️ read off an actual board by this wiki's maintainer; no document archived here carries these references. The manual's diagram names the monitor (SANWA 18V21CP-2), not its board. To be corroborated against a Sanwa document if one turns up
- Arcade-Museum — Mini Cute (cabinet), Capcom 1991 — https://www.arcade-museum.com/Videogame/mini-cute-cabinet
- The Arcade Blogger — Capcom Mini Cute Restoration (1300 mm, coffin lid, 18″, SF2 CE launch) — https://arcadeblogger.com/2022/01/30/capcom-mini-cute-restoration-1/
- Wikipedia — List of Japanese arcade cabinets (Capcom: Status 18/25, Cute, Impress 29″, OOB-50, CAV System 60) — https://en.wikipedia.org/wiki/List_of_Japanese_arcade_cabinets
Image:
-
q-grandam-25-borne.jpg— source Hard*Candy (⚠️ no licence statement anywhere on the site) — https://www.hard--candy.com/wiki/candy/Q-GrandAm_25 -
impress-borne.jpg— source Hard*Candy (⚠️ no licence statement anywhere on the site) — https://www.hard--candy.com/wiki/candy/Impress
Review & corrections
How this space is used
Spotted a wrong value, an outdated procedure, a chip reference that does not match your board? Say so here, with what you observed (model, board revision, serial number, measurement). Every report is cross-checked against a source before anything changes — an unverifiable correction is published as “reported by …, not cross-checked” rather than silently applied.
Reading is open to everyone; posting requires signing in with Discord. Reports from the wiki's declared reviewers are handled first; anyone else's are read too, but go through a human before anything is changed.