Taito — cabinet overview
Beyond the famous Egret, Taito made many cabinets: 80s tables/uprights (MT-2, MT-5, ML-5, MM-5, Uni), candy cabs (Canary, Egret 29/II/3), big-format projectors (Teatro) and the modern Vewlix (LCD). All JAMMA (then JVS on the Vewlix).
Timeline / range
| Cabinet | Year | Type / screen | Detail |
|---|---|---|---|
| MT-2 | 1987 | table / upright | early Taito cabinet (JAMMA) |
| MT-5 | 1989 | table / upright | same, next generation |
| ML-5 / MM-5 / MT-8 | late 80s | table / upright | variants of the same family |
| Uni | late 80s-90s | "universal" upright | JAMMA conversion cabinet |
| Canary | 1991 | candy 25″ (Nanao MS8) | Taito's first candy → page |
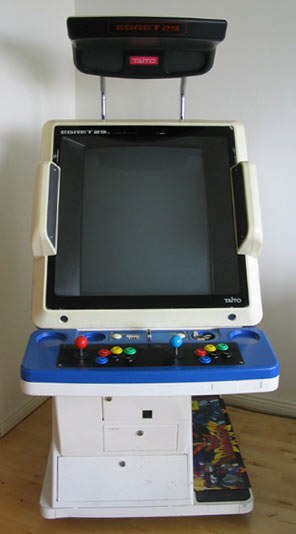
| Egret 29 | 1994 | candy 29″ | the first Egret |
| Egret II | 1996 | candy 29″ | monitor rotation yoko/tate by one person → page |
| Egret 3 | 2003 | candy 29″ | last CRT Egret → page |
| Teatro 37 / 50 / 50 EX | 90s-2000s | big format 33-50″ (projector) | → Big-format page |
| Vewlix (C / Diamond / F / L / L AMI / VS) | 2007+ | LCD 32″ HD, JVS | modern VS cabinet (Type X) → page |
Taito America, before the candy cabs ✅
⚠️ The timeline above starts in 1987, in Japan. Three archived documents open an earlier layer: the American cabinets of Taito America Corporation, in the early 1980s.
The G.T.C. 100 Universal Cabinet — a conversion cabinet, documented by its maker
The G.T.C. 100 Universal Cabinet — Service Instructions (Taito America Corporation, 660 Wheeling Rd., Wheeling, IL 60090, 3 pp.) describe a universal cabinet — the kind you fill with whatever game you like.
ⓘ It is built as two boxes: Upper Cabinet Box and Lower Cabinet Box.
✅ The monitor mounts horizontally OR vertically, and it is not a bodge: "The monitor mounting board has the feature of holding the monitor in a horizontal or vertical position." Two thumb screws at the top corners, pull the board out by its hand slots, rotate it to the side whose screw holes are at the top, put the screws back. ⚠️ The drawing labels the part "Monitor Cover — Horizontal or Vertical".
✅ The electronics live in a drawer (drawer assembly) at the base of the cabinet: power supply, game board, line filter, AC terminal block, fuses — and ⚠️ an isolation transformer ("Isol-Transformer"), fitted as standard. → CRT safety
ⓘ The interlock is on the drawer, not on a door: it cuts the game when the drawer is pulled out. To work with power on, pull the white knob on the switch out; push it in to cut power again. ⓘ Sliding the drawer back restores power automatically.
ⓘ Service switch: a yellow button reachable through the coin door, just to the right — one press, one credit.
✅ And monitor access is an ordered procedure, usable as it stands:
- switch off at the toggle on top of the cabinet;
- open the coin door, release the two lock clamps under the control panel (one per side panel), by pushing up;
- lift the control panel off and set it down in front of the unit;
- lift the glass out of its slots, then the graphic panel surrounding the monitor;
- remove the two thumb screws at the top corners of the mounting board — the monitor then swings forward and stops, ⓘ which gives access to its wiring without removing it;
- to take it out: power connector (1 plug), signal connector (2 plugs), chassis ground (1 wire), then the board's hand slots.
ⓘ The control panel wiring is reached by the same first four steps — the manual points back to them rather than repeating them.
The Trimline — the slim cabinet, with figures ✅
The CRAZY CLIMBER TRIMLINE™ manual (ref. 72-0001-001 Rev 1, 26 pp.) documents a cabinet line of Taito America's, not just a game — Trimline is a trade mark of the house.
| Item | What the manual writes |
|---|---|
| Depth | 24″ (61 cm) |
| Width | 20″ (51 cm) |
| Height | 54″ (138 cm) |
| Package weight | 190 lb (86 kg) |
| Mains | 120 VAC, 60 Hz, ⓘ ≈ 250 W |
| Monitor | ⓘ the parts list carries a Monitor Shroud 14″ |
| Fuses | six — ⓘ five on the switching regulator, one elsewhere |
⚠️ The manual imposes a wait before removing the monitor: "at least one hour before removing the video monitor". ⓘ A figure, where most manuals only say "discharge" → CRT safety.
⚠️ And earthing is worded as a recommendation, not an obligation: "For safe operation it is recommended the cabinet be grounded." ⓘ This wiki reproduces that as written; it does not follow it → the obligation stands, whatever the manual says.
ⓘ A useful comparison: at 54″, the Trimline is lower than Bally/Midway's "Mini" (61″) and far lower than the upright (70″) → western cabinets.
ⓘ Two addresses for one maker: the G.T.C. 100 carries 660 Wheeling Rd., Wheeling, IL 60090; the Space Invaders Cocktail Black & White Parts Catalog (ref. #960015, 17 pp.) carries 1256 Estes Avenue, Elk Grove Village, IL 60007. ⚠️ As at Bally/Midway, the address is not enough to date a document — it places it, it does not prove it.
Technical notes
- CRT (MT/ML/MM, Canary, Egret): Nanao MS8/MS9 (dual 15/24) or tri-sync chassis → Nanao MS8 / MS9 / MS29xx.
- Vewlix: LCD + PC base (Type X) → Vewlix.
- Wiring: JAMMA (CRT) → JAMMA wiring; JVS (Vewlix) → JVS wiring.
- Power: 100 V AC candy brick (JP) → candy PSU + step-down.
Repair & maintenance
Modernise (video, PSU, JVS, upscaler, PC/FPGA) → Modernising a cabinet. CRT → CRT safety + Nanao chassis + Recap. Vewlix (LCD/PC) → Recap + PCB fault-finding.
Procedure — a cabinet that will not start ✅
There is a CRT in this cabinet
The tube stays charged with the cabinet unplugged, and the anode cap is the first thing your hand meets behind the monitor. Discharge it, work with one hand, and never alone if you can help it. → CRT safety
This cabinet is documented as 120 V
It does not go straight onto a European socket. It needs a step-down transformer rated for the whole cabinet, monitor included — not a travel adapter. Feeding 230 V to a cabinet built for 120 V destroys the supply, and usually the monitor with it. → Cabinet power
What this adds
Ordered for a cabinet, not for a board: mains, low-voltage supply, loom, monitor, then the game. The overwhelming majority of "dead cabinets" are dead for a reason that has nothing to do with the PCB — which is why the board comes last here.
1. Mains, and what sits between it and the cabinet. The switch, the fuse or breaker, the isolation transformer if there is one. A cabinet that shows no sign of life at all is almost never electronic.
2. The low-voltage supply — measured under load. Aim for +5 V where power reaches the board — the JAMMA edge, or the JVS power connector, depending on the cabinet — with the game running, not on an idle bench. If the supply has an adjustment (most candy and JVS bricks do; the ATX brick in a PC cabinet does not), do it then and not before: set off-load, it leaves a board that boots and then glitches. With no adjustment the measurement still earns its keep — it tells you whether the supply holds. Check +12 V too, and −5 V if the board uses it: many do not, and an ATX brick does not provide it. → Cabinet power
3. The loom and the connector. Reseat, and check the grounds — a cabinet with a poor ground gives rolling picture, phantom inputs and noise, all at once, and none of it looks like a wiring fault. → Wiring
4. The monitor. This page does not give a single monitor spec — it covers several cabinets. Check which one you have before concluding anything. CRT: no picture but the tube is warm and there is EHT — that is sync or video, not the tube. No EHT at all — chassis. A picture that shrinks, wanders or shifts colour is a chassis recap, and on these monitors that is a scheduled job, not a repair.
5. Scan rate — the mismatch that breaks nothing. If the board's rate is not one the monitor accepts, you get no picture and nothing is faulty. Check what this cabinet takes against what the board puts out before opening anything. → Modernising a cabinet
6. The control panel. Microswitches and the loom, in that order. A single dead direction is a switch; a whole player dead is the loom or its ground. → Control panels
7. Coin mech and sound. Last, because they hide nothing: a mech that no longer registers is usually dirty or misadjusted, and silence with a good picture points at the amplifier and its supply rails.
See also
- Canary · Egret II · Egret 3 · Vewlix · Big format (Teatro) · Other candy cabs · Taito PCB.
Sources & attribution
- Wikipedia — List of Japanese arcade cabinets (Taito: Canary, Egret 29/II/3, MT2 1987, MT5 1989, Uni, Teatro Ex 33/50, Vewlix) — https://en.wikipedia.org/wiki/List_of_Japanese_arcade_cabinets
- Hard*Candy — TAITO arcade machines (full range, ML-5/MM-5/MT-8, Teatro 37/50/50EX, Vewlix C/Diamond/F/L/VS) — https://www.hard--candy.com/taito-arcade-machines/
Image:
-
egret-29-borne.jpg— source Hard*Candy (⚠️ no licence statement anywhere on the site) — https://www.hard--candy.com/wiki/candy/Egret_29
Review & corrections
How this space is used
Spotted a wrong value, an outdated procedure, a chip reference that does not match your board? Say so here, with what you observed (model, board revision, serial number, measurement). Every report is cross-checked against a source before anything changes — an unverifiable correction is published as “reported by …, not cross-checked” rather than silently applied.
Reading is open to everyone; posting requires signing in with Discord. Reports from the wiki's declared reviewers are handled first; anyone else's are read too, but go through a human before anything is changed.