Namco Noir¶
Namco's sitdown cabinet, released in 2007 with Tekken 6. It is the reference Namco versus-fighting cabinet of the 2000s: 32″ LCD, JVS wiring, two-player panel on a layout close to the Vewlix. The Grigio is its 2018 revision.
Identification¶
| Field | Value |
|---|---|
| Manufacturer | Namco |
| Year | 2007 (launched with Tekken 6) |
| Japanese name | ノアールキャビネット (Noāru Kyabinetto) |
| Also known as | Namco Noir HD |
| Type | Sitdown |
| Screen | 32″ LCD, 1366 × 768, analogue or digital (HDCP) input, horizontal only — manual §2 |
| Rotatable | no |
| PCB format | JVS |
| Dimensions | 820 × 800 × 1700 mm (W×D×H) |
| Weight | 130 kg without the game PC board · 140 kg with it fitted ⚠️ see below |
| Mains | AC 100 V ± 10 V (50/60 Hz) in Japan — 250 W, 2.7 A, excluding the game PC board |
Two generations of panel
Not every Noir has the same monitor. Early runs ship with a Sanwa panel capped at 1360 × 768; later ones with a Wei-Ya that accepts 1920 × 1080. Check the panel before planning an HD source: it is what decides what the cabinet can actually display.
The three versions¶
The Noir came in three versions, told apart by eye — and, for one of them, by an electrical difference that matters when ordering a part.
| v1 | v2 | v3 | "Gold" | |
|---|---|---|---|---|
| Dominant colour | red | red | blue | gold |
| Topper | angled | straight | straight | straight, gold frame |
| LED strip | red | red | blue | gold |
| Column fan | 100 V | 12 V | 12 V | not recorded |
| Panel trim line | red | none | silver | gold |
| Speakers | black, red surround | red, black surround | blue, black surround | black, dark surround |
| Panel door | red — or grey, taking card readers | red | blue | gold |
| Associated game | Tekken 6 | Tekken Tag Tournament 2 | Gundam | Tekken 7 Fated Retribution Round 2 |
The \"Gold\" edition
A special run released for Tekken 7 Fated Retribution Round 2, gold on every visible part: topper frame, light strip, screen surround and control panel, with black-ink artwork over the gold. Even the buttons are gold.
It is a finish, not a technical revision: nothing suggests it differs from a v2 or v3 under the metalwork. Its column fan voltage was not recorded.
The column fan is not interchangeable
On the v1 it is 100 V, on the v2 and v3 it is 12 V. Fitting the wrong one is invisible mechanically — the fan is the same size — but a 12 V fan on 100 V burns out instantly, and a 100 V fan on 12 V simply does not turn, leaving the cabinet to overheat with no warning. Check the version before ordering.
Telling the versions apart at a glance
The quickest tell is the LED strip above the screen: red on v1 and v2, blue on v3, gold on the Gold.
Between v1 and v2 it is the topper — angled = v1 — and the red panel trim line, present on the v1 only.
The speakers confirm it: red surround on v1, black on v2 and v3, the driver going black, then red, then blue.
Dimensions: two sources disagree
⚠️ The source is not a Noir manual, but the manual for the game, Tekken 6 Bloodline Rebellion SD-S, which describes the machine as delivered, therefore a Noir.
(This page used to state that "Namco publishes none". That is wrong — see the box on the cabinet manual, below.)
On its folio 7 it gives 820 (W) × 800 (D) × 1,700 (H) mm — Namco labels its figures, so the order is not left to be guessed. Arcade Otaku publishes "800 × 820 × 1700", i.e. the first two transposed. This wiki keeps the manufacturer's order.
Panel doors¶
The control panel door also came in several colours, matched to the cabinet — red on the v1 and v2, blue on the v3.
The v1's grey door — the one that takes card readers
The v1 had an all-grey door, made to take card readers. That is what allowed Tekken 6 players to save their character and progress through the Tekken-Net online service.
It is the variant worth spotting on the second-hand market: without it, no reader, so no character saving.
Link setup: the P1 and P2 assemblies¶
For 1-versus-1 play two cabinets are linked, and only one carries the game system. The manual therefore distinguishes Cabinet (P1) Assy — the equipped cabinet — from Cabinet (P2) Assy, the second station. It shows in the consumption figures, which are very different:
| P1 (with the game board) | P2 (second station) | |
|---|---|---|
| Max. power at 110-120 V | 470 W | 223 W |
| Max. power at 220-240 V | 463 W | 227 W |
| Max. current at 110-120 V | 4.3 A | 2.2 A |
| Max. current at 220-240 V | 2.2 A | 1.1 A |
Do not size two cabinets the same
A P1 draws more than twice a P2. On a multi-cabinet install, it is the P1 that sets the circuit rating.
⚡ Wiring & power¶
| Aspect | Value |
|---|---|
| PCB connector | JVS — no native JAMMA |
| Monitor sync | 31 kHz (LCD, nothing to realign) — 1366 × 768 panel |
| Mains | AC 100 V ± 10 V (50/60 Hz), Japanese manual · 110-120 / 220-240 V on export versions |
| Dimensions | 820 (W) × 800 (D) × 1700 (H) mm |
| Weight | 130 kg without the game PC board · 140 kg with it |
Control panel — pinout¶
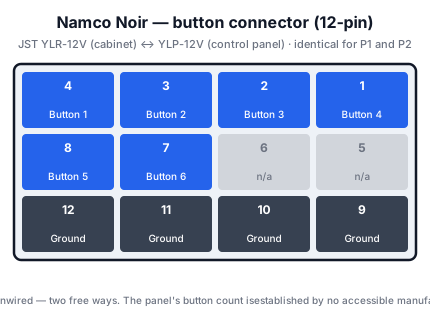
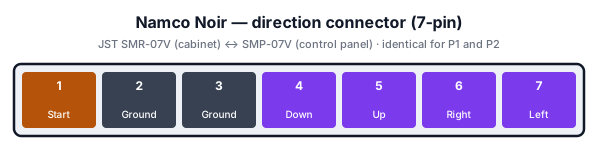
The panel unplugs via two JST connectors per player: one for the buttons, one for the directions and Start. P1 and P2 are wired identically, which makes diagnosis easy — if one station works and the other doesn't, swapping the two looms isolates the fault in a minute.
The cabinet's manual is archived — and it confirms the count
The Japanese Noir manual (『ノアールキャビネット取扱説明書』, 90 pp.) has been found and archived. It is the document this page had been after from the start, the one Bandai Namco restricts to licensed operators — it was circulating in the community.
Its §10-5 parts list (1P panel, folio 78) counts the panel piece by piece:
| Item | Part | Qty | Reference |
|---|---|---|---|
| 3 | スタートボタン (start) | 1 | OBSF-24-Y |
| 4 | ボタン (button) | 4 | OBSF-30-K-DH |
| 6 | 目隠しキャップ (blanking cap) | 2 | OBSM-30 |
| 5 | レバー (joystick) | 1 | TP-8Y-SK-LB-35-DH |
4 fitted buttons + 2 Ø30 caps = 6 holes, plus the start in Ø24. §10-6 (2P panel) doubles everything: 8 buttons, 4 caps, 2 starts, 2 levers.
That is exactly the count taken on an original panel, and it adds what the eye could not see: the cabinet leaves the factory with two holes blanked off. A panel that looks drilled for six buttons carries only four.
Its §2 仕様 sheet also gives: AC 100 V ± 10 V, 250 W, 2.7 A (excluding the game PC board), a cash box for 3,000 ¥100 coins, a 32″ 1366 × 768 panel, analogue or digital HDCP, horizontal only, and 820 × 800 × 1,700 mm for 130 kg — the manual stating 「重量は全てゲーム PC ボードを含みません」, all weights exclude the game PC board.
⚠️ This reconciles the two documents: the 140 kg in the Tekken 6 manual is the machine with the board fitted, the 130 kg the cabinet alone. They never contradicted each other; they were not counting the same thing.
The panel has 6 holes per player plus a start — counted on a unit
Counted on an original panel by this wiki's maintainer, 12 August 2026: six button holes per player, plus the start button. No seventh or eighth hole.
That matches the connector, and it is what finally makes it readable: six wired ways for six holes. Pins 5 and 6, free, correspond to no drilling at all — they are there for a third-party panel that would need more, not for existing holes.
⚠️ This page long said those pins "correspond to buttons 7 and 8 of the Vewlix layout". Wrong twice over: the Vewlix panel has 7 holes (4 top, 3 bottom), not 8 — see Control panels — and the Noir has 6. The original reading, Arcade Otaku's, annotated those pins "expected Button 7 / 8": an assumption by its author, propagated afterwards as fact.
✅ That count has since been confirmed by the manufacturer's manual, found and archived the same day — see the box above. A counted unit and a document agreeing is the best case there is.
Four grounds, not one
Pins 9 to 12 are all grounds. They are not redundant by accident: each row of buttons has its own return. Tying everything to a single ground works on the bench and gives false triggers in play, when every button is pressed at once.
What sets it apart¶
- LCD from 2007: the Noir arrives as Namco leaves the CRT behind. There is no convergence or geometry to set, but the panel is a consumable and backlights fade.
- JVS only. Running a JAMMA PCB needs a JVS I/O board and a video converter — see JVS wiring.
- Panel on a layout close to the Vewlix, which makes aftermarket plates and fightsticks broadly compatible — see Control panels & buttons.
Internal assemblies¶
- 🖥️ 32″ LCD monitor — Sanwa (early runs) or Wei-Ya (later runs).
- ⚡ Cabinet PSU plus the game system's own supply (arcade PC).
- 🎮 JVS I/O board → JVS I/O boards.
Common mods¶
- Panel with more than six buttons: two free ways exist at the connector (pins 5 and 6), but ⚠️ the Noir's hole count is established by no accessible manufacturer document — check the JVS side and the steel before drilling.
- HD source: possible on Wei-Ya runs (1920 × 1080), limited to 1360 × 768 on Sanwa runs.
- PC in the cabinet: it is already JVS and 31 kHz, so the fit is direct — see Modernising a cabinet.
Manuals (archived)¶
- 📘 Namco — TEKKEN 6 BLOODLINE REBELLION SD-S operation manual (PDF, 59 pp., EN) — §2 SPECIFICATIONS on folio 7: dimensions, weight, and consumption and current given separately for P1 and P2. ⚠️ This is the game's manual, not the cabinet's: see below.
What the archived manual confirms — and it labels its figures
Folio 7 gives, in so many words:
| Dimensions | 820 (W) × 800 (D) × 1,700 (H) mm |
| Weight | 140 kg — as installed |
| Screen | 32-inch LCD monitor |
| Power | 110-120 V AC (50/60 Hz) and 220-240 V AC (50/60 Hz) |
| Max consumption | Cabinet (P1) Assy: 470 W (110-120 V) / 463 W (220-240 V) · Cabinet (P2) Assy: 223 W / 227 W |
| Max current | P1: 4.3 A / 2.2 A · P2: 2.2 A / 1.1 A |
Namco writes (W), (D), (H): the order no longer has to be inferred. Arcade Otaku's "800 × 820 × 1700" is indeed the first two figures transposed, and this wiki publishes the manufacturer's order.
⚠️ The 140 kg is given as installed, and the consumption figures are per half-cabinet: a complete Noir is P1 and P2.
How this manual was found, and why it was missing
Bandai Namco's support site does list 『ノアールキャビネット88 取扱説明書』
(February 2015 announcement,
record manual_id=226), but its page redirects to the home page: it requires a
licensed operator account. This wiki does not open one.
The copy archived here comes from the community, via the Arcade-Projects forum. It is titled 『ノアールキャビネット取扱説明書』, without the "88" — so it is most likely the manual for the original model, not the Tekken 7 variant. Its figures and its panel match the cabinet described here.
The game's manual could not stand in for it, and said so itself fifteen times — including at §3 (package contents, item 2), §4 and §10-2: "Regarding other parts, refer to the separate CABINET Operation Manual". It documents no cabinet part.
Where the “8 buttons” came from — and what it actually describes
With no manufacturer document, the only published description of the panel is the connector pinout recorded by Arcade Otaku — a community source, not a manual. A 12-pin JST connector, identical for P1 and P2:
| 4 — Button 1 | 3 — Button 2 | 2 — Button 3 | 1 — Button 4 |
| 8 — Button 5 | 7 — Button 6 | 6 — N/A (expected Button 7) | 5 — N/A (expected Button 8) |
| 12 — Ground | 11 — Ground | 10 — Ground | 9 — Ground |
Eight positions, six wired, and the last two annotated expected — that is, assumed by whoever took the reading, not observed.
The archived manual adds half a clue, and no more. Its INPUT TEST screen (§7-4-6, folio 30) lays each player's buttons out on two rows and elides them itself:
BUTTON1  BUTTON2 ⋯
BUTTON3  BUTTON4 ⋯
The ellipses are the manual's own. So: two rows, more than four buttons read by the board — and the exact count not written down.
That is most likely where this wiki's "8" was born. But a connector that provides eight ways says nothing about how many holes are cut in the steel: on the Vewlix, the manufacturer documents 7 holes with 6 fitted. The Noir's count therefore remains not established, and this wiki no longer publishes it as a fact — see Control panels.
Procedure — a cabinet that will not start ✅¶
This cabinet exists in both low and high voltage
This page documents both a low-voltage version (Japanese or North American market) and a 220-240 V one. Nothing here tells you which one you have.
Read the machine's label before plugging anything in. A step-down transformer on a cabinet already wired for 240 V is every bit as destructive as 230 V into a cabinet built for 100 V. → Cabinet power
What this adds
Ordered for a cabinet, not for a board: mains, low-voltage supply, loom, monitor, then the game. The overwhelming majority of "dead cabinets" are dead for a reason that has nothing to do with the PCB — which is why the board comes last here.
1. Mains, and what sits between it and the cabinet. The switch, the fuse or breaker, the isolation transformer if there is one. A cabinet that shows no sign of life at all is almost never electronic.
2. The low-voltage supply — measured under load. Aim for +5 V where power reaches the board — the JAMMA edge, or the JVS power connector, depending on the cabinet — with the game running, not on an idle bench. If the supply has an adjustment (most candy and JVS bricks do; the ATX brick in a PC cabinet does not), do it then and not before: set off-load, it leaves a board that boots and then glitches. With no adjustment the measurement still earns its keep — it tells you whether the supply holds. Check +12 V too, and −5 V if the board uses it: many do not, and an ATX brick does not provide it. → Cabinet power
3. The loom and the connector. Reseat, and check the grounds — a cabinet with a poor ground gives rolling picture, phantom inputs and noise, all at once, and none of it looks like a wiring fault. Connector on this cabinet: JVS. → Wiring
4. The monitor. This page describes the monitor as: 32″ LCD, 1366 × 768, analogue or digital (HDCP) input, horizontal only — manual §2. LCD: no high voltage, but a backlight that fades and a panel that is a consumable. A black screen with sound is usually the backlight or its supply, not the panel.
5. Scan rate — the mismatch that breaks nothing. If the board's rate is not one the monitor accepts, you get no picture and nothing is faulty. Check what this cabinet takes against what the board puts out before opening anything. → Modernising a cabinet
6. The control panel. Microswitches and the loom, in that order. A single dead direction is a switch; a whole player dead is the loom or its ground. → Control panels
7. Coin mech and sound. Last, because they hide nothing: a mech that no longer registers is usually dirty or misadjusted, and silence with a good picture points at the amplifier and its supply rails.
Photos / assets¶
(To add: whole cabinet, control panel, connector block and JST connectors, rear, panel label — it is what tells you whether the cabinet reaches 1080p.)
Repair & maintenance
LCD panel → no CRT-style high voltage, but the backlight supply is still dangerous. JVS wiring → JVS wiring · panel → Control panels & buttons.
Sources & attribution¶
Text (synthesised here; sources listed for attribution):
- Arcade Otaku Wiki — Namco Noir (year, dimensions, weight, mains, full pinout of both panel connectors) — https://wiki.arcadeotaku.com/w/Namco_Noir
-
The Retro Arcade Shop — Namco Noir (panel generations: Sanwa 1360×768 on early runs, Wei-Ya 1920×1080 on later ones) — https://retroarcadeshop.com/products/namco-noir
-
Namco — 『ノアールキャビネット取扱説明書』, the cabinet's manual, 90 pp. — archived here — §2 仕様 (AC100V, 250 W, 2.7 A, 1366×768, 820×800×1700, 130 kg excluding the game PC board), §10-5/10-6 parts lists for the 1P and 2P panels (4 OBSF-30 buttons + 2 OBSM-30 caps + 1 OBSF-24 start per player). Community copy, via Arcade-Projects
- Counted on an original panel by this wiki's maintainer, 12 August 2026 — 6 holes per player + start, since confirmed by the manual's parts list above
- Namco — Tekken 6 Bloodline Rebellion SD-S operation manual (59 pp.) — archived here — ⚠️ this is the game's manual, not the cabinet's: it describes the delivered machine, which is a Noir. Section 2 "Specifications": dimensions 820 × 800 × 1700 mm, weight 140 kg, 32″ LCD, and above all the power and current figures given separately for the P1 and P2 assemblies. Test mode documents a CARD RW TEST (card reader/writer). — https://www.manualslib.com/manual/1722559/Namco-Tekken-6-Bloodline-Rebellion-Sd-S.html
Differences between versions (colours, topper, column fan voltage, speakers, panel trim): recorded first-hand by gtranche, the wiki's owner, from cabinets he has seen. No written source consulted documents them — neither Arcade Otaku nor Hard*Candy. the Gold edition (Tekken 7 Fated Retribution Round 2), the panel doors (red, blue, and the v1's grey one taking card readers), and A photo of each version's panel would usefully illustrate the trim line, the hardest detail to put into words. The v3 trim was not recorded.
Diagrams: noir-boutons-12p.en.svg and noir-directions-7p.en.svg are
drawn for this wiki from the pinout published by Arcade Otaku. No pin is
inferred: those the source does not document are marked n/a.
Review & corrections
How this space is used
Spotted a wrong value, an outdated procedure, a chip reference that does not match your board? Say so here, with what you observed (model, board revision, serial number, measurement). Every report is cross-checked against a source before anything changes — an unverifiable correction is published as “reported by …, not cross-checked” rather than silently applied.
Reading is open to everyone; posting requires signing in with Discord. Reports from the wiki's declared reviewers are handled first; anyone else's are read too, but go through a human before anything is changed.