Atari Lynx
Atari's handheld (1989), the first handheld with a colour backlit screen. Powerful for its time (Suzy & Mikey customs). Preservation points: the recap (its caps leak) and the IPS screen (McWill mod).
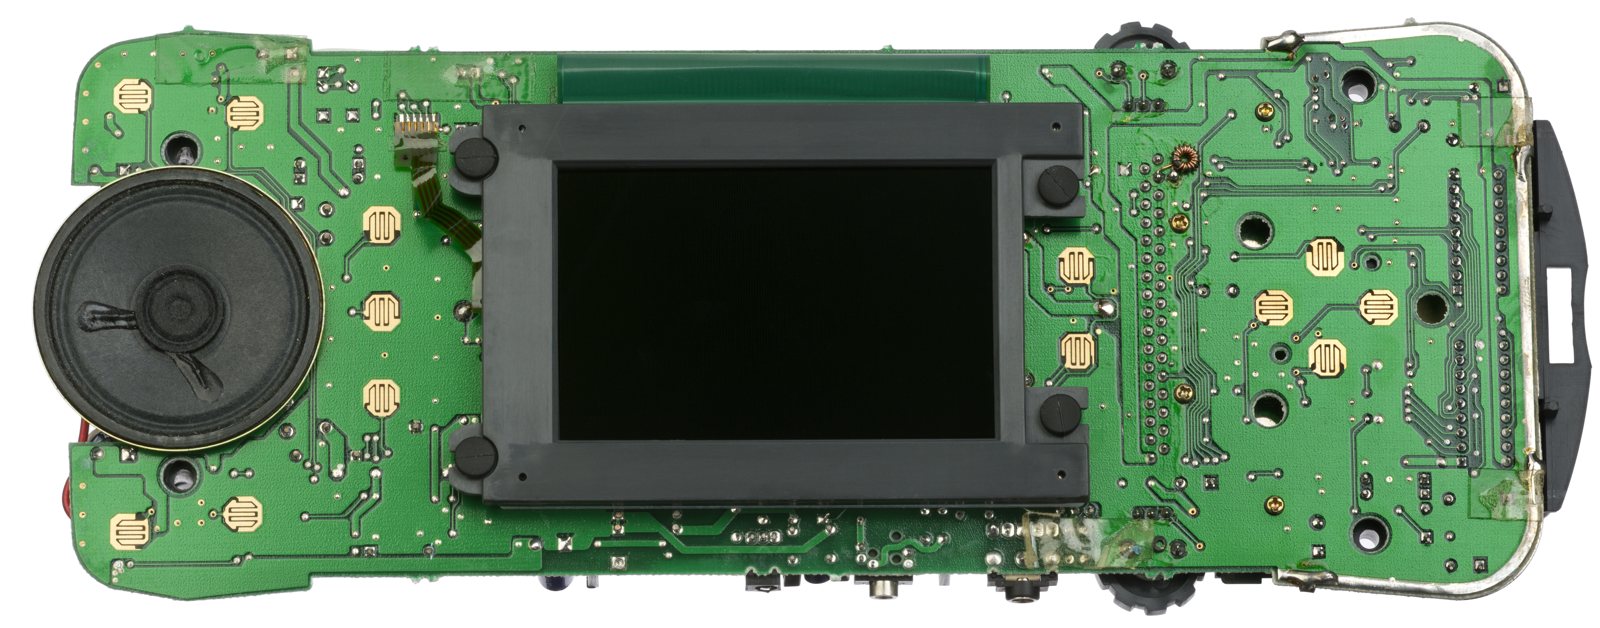
Identification
| Field | Value |
|---|---|
| Manufacturer | Atari |
| Release | 1989 (Lynx I) · Lynx II (1991) |
| Type | Colour backlit handheld |
| Media | Cartridge |
Architecture (detail)
| Block | Chip | Clock | Role |
|---|---|---|---|
| CPU | WDC 65C02 | ~4 MHz | |
| Suzy | custom ASIC | blitter (sprites with hardware scaling/distortion) + math (mult/div) — rare for 1989 | |
| Mikey | custom ASIC | timers, video (LCD 160×102, 4096 colours / 16 on screen), 4-voice sound, I/O | |
| Memory | 64 KB RAM |
A flippable console (the image can rotate 180° in software, hence games playable left/right-handed). Suzy's hardware scaling made it the most advanced handheld of its time — at the cost of battery life (6 AA).
Lynx I vs Lynx II & ComLynx
- Lynx I (1989): large, mono headphone jack, no screen-off switch.
- Lynx II (1991): smaller and lighter, stereo headphone sound, backlight off toggle to save batteries, better shells.
- ComLynx: a networking cable linking several Lynx units (up to ~8-16 players depending on the game, e.g. California Games, Warbirds) — rare for a 1989 handheld.
⚠️ Recap
Like many handhelds of the era, the Lynx's capacitors age badly (sound, power, screen) → frequent recap. Per-CXX list: see Console5.
Common faults
| Symptom | Likely cause | Lead |
|---|---|---|
| No sound / flaky power | Capacitors | Recap |
| Dark / failing screen | Stock backlight | IPS screen (McWill) |
| Battery contact corrosion | Leaked batteries | Clean the contacts |
| Cartridge not read | Contacts | Cleaning |
Step-by-step disassembly procedures ✅
6 procedures transcribed from the iFixit guides, with difficulty and estimated time.
| Procedure | Difficulty | Time |
|---|---|---|
| The Internal Components of an Atari Lynx | — | — |
| Atari Lynx Backlight Replacement | Difficult | No estimate |
| Atari Lynx Battery Wire Replacement | Difficult | 15 - 30 minutes |
| Replacing Atari Lynx Buttons and D-Pad | Easy | 15 minutes |
| Replacing an Atari Capacitor | Difficult | No estimate |
| Replacing Atari Lynx Speaker | Difficult | No estimate |
The Internal Components of an Atari Lynx
This guide will show you how to disassemble...
- Before disassembling your Atari Lynx, be sure the device is powered off. Remove any game in the console by opening the right latch and sliding the game to the right.
- Remove the four 35 mm Phillips #1 screws at each corner of the backside on the Atari Lynx. Pinch the rear panel with your fingers and lift away from the Atari.
- Remove the battery panel by pinching the sides with your fingers and lifting it away from the Atari. Be sure not to tear any wires attached to battery panel.
- Remove the control panel by pinching the sides with your fingers and lifting it away from the Atari. Be sure not to tear the speaker wire while removing the control panel.
Atari Lynx Backlight Replacement
Before starting this guide you may need some experience with soldering/ desoldering. If you do not know how, you can learn by clicking the link we put on step 8 (when you have to desolder the backlight).
- Before disassembling your Atari Lynx, be sure the device is powered off.
- Remove any game in the console by opening the right latch and sliding the game to the right.
- Remove the four 35 mm Phillips #1 screws at each corner of the backside on the Atari Lynx.
- Pinch the rear panel with your fingers and lift away from the Atari.
- Remove the battery panel by pinching the sides with your fingers and lifting it away from the Atari.
- Be sure not to tear any wires attached to battery panel.
- Remove the control panel by pinching the sides with your fingers and lifting it away from the Atari.
- Be sure not to tear the speaker wire while removing the control panel.
- Pull out the logic-board.
- Pull to the sides the four rubber tabs holding in the screen
- Unscrew the two 10 mm screws as shown with a Phillips #0 screwdriver in order to remove the shield behind the backlight.
- Flip over the motherboard and remove the shield behind the backlight.
- Flip the motherboard back over and desolder the two components that are holding the backlight in place.
- If you need help with basic desoldering, click here.
Atari Lynx Battery Wire Replacement
Before starting this guide you may need some experience with soldering/ desoldering. If you do not know how, you can learn by clicking the link on step 5 (when you have to desolder the wires).
- Before disassembling your Atari Lynx, be sure the device is powered off.
- Remove any game in the console by opening the right latch and sliding the game to the right.
- Remove the four 35 mm Phillips #1 screws at each corner of the backside on the Atari Lynx.
- Pinch the rear panel with your fingers and lift away from the Atari.
- Remove the battery panel by pinching the sides with your fingers and lifting it away from the Atari.
- Be sure not to tear any wires attached to battery panel.
- Remove the control panel by pinching the sides with your fingers and lifting it away from the Atari.
- Be sure not to tear the speaker wire while removing the control panel.
- Desolder both the black and red wire as shown.
- If you need help with basic desoldering, click here.
- Desolder the black wire as shown.
- Desolder the white wire and then the red wire as shown.
- Desolder the white wire as shown in order for the battery pack to be completely removed from the device.
Replacing Atari Lynx Buttons and D-Pad
This guide will take you step-by-step on how to replace your buttons.
- Before disassembling your Atari Lynx, be sure the device is powered off.
- Remove any game in the console by opening the right latch and sliding the game to the right.
- Remove the four 35 mm Phillips #1 screws at each corner of the backside on the Atari Lynx.
- Pinch the rear panel with your fingers and lift away from the Atari.
- Remove the battery panel by pinching the sides with your fingers and lifting it away from the Atari.
- Be sure not to tear any wires attached to battery panel.
- Remove the control panel by pinching the sides with your fingers and lifting it away from the Atari.
- Be sure not to tear the speaker wire while removing the control panel.
- If you want to replace the buttons other than the D-pad, you can pull them up by pinching the sides with your fingers and lifting away from the front panel of Atari.
- To remove the D-Pad, remove three 10 mm Phillips #0 screws surrounding the D-Pad.
- The buttons should fall out once the screws have been removed.
Replacing an Atari Capacitor
Before starting this guide you may need some experience with soldering/ desoldering. If you do not know how, you can learn by clicking the link on step 5 (when you have to desolder the aluminum tabs).
- Before disassembling your Atari Lynx, be sure the device is powered off.
- Remove any game in the console by opening the right latch and sliding the game to the right.
- Remove the four 35 mm Phillips #1 screws at each corner of the backside on the Atari Lynx.
- Pinch the rear panel with your fingers and lift away from the Atari.
- Remove the battery panel by pinching the sides with your fingers and lifting it away from the Atari.
- Be sure not to tear any wires attached to battery panel.
- Remove the control panel by pinching the sides with your fingers and lifting it away from the Atari.
- Be sure not to tear the speaker wire while removing the control panel.
- Desolder the four aluminum tabs and for more information on soldering click here.
- Remove the aluminum back protector to gain access to the C10 capacitor.
- Desolder the C10 capacitor.
Replacing Atari Lynx Speaker
This guide will show you how to replace the speaker from your Atari Lynx. Before beginning, it is a must to know how to solder and desolder. In order to find out how to do these processes there will be a link in the the following steps. Aside from soldering, most steps should be easy to follow and simple.
- Before disassembling your Atari Lynx, be sure the device is powered off.
- Remove any game in the console by opening the right latch and sliding the game to the right.
- Remove the four 35 mm Phillips #1 screws at each corner of the backside on the Atari Lynx.
- Pinch the rear panel with your fingers and lift away from the Atari.
- Remove the battery panel by pinching the sides with your fingers and lifting it away from the Atari.
- Be sure not to tear any wires attached to battery panel.
- Remove the control panel by pinching the sides with your fingers and lifting it away from the Atari.
- Be sure not to tear the speaker wire while removing the control panel.
- Remove the logic board from the console.
- Flip the logic board so the screen is facing down.
- Now you will need to desolder both of the wires connected to the speaker.
- If you are having trouble desoldering, click here.
- Finally solder the new speaker back on and follow the previous steps in reverse order.
Source, licence and scope
iFixit guides, under Creative Commons BY-NC-SA — attribution, non-commercial, share-alike. Only the text is reproduced; the step photos stay on iFixit. ⚠️ These guides target the model named in the title: on another revision, the screws and the order of removal may differ.
Procedure — a dead console, step by step ✅
Backlight and battery
The backlight inverter carries a high voltage, live, on a board you are holding. And a swollen lithium cell is not to be pierced or bent — take it out first and put it somewhere safe.
What this adds
Ordered for a console, not for an arcade board: what kills these is almost never the CPU. It is, in real order, the power supply, the capacitors, the drive or the cartridge slot, and only then the logic. → PCB diagnosis
1. The power supply. Two cases, depending on the machine. External brick: ⚠️ read the marking on the machine, next to the socket, and check the adapter against it — voltage and polarity. A centre-negative machine fed centre-positive loses its fuse, sometimes its regulator; do not trust a third-party label or a generic tip. Internal supply (the machine plugs straight into the wall): mains is inside the shell. Unplug, wait, and confirm the large capacitors are discharged before touching the board. Either way, measure under load: a failing supply holds its voltage until it is asked for current.
1b. Battery and its contacts. On this machine, before anything else: corroded battery contacts, or a cell that reads fine off-load and collapses under it, give exactly the symptoms of a dead machine.
2. The fuse. Many of these machines have one right behind the socket — it is the part designed to die. Test it in continuity, out of circuit. A fuse that blows again is a short, not a fuse problem.
3. Capacitors. On most machines of this age this is the default suspect rather than a last resort — leaking SMD electrolytics eat the tracks underneath before they give any other sign. ⚠️ Not all of them are like that: some carry very few and are not recapped on principle. Read what this page says about it before reaching for the iron. → Recap
4. The cartridge connector. Cartridge contacts with isopropyl alcohol, never an abrasive eraser: it takes the gold plating off and the problem comes back worse. On the machine side, inspect the slot pins — splayed, bent or oxidised — and check continuity between slot and board.
5. The screen. Lines, a dead half, a picture that fades: it is almost always the ribbon and its solder joints, not the panel. Reseat before you order anything. If this machine has a TV output — not all of them do — test that too: it tells the screen apart from what feeds it.
6. Still nothing. Now, and only now, the logic: rails on the board, reset, clock, bus. → PCB diagnosis
Lynx I or Lynx II? ✅
There are two Lynx models and five board revisions — but those revisions have no impact on external functionality: they only matter for modding.
| Lynx I (1989-1991) | Lynx II (1991-1995) | |
|---|---|---|
| Form factor | Wider | More compact |
| Battery life | 4-5 h | 5-6 h |
| Audio | Mono | Stereo |
| Screen | Slightly poorer | Vaguely better |
| Power saving | — | Can turn off the backlight |
| Grip | — | Rubber hand grips |
What does NOT change — and matters most
On the crucial points, both models are identical:
- neither has any region lock;
- both can receive all the important mods;
- both work with flashcarts.
In other words: ending up with a Lynx I is not a bad outcome. The Lynx II's improvements are fairly minor — and neither model's screen is exactly good nowadays: it is the first target for modding either way. (Source: ConsoleMods, CC-BY-SA, in collaboration with io55.net.)
About capacitor lists
ConsoleMods publishes a capacitor map for the Lynx II, board C104471-001 REV A — but
it is an image, not a text list: there is therefore no per-reference BOM to transcribe
here. Identify your board, then follow the source's map or a verified list (Console5).
No values are invented.
Popular mods — what to buy, how
Recap FIRST
Lynx I and II: leaking capacitors → sound/screen failures. Recap before any other mod.
- McWill LCD screen: replaces the blurry stock panel with a sharp, bright LCD (adjustable) — the flagship mod. Install 🟠 (remove screen + flex). → McWill LCD page.
- Flashcart: the Lynx GameDrive (RetroHQ) — games/homebrew on SD, plug-and-play 🟢.
- USB-C / internal rechargeable battery (the Lynx eats 6 AA cells).
Photos / assets
(To add: Lynx I vs II, board, screen.)
Advanced repair
Full recap all but mandatory (electrolyte leakage = the No. 1 issue) + screen/ backlight (IPS mods). Methods: Recap · PCB fault-finding · Traces & vias.
Archived manufacturer documentation ✅
Manufacturer documentation archived locally. ⚠️ These are owner's and reference manuals, not service manuals: they give the specifications, the connectors and the expected behaviour, but not the schematics or troubleshooting voltages.
- Lynx — PDF
Status
Manufacturer documents with no explicit licence, kept for preservation (machines out of production for decades).
Sources & attribution
- ConsoleMods Wiki — Lynx Model Differences — CC-BY-SA — Lynx I vs Lynx II (battery life, mono/stereo, power saving), neither has a region lock, board revisions with no external impact — in collaboration with io55.net — https://consolemods.org/wiki/Lynx:Model_Differences
- ConsoleMods Wiki — Capacitor Maps — CC-BY-SA — Lynx II
C104471-001 REV Acapacitor map (an image, no transcribable text list) — https://consolemods.org/wiki/Lynx:Capacitor_Maps - Wikipedia — Atari Lynx — CC-BY-SA — https://en.wikipedia.org/wiki/Atari_Lynx
- Console5 — Lynx (CXX cap kit) — to reference
Image:
-
lynx-board.jpg— Evan-Amos, public domain — https://commons.wikimedia.org/wiki/File:Atari-Lynx-Motherboard-Top.jpg

Review & corrections
How this space is used
Spotted a wrong value, an outdated procedure, a chip reference that does not match your board? Say so here, with what you observed (model, board revision, serial number, measurement). Every report is cross-checked against a source before anything changes — an unverifiable correction is published as “reported by …, not cross-checked” rather than silently applied.
Reading is open to everyone; posting requires signing in with Discord. Reports from the wiki's declared reviewers are handled first; anyone else's are read too, but go through a human before anything is changed.