Taito Vewlix¶
The reference modern LCD cabinet (2006): built for the Taito Type X2 and the Street Fighter IV / BlazBlue era, the Vewlix is the widescreen candy cab of 2010s fighting games. A 32″ wide LCD, glossy-black look.
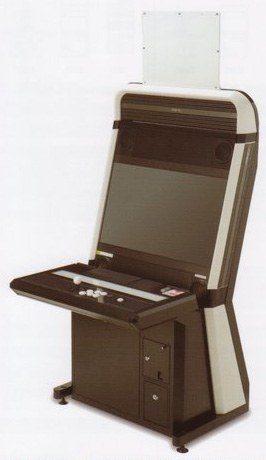
Identification¶
| Field | Value |
|---|---|
| Manufacturer | Taito |
| Year | 2006 → (original flyer dated 2006.09; the L's flyer is dated 2008.08) |
| Type | LCD candy cab (versus/fighting) |
| Screen | 32″ wide LCD (the manufacturer documents say only "32インチワイド") |
| Controls | 1 player: 1 joystick, panel drilled with 8 holes — 7 for buttons (上段4、下段3) + 1 for start. 6 game buttons fitted, the 7th blanked off with a ボタンカバー. Taito designates the whole thing 1J7B ⚠️ its "7B" counts the buttons supplied (start included), not the holes — see below |
| I/O | JVS and JAMMA depending on the kits fitted (Type X, NESiCAxLive, PC) |
⚡ Connector & power¶
| Aspect | Value |
|---|---|
| Connector | JVS and JAMMA, via optional kits on the Vewlix L — and the JAMMA kit requires the JVS power kit ⚠️ |
| Screen | 32″ wide LCD — 31 kHz required: a 15 kHz PCB will produce no picture at all |
| Power | AC 100 V (50/60 Hz) — 120 V US is common practice, not documented by Taito |
| Consumption | 270 W (rated), 2.9 A max — L manual, folio 7 |
| Dimensions, instruction panel included | 800 × 800 × 1890 mm (W×D×H) — L manual, folio 7 |
| Shipping dimensions | 800 × 525 × 1575 mm — L manual, folio 7 (table) and folio 8 (drawing) |
| Dimensions, cabinet alone | 800 × 800 × 1575 mm (W×D×H) — ⚠️ recomposed, no document dimensions this triplet |
| Control panel height | 710 mm |
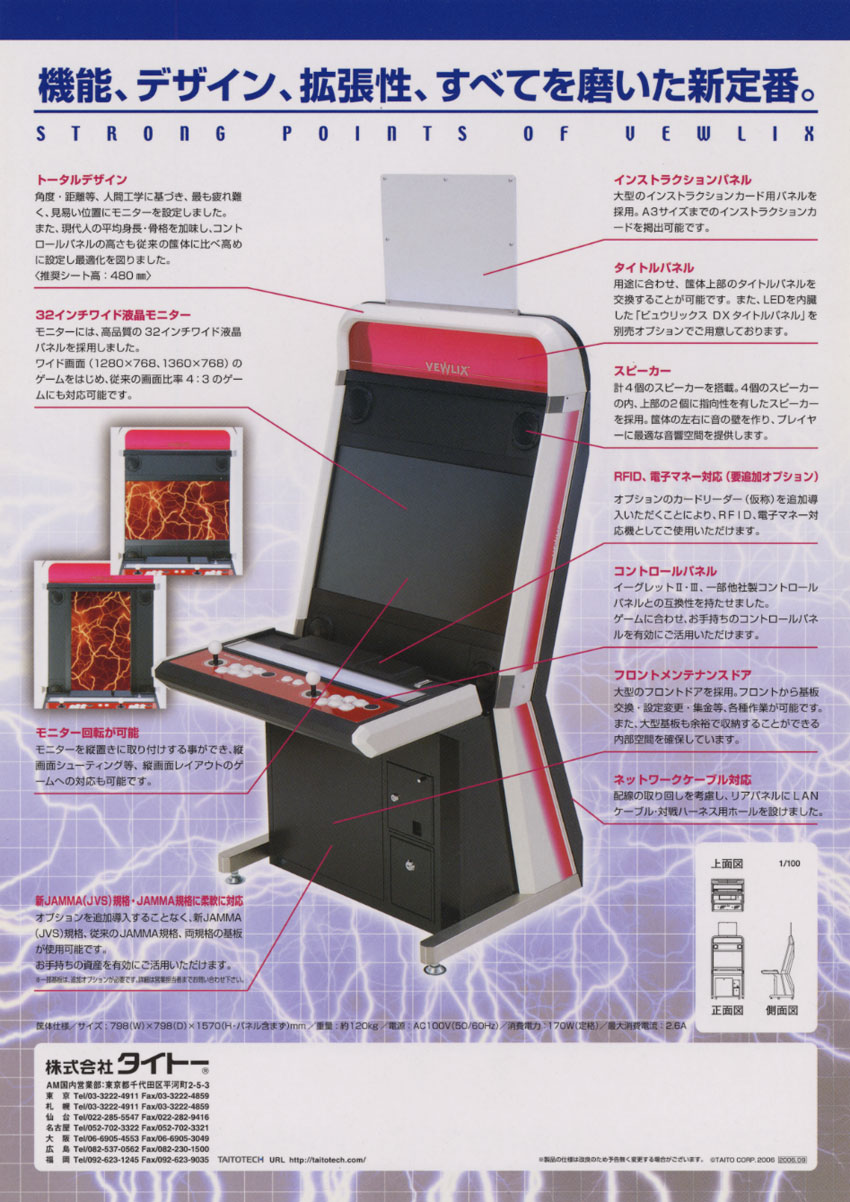
| Recommended seat height | 480 mm (推奨シート高, 2006 flyer) |
| Weight | ~105 kg (manual: 約105 kg) |
Read this first: “Vewlix” names several machines, and six documents
Everything below describes the Vewlix L, the cabinet whose manual this wiki archives. The other Vewlix have figures of their own:
| Vewlix 2006 (flyer) | Vewlix L (2008 flyer) | Vewlix L (2008 manual) | |
|---|---|---|---|
| Dimensions | 798 × 798 × 1570 (パネル含まず) | 798 × 798 × 1575 ⚠️ | 800 × 800 × 1890 panel fitted |
| Weight | ~120 kg | — | ~105 kg |
| Consumption | 170 W (rated) | — | 270 W (rated) |
| Max current | 2.6 A | — | 2.9 A |
⚠️ The L's flyer follows its 1,575 with a parenthesis — (H・インストラクションスペース…) — whose remainder is illegible on the only known scan, magnification included. So we cannot say whether its 1,575 is measured like the manual's. Nor is the 2 mm gap with the manual (798 against 800) arbitrated here: two Taito documents, two values.
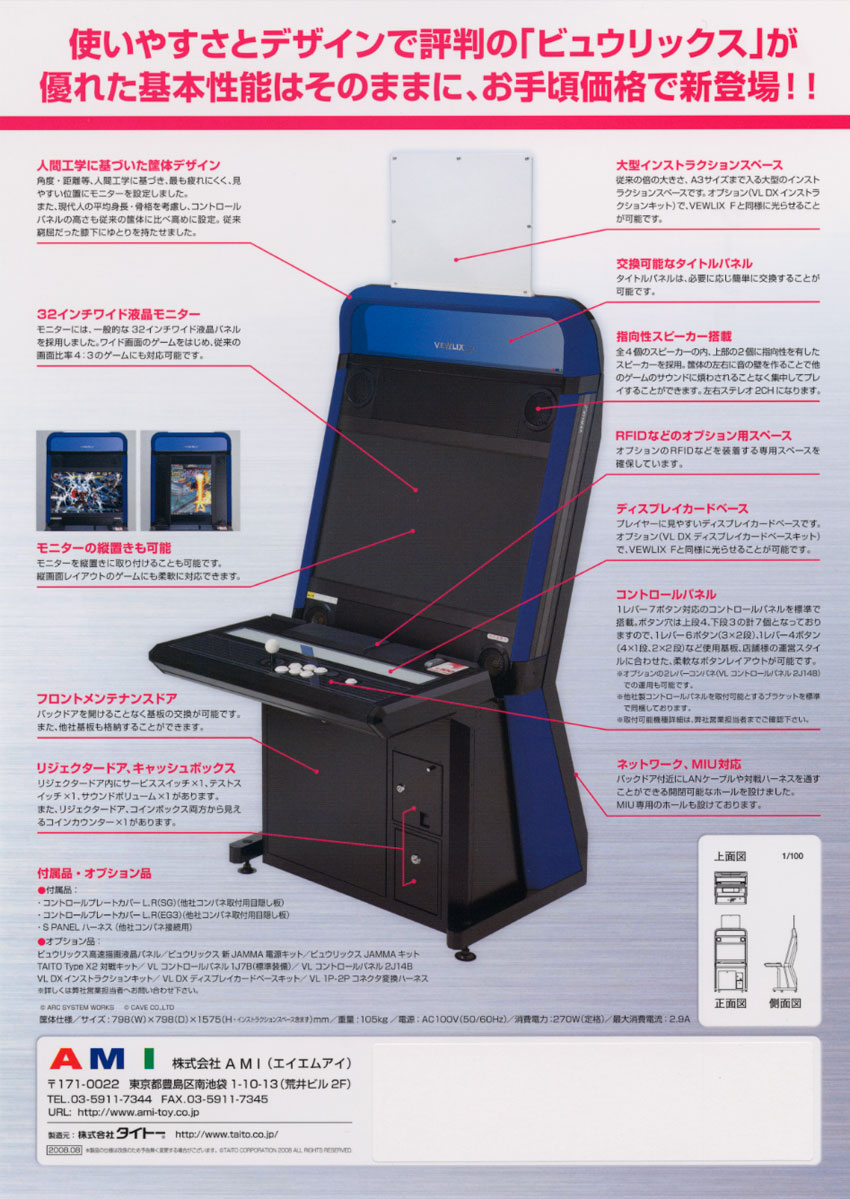
The manuals of the C, the F and the Diamond all carry the same figures as the L's — what separates them is weight and power draw, set out in what the manuals give, cabinet by cabinet.
Two documented figures, and a third one recomposed
This is the cabinet's trap. The L's manual publishes only two triplets, both in the 筐体仕様 table on folio 7:
| Figure | What the manual writes | State |
|---|---|---|
| 800 × 800 × 1,890 | 外形寸法(インストラクションパネル含む) | installed, instruction panel fitted |
| 800 × 525 × 1,575 | 外形寸法(搬入時) | as delivered |
| 800 × 800 × 1,575 | nothing ⚠️ | recomposed below |
The folio 8 drawing redraws the 搬入時, and only that: it dimensions 800 × 525 × 1,575. Folio 7 draws the 設置時: 800 × 800, control panel at 710.
The 800 × 800 × 1,575 is written nowhere: it is the 設置時 footprint (folio 7) set on the 搬入時 height (folio 8). This wiki adopts it, because it is the real state of very nearly every Vewlix in circulation — but you should know it is inferred.
What the manual does say about the word 搬入時, and what licenses the inference: the instruction panel is an accessory (folio 9, 付属品 list: インストラクションパネル — 液晶モニターに貼り付け, to be stuck onto the LCD), and the control panel arrives unmounted, bolted to two シッピングブラケット which §2-2-2 has you remove on installation. The two are fitted separately: hence 1,890 − 1,575 = 315 mm for the instruction panel alone, and 800 − 525 = 275 mm for the control panel alone. The footprint comparison uses 800 × 800 × 1,575.
No, the Vewlix does not draw less than a CRT candy cab
The L's manual gives, on folio 7 (筐体仕様 table), 270 W (rated) and 2.9 A. The Astro City, a CRT candy cab, draws 140 W according to its own manual. The screen saves power; the internal PC (Type X and its ATX supply) spends more — and it is the venue's wall socket that matters once you line several of them up.
It is a 1-player cabinet, and its panel is drilled with 8 holes
All four archived manuals give コントロールパネル: 1ジョイスティック… — a single joystick. The flyer photo confirms it: joystick and 6 buttons on the left, right half bare. Versus is played by pairing two cabinets (⚠️ inferred: the L's flyer lists a Type X2 対戦キット, a 1P-2P harness and a pass-through for the 対戦ハーネス, but no document says so in those words).
The panel carries 8 drillings, and it takes two documents to see it. The L's flyer counts the button holes: ボタン穴は上段4、下段3の計7個 — 4 upper, 3 lower, 7 in all. The start is not one of those seven: the manuals' drawings put it on its own, to the right and below the play cluster, in a drilling of its own. Hence 7 + 1 = 8**.
The 各部の名称 drawing in the F's manual (folio 6) shows the delivered state unambiguously: in the play cluster, six buttons drawn with their bodies, and a seventh circle left flat — the hole with no button in it. That seventh is closed off with the supplied ボタンカバー (付属品 list). A bare original panel shows those same eight drillings.
⚠️ Mind the trap of the two "sevens". The manuals' designations do not count holes — they count the buttons supplied:
| Archived manual | コントロールパネル line of the 製品仕様一覧 | Designation |
|---|---|---|
| Vewlix L (folio 7) | 1ジョイスティック・6ボタン | 1J7B |
| Vewlix C | 1ジョイスティック・6ボタン・スタートボタン | 1J7B |
| Vewlix F | 1ジョイスティック・6ボタン | 1J6B ⚠️ |
| Vewlix Diamond | 1ジョイスティック・6ボタン | 1J7B |
All four describe six game buttons. Only the designation moves, and it is the C's manual that spells out the key: 6 buttons + start button → 1J7B. Taito's 7th "B" is the start — not the seventh hole. The F writes 1J6B** for exactly the same Japanese line: it simply does not count the start.
So the flyer's 7 (button holes) and Taito's 7 (buttons supplied) land on the same number while naming different things, and the real panel has neither 7 nor 6 but 8 holes, 7 buttons supplied, 6 game buttons. That, and nothing else, is where the confusion over a Vewlix's buttons comes from — no Taito document announces eight, and yet eight drillings there are.
The option panel's name reads by the same rule: 2J14B, 2 ジョイスティック・14 ボタン (§4-3) — 7 per player. That two-joystick panel is therefore available as an option, and the 2006 flyer states that the panel accepts those of the Egret II and Egret 3, plus "some" third-party ones.
The L's manual never says so, but its accessory list (folio 10) proves it part by part: コントロールプレートカバー(EG3) blanking plates for an Egret 3 panel, (SG) plates and an S PANEL HARNESS explicitly marked 他社コンパネ接続用 — for connecting another maker's panel — and EG3・他社コントロールパネル固定用 bolts to fix them. The cabinet ships with the hardware for both cases.
⚠️ The two-joystick photo often seen is the 2006 flyer's.
JVS and JAMMA: entirely a matter of model
2006 Vewlix — both, with no option. The flyer heads a section 「新JAMMA(JVS)規格・JAMMA規格に柔軟に対応」: "without adding any option, JVS boards and conventional JAMMA boards can both be used", with its caveat — "※some boards require an additional option".
Vewlix L — two kits, and the second requires the first. Manual, §4-3: the 新JAMMA電源キット runs a JVS board; the JAMMAキット runs a JAMMA board, but "in a Vewlix L where the power kit is already fitted".
In other words: on the L, a bare cabinet accepts neither JVS nor JAMMA.
⚠️ Kit supply capacity (§4-3-2): 12 V 4 A · 5 V 10 A · 3.3 V 12 A. Never use a board requiring more — the manual speaks of 思わぬ事故, an accident.
⚠️ And the caveat Taito prints twice, under the folio 7 table and again at §4-3-2: "depending on the game board, the VEWLIX L may not display correctly" — and the remedy is to hand the board over to Taito for a custom adjustment, "chargeable where applicable". This is not something you settle at home.
No 15.75 kHz, and no fast panel as standard
§4-3-2: "本機は、モニター水平同期周波数15.75kHzに対応しておりません。ゲームボードの 設定で、31kHzに変更して接続してください。" — that is: "this machine does not support a 15.75 kHz monitor horizontal sync frequency. Set the game board to 31 kHz before connecting it."
A classic 15 kHz PCB will produce no picture, whatever kit is fitted. The panel accepts 1280 × 768 and 1360 × 768 (2006 flyer), plus classic 4:3.
And for fast games — shoot'em ups above all — Taito points to the optional ビュウリックス高速描画液晶パネル (fast-drawing LCD panel), in a note under the folio 7 table and again at §4-3. On a cabinet with a reputation for latency, that is a buying consideration.
(Sources: archived Taito Vewlix L service manual for the L's dimensions, consumption, current, weight and screen; archived 2006 Taito sales flyer for the original Vewlix's dimensions and consumption, the seat height, the JAMMA/JVS support and the control-panel compatibility. Arcade Otaku for the rest.)
→ Detailed wiring: a JVS and JAMMA cabinet → see JVS wiring, JAMMA wiring, the JVS I/O board (Taito JVS PCB Vewlix) and Control panels & buttons (Vewlix layout).
Technical notes¶
- 32″ wide LCD (no more CRT) → made for the 31 kHz of arcade PCs (Type X2/X3, NESiCAxLive). The Vewlix button layout became a worldwide standard (copied by many fightsticks and bartops).
- JVS I/O: connected to an arcade PC (Type X) via a JVS I/O board + dongle/NESiCA.
Vewlix variants¶
| Model | Positioning | Notable differences |
|---|---|---|
| Vewlix L | entry model | 720p screen, power button inside, 2 m cord |
| Vewlix F | premium model | JAMMA converter (I/O board), backlit instruction panel and marquee, front + rear power buttons, 3 m cord, Sanwa T32H075 (KA) 1080p panel |
| Vewlix C (Capcom) | Capcom commission, manual © 2008 (ref. G2002797A) | based on the F, launched for Street Fighter IV. ⚠️ The manual is titled simply VEWLIX: the "C" is a community designation |
| Vewlix VS | back-to-back dual screen | face-to-face design like Sega's VS City |
| Vewlix Diamond | current generation | Diamond Black panel, revised finishes. Shipped without an I/O board (order one to suit the PCB) |
What the manuals give, cabinet by cabinet¶
Four manuals are archived here. Their 製品仕様一覧 folio reads in columns:
| L | C | F | Diamond | |
|---|---|---|---|---|
| Figures, instruction panel fitted | 800 × 800 × 1,890 | 800 × 800 × 1,890 | 800 × 800 × 1,890 | 800 × 800 × 1,890 |
| Figures, 搬入時 (as delivered) | 800 × 525 × 1,575 | 800 × 525 × 1,575 | 800 × 525 × 1,575 | 800 × 525 × 1,575 |
| Control panel height | 710 | 710 | 710 | 710 |
| Weight (総質量) | ~105 kg | ~125 kg | ~125 kg | ~105 kg |
| Supply | AC 100 V | AC 100 V | AC 100 V | AC 100 V |
| Power (定格消費電力) | 270 W | 290 W | 290 W | 230 W ※ |
| Max current (最大消費電流) | 2.9 A | 4.28 A | 3.8 A | 2.7 A ※ |
| Panel | 1J7B | 1J7B | 1J6B | 1J7B |
⚠️ All four cabinets share exactly the same geometry — the same two triplets, the same 710. What changes is weight and power draw. And 800 × 800 × 1,575 is absent from all four: this cabinet's most useful figure is written in no document.
⚠️ The C and the F weigh the same and draw the same power, but not the same current: 4.28 A against 3.8 A for 125 kg and 290 W on both sides. Both manuals are archived here; this wiki does not arbitrate.
※ On the Diamond, the manual's ※1 note states that the 230 W and 2.7 A are the figures with NESiCAxLive fitted. The other manuals attach no such reservation to their numbers.
(⚠️ The "Vewlix VS" row is now the only one with no archived document: it comes from the Arcade Otaku forum. "FR" and "Sunred", seen here and there, appear in no archived document — which does not prove they do not exist.)
Why it matters
The Vewlix set modern versus ergonomics (screen distance, panel angle, button layout). It's the tournament cabinet for SF4/SFV/BlazBlue.
Common faults¶
| Symptom | Likely cause | Lead |
|---|---|---|
| No image | LCD panel / scaler board / PC | LCD diagnosis; check the Type X source |
| Dead controls | JVS I/O / harness | JVS diagnosis |
| Game won't launch | dongle / NESiCA (Type X) | See Type X |
| Power | PC/ATX brick + cab PSU | Check PSUs |
Procedure — a cabinet that will not start ✅¶
This cabinet is documented as 100 V
It does not go straight onto a European socket. It needs a step-down transformer rated for the whole cabinet, monitor included — not a travel adapter. Feeding 230 V to a cabinet built for 100 V destroys the supply, and usually the monitor with it. → Cabinet power
What this adds
Ordered for a cabinet, not for a board: mains, low-voltage supply, loom, monitor, then the game. The overwhelming majority of "dead cabinets" are dead for a reason that has nothing to do with the PCB — which is why the board comes last here.
1. Mains, and what sits between it and the cabinet. The switch, the fuse or breaker, the isolation transformer if there is one. A cabinet that shows no sign of life at all is almost never electronic.
2. The low-voltage supply — measured under load. Aim for +5 V where power reaches the board — the JAMMA edge, or the JVS power connector, depending on the cabinet — with the game running, not on an idle bench. If the supply has an adjustment (most candy and JVS bricks do; the ATX brick in a PC cabinet does not), do it then and not before: set off-load, it leaves a board that boots and then glitches. With no adjustment the measurement still earns its keep — it tells you whether the supply holds. Check +12 V too, and −5 V if the board uses it: many do not, and an ATX brick does not provide it. → Cabinet power
3. The loom and the connector. Reseat, and check the grounds — a cabinet with a poor ground gives rolling picture, phantom inputs and noise, all at once, and none of it looks like a wiring fault. Connector on this cabinet: JVS and JAMMA, via optional kits on the Vewlix L — and the JAMMA kit requires the JVS power kit ⚠️. → Wiring
4. The monitor. This page describes the monitor as: 32″ wide LCD (the manufacturer documents say only "32インチワイド"). LCD: no high voltage, but a backlight that fades and a panel that is a consumable. A black screen with sound is usually the backlight or its supply, not the panel.
5. Scan rate — the mismatch that breaks nothing. If the board's rate is not one the monitor accepts, you get no picture and nothing is faulty. Check what this cabinet takes against what the board puts out before opening anything. → Modernising a cabinet
6. The control panel. Microswitches and the loom, in that order. A single dead direction is a switch; a whole player dead is the loom or its ground. → Control panels
7. Coin mech and sound. Last, because they hide nothing: a mech that no longer registers is usually dirty or misadjusted, and silence with a good picture points at the amplifier and its supply rails.
Repair & modern use¶
Since the Vewlix hosts a PC (Type X): PC + LCD maintenance. Many are repurposed to host a standard PC / mini-PC (emulation, modern games) via a JVS-USB I/O board. See also the supergun page to plug JAMMA PCBs into it, and the Modernising a cabinet hub (video, JVS, PC/FPGA).
Documents (archived)¶
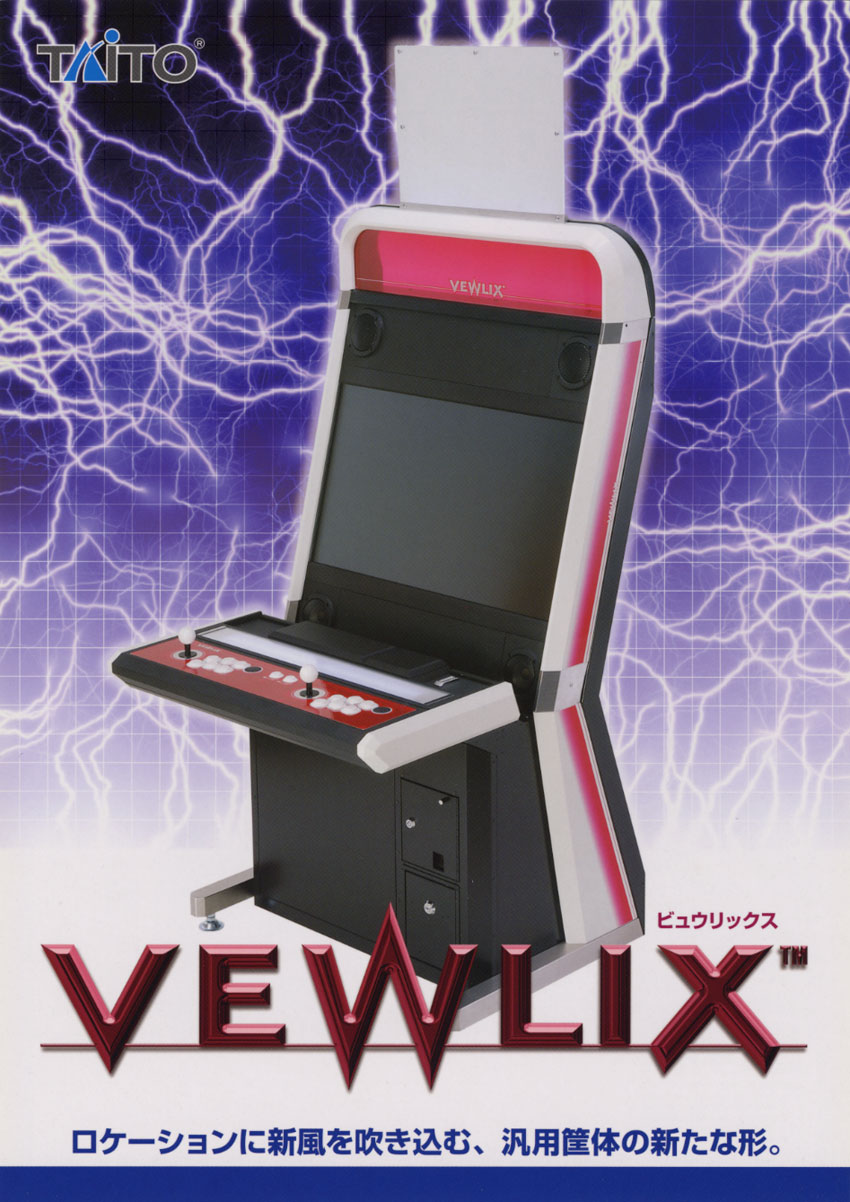
- 📄 Taito sales flyer (© TAITO CORP. 2006, print run 2006.09) — front · back, 筐体仕様 strip ← the original Vewlix's figures
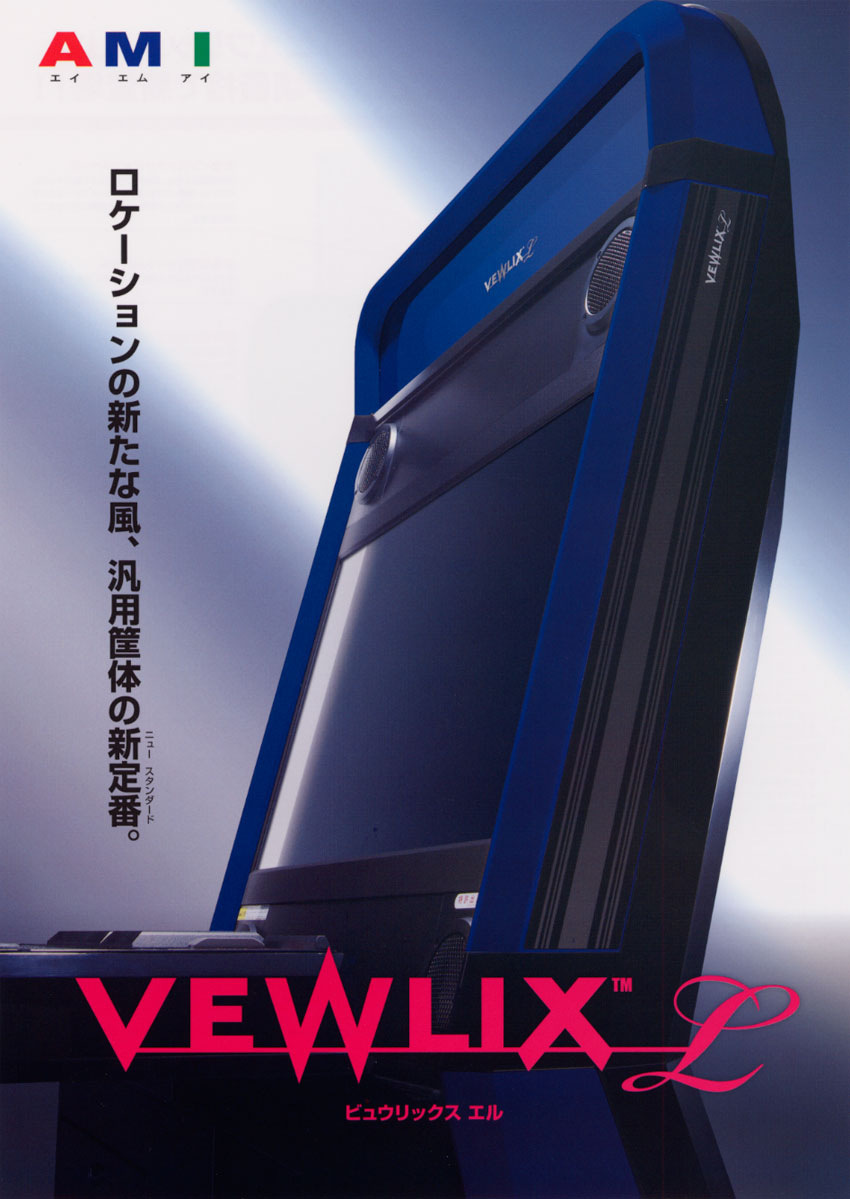
- 📄 Vewlix L sales flyer (print run 2008.08, © TAITO CORPORATION 2008) — front · back — issued by 株式会社AMI, with Taito appearing only as 製造元. It is the sole document giving the panel's 7 button holes (計7個) and the versus option list. It publishes 798 × 798 × 1,575, with a parenthesis ⚠️ illegible on this scan
- 📘 Vewlix C manual (PDF, 122 pp., JP) — 製品仕様一覧 and 外形寸法 on folio 7, 搬入時 drawing on folio 8
- 📘 Vewlix L manual — part 1 · part 2 · part 3 (PDF) — 製品仕様一覧, folio 7
- 📘 Vewlix F manual (PDF, 122 pp., JP) — 製品仕様一覧 on folio 7: 125 kg, 290 W, 3.8 A, and the panel written 1J6B ⚠️ the only one of the four not to count the start
- 📘 Vewlix Diamond manual (PDF, 116 pp., JP) — ビュウリックス ダイヤ, © TAITO 2010. 製品仕様一覧 on folio 7: 105 kg, 230 W, 2.7 A ⚠️ figures with NESiCAxLive fitted, plus the statement that the cabinet ships without an I/O board
(Sources: flyer via The Arcade Flyer Archive; L and C manuals via Arcade Otaku Wiki, F and Diamond manuals via Hard*Candy. Archived locally for preservation.)
Photos / assets¶
(To add: a close-up of a bare panel, where the 8 drillings can be counted.)
Repair & maintenance
LCD screen / PC base: PSU and board → Recap · diagnosis → PCB fault-finding.
Sources & attribution¶
- Taito — VEWLIX sales flyer, © TAITO CORP. 2006 (print run 2006.09), 筐体仕様 strip — archived here (front · back) — dimensions panel excluded, weight, consumption, maximum current, recommended seat height, JAMMA/JVS support and control-panel compatibility with the Egret II/3. Found via The Arcade Flyer Archive
- Taito — VEWLIX L 取扱説明書, ref. G2002813A, © TAITO CORP. 2008, archived here — folio 7: 筐体仕様 table (both triplets, 270 W, 2.9 A, 105 kg) and the 設置時 drawing (800 × 800, control panel at 710), plus both display caveats; folio 8: the 搬入時 drawing alone, 800 × 525 × 1,575; folio 9: the instruction panel as a stick-on accessory; folio 10: the EG3 blanking plates (Egret 3 and third-party panels); §2-2-2: the control panel delivered unmounted on シッピングブラケット; §4-3: the two JVS/JAMMA kits and the ビュウリックス高速描画液晶パネル option; §4-3-2: 15.75 kHz not supported and the supply capacity
- AMI / Taito — VEWLIX L sales flyer, print run 2008.08, © TAITO CORPORATION 2008, archived here (front · back) — the 7 button holes (計7個 ⚠️ start not included: the panel carries 8 in all), the versus options, and 798 × 798 × 1,575 ⚠️ parenthesis illegible on this scan
- Taito / Capcom — VEWLIX 取扱説明書 (Vewlix C), 122 pp., archived here — the same figures as the L (800 × 800 × 1,890 and 800 × 525 × 1,575, p. 9), plus the C's own specs (125 kg, 290 W, 4.28 A, ref. G2002797A). ⚠️ This PDF has no text layer: everything quoted from it was read off the rendered page. Source: Internet Archive
- Taito — VEWLIX F 取扱説明書, 122 pp., archived here — folio 7: 800 × 800 × 1,890 / 800 × 525 × 1,575, control panel at 710, 約125 kg, AC 100 V, 290 W, 3.8 A, 32″ wide, and the コントロールパネル line 1ジョイスティック・6ボタン written 1J6B — the only one of the four manuals not to count the start. ⚠️ This PDF has no text layer at all: everything quoted from it was read off the rendered pages. Via Hard*Candy
- Taito — ビュウリックス ダイヤ 取扱説明書 (Vewlix Diamond), 116 pp., © TAITO CORPORATION 2010, archived here — folio 7: the same two triplets and the same 710 as the other three, 約105 kg, AC 100 V, 230 W, 2.7 A ⚠️ the ※1 note states these two values are the ones with NESiCAxLive fitted; コントロールパネル 1ジョイスティック・6ボタン(1J7B). The same folio warns that some boards will not display correctly on the Diamond (adaptation possibly chargeable) and that the cabinet ships without an I/O board. ⚠️ This PDF's text layer is scrambled by a font shift; it was decoded and then cross-checked against the rendered page. Via Hard*Candy
- Arcade Otaku Wiki — Taito Vewlix (32″ LCD, JVS, layout, L/C/Diamond variants) — ⚠️ the Vewlix also accepts conventional JAMMA, contrary to what this page inferred — https://wiki.arcadeotaku.com/w/Taito_Vewlix
- Arcade Otaku (forum) / shmups system11 — Vewlix Cab Differences: L vs F (720p/1080p, JAMMA I/O, backlighting, cord), C (Capcom SF4), VS, Diamond — ⚠️ now the only source for the "VS" row; the F and Diamond rest on their manuals — https://forum.arcadeotaku.com/viewtopic.php?t=139
- Internal page: Taito Type X (the hosted PC)
Image:
-
vewlix-l-borne.jpg— catalogue view, source Hard*Candy (⚠️ no licence statement anywhere on the site) — https://www.hard--candy.com/wiki/candy/VewlixL
Review & corrections
How this space is used
Spotted a wrong value, an outdated procedure, a chip reference that does not match your board? Say so here, with what you observed (model, board revision, serial number, measurement). Every report is cross-checked against a source before anything changes — an unverifiable correction is published as “reported by …, not cross-checked” rather than silently applied.
Reading is open to everyone; posting requires signing in with Discord. Reports from the wiki's declared reviewers are handled first; anyone else's are read too, but go through a human before anything is changed.