Sammy Atomiswave
Sammy arcade platform (2003), based on the NAOMI / Dreamcast (SH-4 + PowerVR2) but with ROM cartridges. Guilty Gear XX, KOF NeoWave, Metal Slug 6, Demolition Derby… JVS for I/O. Cart-based → easy preservation.
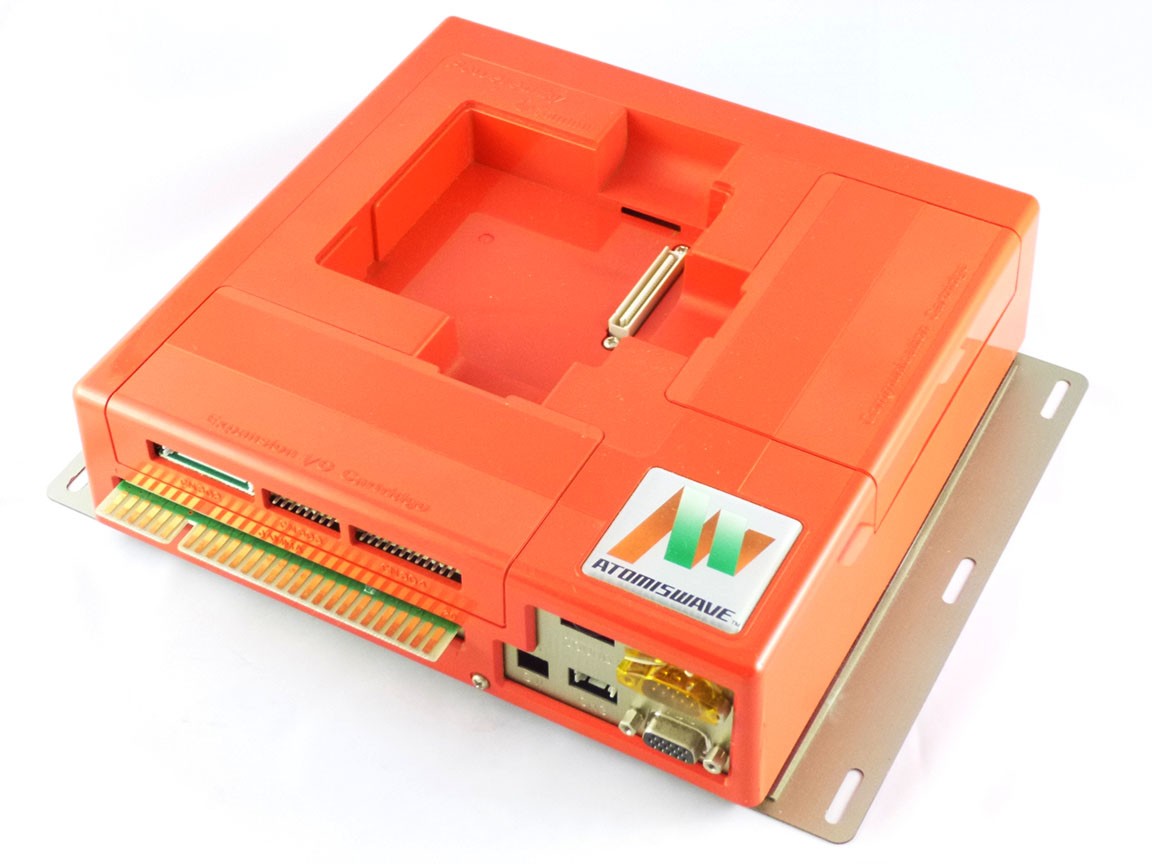
Identification
| Field | Value |
|---|---|
| Manufacturer | Sammy |
| Year | 2003 |
| Base | NAOMI / Dreamcast (SH-4, PowerVR2) |
| Media | ROM cartridge |
| I/O | JVS |
| Region | set at the BIOS |
Architecture (≈ NAOMI)
| Block | Chip | Clock | Role |
|---|---|---|---|
| CPU | Hitachi SH-4 | ~200 MHz | |
| GPU | PowerVR2 (CLX2) | same as NAOMI/Dreamcast | |
| Sound | ARM7 + AICA | ||
| Media | cartridge (mask ROM / flash), region at the BIOS |
→ Sammy's cost-reduced derivative of the NAOMI (2003). Same graphics family (SH-4 + PowerVR2). The game sits on an AW cartridge (flash / mask ROM) with a region key at the BIOS. Some cabinets handle the AW-NET network.
Sammy, the NAOMI… and the Sega merger
The Atomiswave is designed by Sammy to rival the NAOMI at lower cost — and, by an irony of history, Sammy bought Sega in 2004 (Sega Sammy). The very strong hardware kinship with the NAOMI/Dreamcast let the scene port many AW games to the Dreamcast / NAOMI (same SH-4/CLX2).
Notable games
Guilty Gear XX (variants), The King of Fighters NeoWave, NeoGeo Battle Coliseum, Samurai Shodown VI, Fist of the North Star (Hokuto no Ken), Metal Slug 6, The Rumble Fish 1/2, Dolphin Blue, Demolition Derby, Maximum Speed, Ranger Mission…
Security & preservation
- AW cartridge: region handled at the BIOS (key); trivial swap (no laser).
- Ports to NAOMI/Dreamcast: documented by the scene thanks to the hardware kinship — hence solid cross-preservation.
- Emulation: the Flycast / Demul emulators (NAOMI/Dreamcast lineage) run the Atomiswave; MAME supports it too. No FPGA/MiSTer core (SH-4 + PowerVR2 out of budget).
- Targeted recap depending on age; clean the cartridge contacts.
Common faults
| Symptom | Likely cause | Lead |
|---|---|---|
| Cartridge not read / corrupt graphics | Oxidised AW cartridge contacts | Clean the edge + slot |
| Won't boot / wrong region | BIOS region setting | Check the BIOS key/region |
| No sound | AICA (ARM7) | Sound-stage diagnosis |
| No image | Power, SH-4/PowerVR2, contacts | Base diagnosis (NAOMI/Dreamcast-like) |
Cart-based → easy preservation (no laser). A NAOMI/Dreamcast base: those machines' repair procedures largely apply.
Modernisation & mods
The common ground for every JAMMA board
Video, power, control panel and upscalers depend on the cabinet rather than the board: everything is centralised in Modernising a cabinet. To run the board outside a cabinet (at home, on a display): supergun.
- Storage 🟢: a cartridge system — the modern route is a multi-game cart / flashcart rather than reprogramming, where one exists for the platform → PCB preservation hub.
- Scan rate 📺: ~32.83 kHz / 61.7 Hz (same hardware base as Naomi) — high resolution (VGA class), ⚠️ a 31 kHz / tri-sync monitor is required; a 15 kHz chassis is incompatible → tri-sync and upscalers.
(Computed from the MAME sources —
sega/naomi.cpp— pixel clock ÷ htotal.) - FPGA / emulation: see the Emulation & FPGA section below.
Repair (technician)
- NAOMI / Dreamcast base (SH-4, PowerVR2): the same fault families as a NAOMI/DC (recap, RAM, GPU). ROM cartridge = simple swap, no laser.
- Encryption: encrypted games → key on the cartridge, not the board.
- Sound: AICA — diagnose the sound stage. Capacitors: recap PSU + audio.
→ Methods: PCB fault-finding · Recap · EPROM · Traces & vias
DIP settings ✅
2 games on this platform, settings extracted from the MAME sources (INPUT_PORTS_START blocks). The Position column gives the switch's physical reference on the board (SW2:!3,!4 = bank SW2, levers 3 and 4) — which is what lets you set it up without the paper manual. Games are sorted by MAME set name.
DIP settings — MAME set alpilota
| Setting | Position | Options (default in bold) |
|---|---|---|
| Monitor | SW1:1 | 31 kHz · 15 kHz |
DIP settings — MAME set naomi_mie
| Setting | Position | Options (default in bold) |
|---|---|---|
| Monitor | SW1:1 | 31 kHz · 15 kHz |
Check against your own board
These settings apply to the game and revision described by MAME. One title may have several DIP sets depending on region or revision, and some systems use soft-dips (settings in memory, via the test menu) rather than physical switches. In case of a discrepancy, the board's silkscreen and the test menu are authoritative.
See also: DIP reference · game manuals
Procedure — a dead board, step by step ✅
What this adds
The general method lives in PCB diagnosis. This is its application to this platform: the same order, but with the values actually expected here, so you do not have to go back and forth.
Tools: multimeter, oscilloscope (or frequency counter), current-limited bench supply, desoldering braid. → Tooling
If the board is still in a cabinet
A CRT holds its charge with the machine unplugged. → CRT safety
1. Inspection, power off. Corrosion, cut tracks, oxidised EPROM legs, leaking SMD capacitors, dubious earlier repairs.
2. The connector, before anything else. A large share of "dead boards" are a contact problem, not a fault. Clean the contacts with isopropyl alcohol and reseat — not with an abrasive eraser on a gold edge, which takes the plating off and brings the problem back worse. It costs two minutes and settles the question.
3. Power, measured on the board. Aim for +5.0 V measured as close as possible to where power reaches the board — not at the PSU output: the drop is in the loom, and that is exactly what makes a board boot on the bench and not in the cabinet. Where you probe depends on this board's connector — JAMMA edge, JVS loom or a proprietary harness — plenty of makers kept one long after JAMMA arrived — see Identification above. → Wiring Check −5 V and +12 V too if the sound stage uses them. Suspected short: bring it up current-limited and find the hot spot.
4. /RESET. It must release after power-up. Held low = the CPU never starts. A 1–2 Hz loop is not the reset circuit, it is the watchdog: the CPU is crashing at boot, so look at the bus, not at the reset.
5. Clocks. There is no measurement table for this platform — MAME's sources yield nothing usable for it. Any frequency quoted under Architecture on this page serves as a marker; otherwise compare against a working board rather than against a number: an invented value condemns healthy parts. → PCB diagnosis
6. Bus. Activity on the main CPU's address lines tells you whether it is running or frozen. Frozen with good clocks and good reset → work RAM, bus buffers, ROMs.
7. It boots but the picture or the sound is wrong — that is another job: see Common faults on this page, then signal tracing.
Photos / assets
(To add: Atomiswave board, cartridge, JVS I/O.)
Sources & attribution
- Wikipedia — Atomiswave — CC-BY-SA — https://en.wikipedia.org/wiki/Atomiswave
- System16 — Sammy Atomiswave Hardware — to reference
Image:
-
atomiswave.jpg— Black Squirrel, CC BY 4.0 — https://commons.wikimedia.org/wiki/File:Atomiswave.jpg

Review & corrections
How this space is used
Spotted a wrong value, an outdated procedure, a chip reference that does not match your board? Say so here, with what you observed (model, board revision, serial number, measurement). Every report is cross-checked against a source before anything changes — an unverifiable correction is published as “reported by …, not cross-checked” rather than silently applied.
Reading is open to everyone; posting requires signing in with Discord. Reports from the wiki's declared reviewers are handled first; anyone else's are read too, but go through a human before anything is changed.