Triforce (Sega / Nintendo / Namco)
A rare joint venture (2002): Sega + Nintendo + Namco around a GameCube motherboard (Japanese DOL-001) + a NAOMI-style media system. Mario Kart Arcade GP, F-Zero AX, Virtua Striker… Long hard to preserve — until Triforce support in Dolphin.
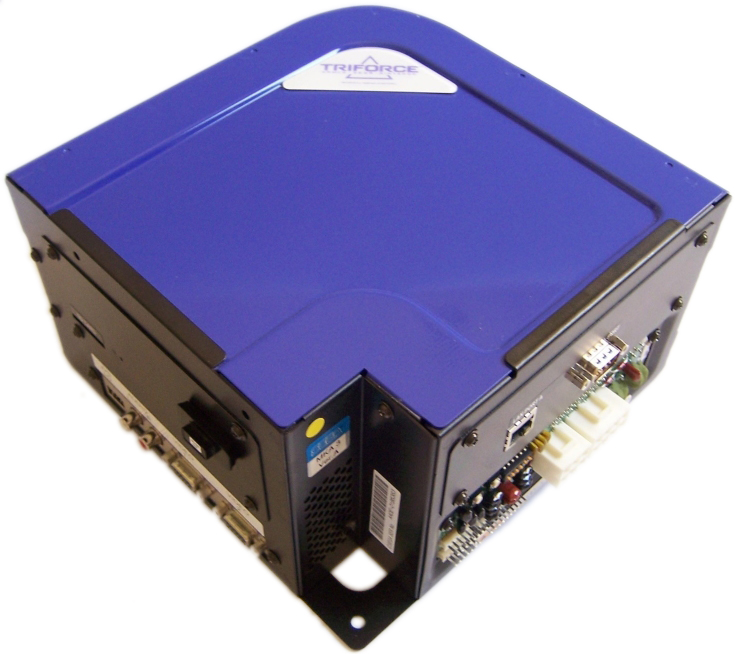
Identification
| Field | Value |
|---|---|
| Manufacturers | Sega + Nintendo + Namco (joint venture) |
| Year | 2002 |
| Base | Nintendo GameCube (NTSC-J DOL-001 motherboard, modified IPL) |
| Media | GD-ROM (DIMM variant) loaded into RAM; cartridge variants |
| I/O | JVS |
Architecture (≈ GameCube)
| Block | Chip | Role |
|---|---|---|
| CPU | PowerPC Gekko | GameCube base |
| GPU | ATI/ArtX Flipper | 3D rendering |
| Media | media board (DIMM) + GD-ROM | data loaded into RAM on first boot |
| Boot | modified IPL (arcade) | starts the arcade system |
| I/O | JVS | arcade controls |
Most games target the DIMM variant: the game ships on GD-ROM and loads into RAM on first boot. Sega designed the board to reuse its arcade GD-ROM drives (a generic SCSI connector, like NAOMI/Chihiro).
Security & preservation
- Media board (DIMM): hardware pairing + battery, logic close to the NAOMI.
- Emulation: Dolphin (the GameCube/Wii emulator) has added Triforce support — a major advance, preservation directly benefiting from the GameCube ecosystem.
- Priority: image the GD-ROMs and back up the media board's data.
Notable games
Mario Kart Arcade GP (1/2, with Namco/Bandai), F-Zero AX (2003), Virtua Striker 2002 / Virtua Striker 4, Gekitou Pro Yakyuu, The Key of Avalon (1/2)…
The F-Zero AX ↔ GX bridge
F-Zero GX (GameCube) and F-Zero AX (Triforce) are twins: plugging a GameCube controller + memory card into an AX cabinet unlocks content in GX (and vice versa) — a perfect illustration of the hardware kinship.
Four manufacturer manuals, and what they establish ✅
✅ The first manufacturer figures on this page
ⓘ This page described the platform without a single dimension. Four manuals are archived here — two publishers, three cabinets and one kit:
| Document | Publisher | Reference |
|---|---|---|
| F-Zero AX, Standard Version, Owner's Manual | Sega Amusements USA | 999-1930, game code FZR, 1st printing Sept. 2003 |
| Virtua Striker 4, kit manual | Sega | 2004 |
| Mario Kart Arcade GP, Operator's Manual | Namco Europe | — |
| Mario Kart Arcade GP 2, Operator's Manual | Namco Europe | — |
ⓘ The Namco manuals are European and multilingual (English, German, Danish…), the Sega one is American: the first states millimetres and kilos, the second inches and pounds.
✅ Three cabinets, and a conversion that brings the extremes together
| F-Zero AX (Standard) | Mario Kart Arcade GP | Mario Kart Arcade GP 2 | |
|---|---|---|---|
| Stated footprint | 72 × 90 in (1,829 × 2,286 mm, this wiki's calculation) | — | — |
| Assembled cabinet | 39 × 68.5 × 77 in (991 × 1,740 × 1,956 mm) | 1,760 × 1,750 × 2,050 mm | 870 × 1,620 × 1,943 mm |
| Weight | 580 lbs (263 kg) | 495 kg | 260 kg |
| Power | 600 W, 5 A at AC 120 V 60 Hz | 230 V, 500 W | 230 V, 340 W |
| Monitor | Sanwa 29E31S (Sega 998-0162, chassis 998-0161) | "Pantranic 29" Flat Screen" | Sanwa 29″ Flat Screen |
| Operating temperature | — | +5 to +25 °C | +5 to +25 °C |
⚠️ The Mario Kart GP is a two-seat cabinet: 1,760 mm wide, and its breakdown says so — 369 kg for the monitor cabinet, 53 kg per seat, 20 kg for the header. ⓘ 369 + 2 × 53 + 20 = 495 kg (this wiki's calculation): the total adds up.
ⓘ The GP 2 went back to a single seat — 870 mm wide, 260 kg — and draws 160 W less. ⚠️ At 263 kg against 260, the F-Zero AX and the GP 2 match to the kilo, though one is stated in pounds and the other in kilos.
ⓘ The F-Zero AX's Sanwa 29E31S chassis is the one this wiki already records on the NAOMI Universal: Sega reused the same monitor from one platform to the next.
⚠️ A GameCube main board, but a cell and a chip decide everything
The F-Zero AX manual details the board, and two parts command the rest.
- The key chip: "With the key chip installed, the TRIFORCE board becomes a proprietary game board for this product". ⓘ It is what ties a Triforce to a given game — the same logic as on the NAOMI.
- The battery: a CR2032, Sega part 401-0065, at the very bottom of the main board, under a cover held by 5 M3×6 screws. Fitted + terminal upward.
⚠️ And the warning worth reading twice:
"If an error appears indicating that the battery power is very low within the first year of use, it is usually an indication of a problem or abnormality with something other than the battery. Be sure to inspect the board that the battery is connected to."
ⓘ In other words: a cell reported flat too early accuses the board, not the cell. ✅ Replacing the battery without looking further means doing it again a year later.
ⓘ Part numbers recorded: assembly 842-02DD511U (ASSY TRF FZR USA), main board 842-00A0000U (USA) or 842-00A0000E (export), DIMM media board 842-00FD0000.
ⓘ What the Triforce requires of the cabinet
The Virtua Striker 4 kit manual sets the conditions, and they are short:
- a JVS cabinet — "Use the TRIFORCE in a cabinet that supports JVS";
- a 15 kHz or 31 kHz monitor: "Cabinets using monitors and projectors not compatible with 15/31 kHz cannot be used";
- the original shield case: without it, "electrical interference may be produced".
ⓘ The manual also restates the distinction this wiki uses throughout: JVS for the serial standard, "old JAMMA standards" for the 56-pin edge.
⚠️ Maintenance: what the card reader demands, and which exists nowhere else here
The F-Zero AX periodic inspection table follows Sega's usual rhythm — monthly for potentiometers and switches, trimonthly for gear mesh, greasing and coin selector cleaning, annually for the power cord. ⓘ The seat has a line of its own: rail greasing every three months, seat pushed fully back, then a few passes to spread the grease.
⚠️ But one line stands out: "CARD READER/WRITER — Head cleaning — Every 151 counts of the card reader/writer or Daily". ⓘ A head cleaning every 151 cards, or daily. The figure is reproduced as printed.
ⓘ The cards are a consumable: CARD PACKAGE FZR ENG (601-11334-01) in 200 magnetic cards, and cleaning cards (601-11050) in 30. ⚠️ Neither comes with the cabinet — the manual states they are ordered separately.
ⓘ Up to four cabinets networked, and 70 cm between them
"Up to 4 machines can be linked for network play." ⚠️ And the manual imposes a distance, for safety rather than for the cable: "be sure to secure space in excess of 70 cm between the machines", the drawing adding 200 mm of clearance.
ⓘ As with the Sega cabinets already documented here, the instruction is to provide each machine's current — power is not shared.
Faults & repair
GameCube-class hardware → GameCube repairs apply + arcade specifics:
| Symptom | Likely cause | Lead |
|---|---|---|
| Won't boot | media/DIMM board, battery, IPL | Media-board diagnosis; image |
| GD not read | Worn GD-ROM drive | Repair/image; SD solutions |
| Reboots | PSU capacitors | Recap |
| Dead controls | JVS I/O / harness | JVS diagnosis |
Modernisation & mods
The common ground for every JAMMA board
Video, power, control panel and upscalers depend on the cabinet rather than the board: everything is centralised in Modernising a cabinet. To run the board outside a cabinet (at home, on a display): supergun.
- Battery 🟢: a save battery is fitted (settings/counters/RTC). A leaking battery corrodes traces — check and replace it before it leaks → save batteries.
- Optical storage 🟡: the drive is the number-one wear part. Modern routes: an ODE, netboot, or replacement by flash storage depending on the platform → PCB preservation hub.
- Scan rate 📺: derived from a home console (see the architecture above): 480i/480p output, i.e. ~15.7 kHz interlaced and ~31.5 kHz progressive. ⚠️ A 15 kHz chassis only covers the interlaced mode — plan for a tri-sync. (Derived from the platform, not measured from MAME.) → tri-sync and upscalers.
- FPGA / emulation: see the Emulation & FPGA section below.
Repair (technician)
- GameCube base (DOL-001): the same faults as a GameCube (recap, PSU, DOL chip).
- DIMM board: content loaded into RAM on first boot (battery → reload); media board.
- GD-ROM: drive/laser → ODE mods.
- Capacitors: recap.
→ Methods: PCB fault-finding · Recap · Backup batteries · Traces & vias
Procedure — a dead board, step by step ✅
What this adds
The general method lives in PCB diagnosis. This is its application to this platform: the same order, but with the values actually expected here, so you do not have to go back and forth.
Tools: multimeter, oscilloscope (or frequency counter), current-limited bench supply, desoldering braid. → Tooling
If the board is still in a cabinet
A CRT holds its charge with the machine unplugged. → CRT safety
1. Inspection, power off. Corrosion, cut tracks, oxidised EPROM legs, leaking SMD capacitors, dubious earlier repairs.
2. The connector, before anything else. A large share of "dead boards" are a contact problem, not a fault. Clean the contacts with isopropyl alcohol and reseat — not with an abrasive eraser on a gold edge, which takes the plating off and brings the problem back worse. It costs two minutes and settles the question.
3. Power, measured on the board. Aim for +5.0 V measured as close as possible to where power reaches the board — not at the PSU output: the drop is in the loom, and that is exactly what makes a board boot on the bench and not in the cabinet. Where you probe depends on this board's connector — JAMMA edge, JVS loom or a proprietary harness — plenty of makers kept one long after JAMMA arrived — see Identification above. → Wiring Check −5 V and +12 V too if the sound stage uses them. Suspected short: bring it up current-limited and find the hot spot.
4. /RESET. It must release after power-up. Held low = the CPU never starts. A 1–2 Hz loop is not the reset circuit, it is the watchdog: the CPU is crashing at boot, so look at the bus, not at the reset.
5. Clocks. There is no measurement table for this platform — MAME's sources yield nothing usable for it. Any frequency quoted under Architecture on this page serves as a marker; otherwise compare against a working board rather than against a number: an invented value condemns healthy parts. → PCB diagnosis
6. Bus. Activity on the main CPU's address lines tells you whether it is running or frozen. Frozen with good clocks and good reset → work RAM, bus buffers, ROMs.
7. It boots but the picture or the sound is wrong — that is another job: see Common faults on this page, then signal tracing.
Emulation & FPGA
- Emulation: Dolphin (Triforce support) — the preservation route.
- FPGA / MiSTer: no core (a full GameCube, out of budget).
- → Preservation & modernisation (GD-ROM/netboot, no-battery).
Lineage
A console-based cousin of the Chihiro (Xbox); on the console side, see the GameCube. Contemporary with the NAOMI.
Photos / assets
(To add: Triforce board, media/DIMM board, GD-ROM drive, JVS I/O.)
Sources & attribution
- Sega Amusements USA — F-Zero AX Standard Version, Owner's Manual, 999-1930, 174 pp. — archived PDF — specifications, dimensions and weights table, card reader, periodic inspection, game board and battery, network play
- Sega — Virtua Striker 4, Triforce kit manual, 48 pp. — archived PDF — cabinet requirements (JVS, 15/31 kHz, shield case)
- Namco Europe — Mario Kart Arcade GP, Operator's Manual, 93 pp. — archived PDF — specifications and weight breakdown
- Namco Europe — Mario Kart Arcade GP 2, Operator's Manual, 111 pp. — archived PDF — specifications
- Arcade Otaku — Triforce (GameCube DOL-001 base, DIMM + GD-ROM, JVS, games) — https://wiki.arcadeotaku.com/w/Triforce
- Image:
triforce-hardware.jpg— Black_Squirrel at SegaRetro, CC BY 4.0, via Wikimedia Commons - Dolphin — Rise of the Triforce (Triforce support in the emulator) — https://dolphin-emu.org/blog/
- Internal page: GameCube

Review & corrections
How this space is used
Spotted a wrong value, an outdated procedure, a chip reference that does not match your board? Say so here, with what you observed (model, board revision, serial number, measurement). Every report is cross-checked against a source before anything changes — an unverifiable correction is published as “reported by …, not cross-checked” rather than silently applied.
Reading is open to everyone; posting requires signing in with Discord. Reports from the wiki's declared reviewers are handled first; anyone else's are read too, but go through a human before anything is changed.