Sammy Atomiswave SD
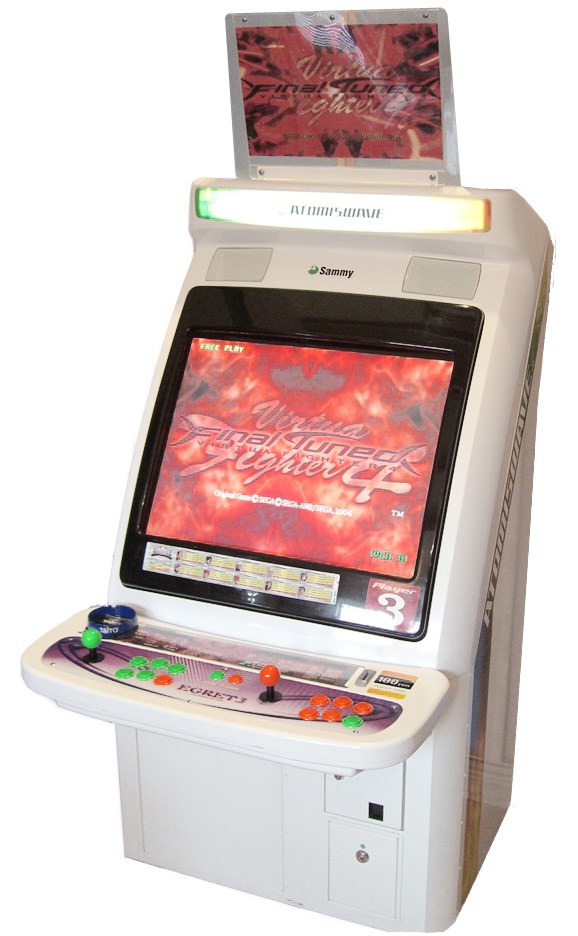
Sammy's dedicated candy cab for its Atomiswave system (2003). A neat industrial trick: it reuses the Taito Egret 3 shell under licence, with a Wei-Ya monitor and power supply. "SD" = Standard.
Identification
| Field | Value |
|---|---|
| Manufacturer | Sammy |
| Year | 2003 |
| Type | Candy cab (licensed Egret 3 shell) |
| Screen | 29″ CRT tri-sync 15/24/31 kHz (Wei-Ya M3192D chassis), rotatable |
| Controls | 1L6B panel + memory-card reader (default); 2L12B Egret 3 possible |
| PCB format | JAMMA + half-JVS |
⚡ Connector & power
| Aspect | Value |
|---|---|
| PCB connector | JAMMA (56-pin edge) + half-JVS |
| Monitor sync | tri-sync 15/24/31 kHz (29″ CRT, Wei-Ya M3192D chassis), rotatable |
| Power | Wei-Ya P271 brick (3.3 V / 5 V / 12 V), 100 V AC (Japan) |
| Naomi | native JAMMA → for a pure Naomi/JVS, add a JVS I/O converter (Capcom/Sega) |
| Dimensions, instruction panel included | 750 (幅) × 903 (奥行き) × 1765 (高さ) mm — Sammy manual, folio 1 |
| Dimensions, cabinet only | 750 × 903 × 1450 mm (W×D×H) — Sammy manual, folio 1: インストラクションパネル無し:高さ1450mm |
| Power draw | 140 W (定格消費電力), 2.0 A (最大電流) — Sammy manual |
| Weight | 110 kg (Sammy manual) ⚠️ 102 kg at Arcade Otaku — see below |
| Operating conditions | 10 to 30 °C, 30 to 70 % RH, no condensation — Sammy manual |
The Sammy manual has been found, and it settles it
This page long published the Egret 3's figures for want of a Sammy document, saying that the manual would be what settled it. It is now archived here (63 pp., October 2003), and its folio 1 gives directly:
外形寸法: 幅750 mm × 奥行き903 mm × 高さ1765 mm(インストラクションパネル無し:高さ1450 mm)
Three consequences, two of which correct this page:
| Point | What the page said | What the manual writes |
|---|---|---|
| Height, panel included | 1764 mm (Taito Egret 3 flyer), with "the stray 1765" dismissed for want of a source | 1765 mm ⚠️ the 1765 was right |
| Weight | 102 kg (Arcade Otaku) | 110 kg |
| Height, cabinet only | 1,450 | 1,450 ✅ confirmed |
⚠️ The 1764 mm and the 1765 mm are not arbitrated: they are two manufacturer documents, a Taito flyer for the Egret 3 and a Sammy manual for the Atomiswave SD. One millimetre apart on a shared shell has no documented explanation here.
⚠️ Nor are the 102 kg and the 110 kg — but they do not carry the same weight as sources: the 110 comes from the manufacturer, the 102 from a community wiki.
What the manual makes redundant. This page previously leaned on Arcade Otaku's dimension drawing — whose filename brings together Egret 2, Egret 3 and Atomiswave SD — to decide which of the two numbers was the width. The Sammy manual labels them itself (幅 750, 奥行き 903), so the drawing no longer has to arbitrate. ⚠️ Arcade Otaku's infobox still reads "903 x 750 x 1450" without saying which is which: do not copy it in that order.

The manual says who builds the cabinet
Folio 1 ends on three lines of contacts, and the last one settles the shell question: 総販売元 サミー株式会社 (distributor: Sammy) · サービス サミー株式会社 · 製造元 株式会社タイトー — manufacturer: Taito.
This wiki wrote "licensed Egret 3 shell" by inference. The document says neither "licence" nor "Egret 3", but it does say in plain terms that the machine is built by Taito — which is the documented half of the inference. The dimensions shared with the Egret 3 do the rest, and remain an inference.
(Addresses and phone numbers dated 2003年10月現在 — October 2003, which dates the document.)
(Sources: archived Sammy manual for the dimensions, weight, power draw and manufacturer. Arcade Otaku for the screen, PSU and wiring — ⚠️ their infobox lists depth first without declaring it, and its weight differs from the manual.)
→ Detailed wiring: JAMMA (+ half-JVS) → JAMMA wiring, JVS wiring, JVS I/O boards (converter for Naomi) and Control panels.
Technical notes
- Egret 3 shell: same cabinet-only height (1,450 mm, confirmed by the Sammy manual), same 750 × 903, same panel bay. Egret II / Egret 3 panels and — with adaptation — Sega Astro/Blast/Naomi panels fit the housing.
- Wei-Ya M3192D tri-sync 29″ monitor (15/24/31 kHz), rotatable for vertical games — as on the Egret 3.
- Wei-Ya P271 PSU: supplies 3.3 V (on top of 5 V / 12 V) — handy for modern JVS systems.
- I/O: mostly JAMMA with some JVS. The Atomiswave itself is a Sammy Naomi-class system; to run a genuine Naomi board over JVS you need a JVS I/O converter.
- Dedicated memory-card reader on the stock 1L6B panel (save data for some Atomiswave games).
- JIS screws.
Common faults
| Symptom | Likely cause | Lead |
|---|---|---|
| Unstable image / geometry | Wei-Ya M3192D chassis, recap | Adjust + recap |
| No power | Wei-Ya P271 brick | Check 3.3 / 5 / 12 V |
| Naomi won't boot | no JVS conversion | Add a JVS I/O converter (Capcom/Sega) |
| JAMMA contacts | oxidation | Clean the edge connector |
Procedure — a cabinet that will not start ✅
There is a CRT in this cabinet
The tube stays charged with the cabinet unplugged, and the anode cap is the first thing your hand meets behind the monitor. Discharge it, work with one hand, and never alone if you can help it. → CRT safety
This cabinet is documented as 100 V
It does not go straight onto a European socket. It needs a step-down transformer rated for the whole cabinet, monitor included — not a travel adapter. Feeding 230 V to a cabinet built for 100 V destroys the supply, and usually the monitor with it. → Cabinet power
What this adds
Ordered for a cabinet, not for a board: mains, low-voltage supply, loom, monitor, then the game. The overwhelming majority of "dead cabinets" are dead for a reason that has nothing to do with the PCB — which is why the board comes last here.
1. Mains, and what sits between it and the cabinet. The switch, the fuse or breaker, the isolation transformer if there is one. A cabinet that shows no sign of life at all is almost never electronic.
2. The low-voltage supply — measured under load. Aim for +5 V where power reaches the board — the JAMMA edge, or the JVS power connector, depending on the cabinet — with the game running, not on an idle bench. If the supply has an adjustment (most candy and JVS bricks do; the ATX brick in a PC cabinet does not), do it then and not before: set off-load, it leaves a board that boots and then glitches. With no adjustment the measurement still earns its keep — it tells you whether the supply holds. Check +12 V too, and −5 V if the board uses it: many do not, and an ATX brick does not provide it. → Cabinet power
3. The loom and the connector. Reseat, and check the grounds — a cabinet with a poor ground gives rolling picture, phantom inputs and noise, all at once, and none of it looks like a wiring fault. Connector on this cabinet: JAMMA + half-JVS. → Wiring
4. The monitor. This page describes the monitor as: 29″ CRT tri-sync 15/24/31 kHz (Wei-Ya M3192D chassis), rotatable. CRT: no picture but the tube is warm and there is EHT — that is sync or video, not the tube. No EHT at all — chassis. A picture that shrinks, wanders or shifts colour is a chassis recap, and on these monitors that is a scheduled job, not a repair.
5. Scan rate — the mismatch that breaks nothing. If the board's rate is not one the monitor accepts, you get no picture and nothing is faulty. Check what this cabinet takes against what the board puts out before opening anything. → Modernising a cabinet
6. The control panel. Microswitches and the loom, in that order. A single dead direction is a switch; a whole player dead is the loom or its ground. → Control panels
7. Coin mech and sound. Last, because they hide nothing: a mech that no longer registers is usually dirty or misadjusted, and silence with a good picture points at the amplifier and its supply rails.
Repair
- Recap + adjustments of the Wei-Ya M3192D chassis (like the Nanao MS9 principle).
- Wei-Ya P271 PSU: service like a candy cab PSU.
- Shell parts: interchangeable with the Taito Egret 3.
Photos / assets
(To add: Atomiswave SD, 1L6B panel + card reader, Wei-Ya monitor.)
Repair & maintenance
Modernise (video, PSU, JVS, upscaler, PC/FPGA) → Modernising a cabinet. CRT monitor (discharge HV!) → CRT safety (Nanao MS8/MS9 or equivalent chassis) · recap → Recap · diagnosis → PCB fault-finding.
Sources & attribution
- Sammy / Taito — ATOMISWAVE SD CABINET 取扱説明書, 63 pp., October 2003, archived here — folio 1: 外形寸法 750 × 903 × 1765 mm(インストラクションパネル無し:高さ 1450 mm), 重量 110 kg, 定格電圧 AC100V 50/60Hz, 定格消費電力 140 W, 最大電流 2.0 A, 使用条件 10–30 °C / 30–70 % RH, and the three contact lines including 製造元 株式会社タイトー. ⚠️ This PDF has no text layer: everything quoted from it was read off the rendered page. Via Hard*Candy
- Arcade Otaku Wiki — Sammy Atomiswave SD (2003, 29″ tri-sync Wei-Ya M3192D, Wei-Ya P271 PSU, JAMMA/half-JVS, 750×903×1450 mm, 102 kg, licensed Egret 3 shell, 1L6B panel + card reader) — https://wiki.arcadeotaku.com/w/Sammy_Atomiswave_SD
- Arcade Otaku Wiki — Taito Egret 3 (shared original shell) — https://wiki.arcadeotaku.com/w/Taito_Egret_3
- Internal pages: Taito Egret 3 · JVS I/O boards
Image:
-
atomiswave-sd-borne.jpg— catalogue view, source Hard*Candy (⚠️ no licence statement anywhere on the site) — https://www.hard--candy.com/wiki/candy/AtomiswaveSD
Review & corrections
How this space is used
Spotted a wrong value, an outdated procedure, a chip reference that does not match your board? Say so here, with what you observed (model, board revision, serial number, measurement). Every report is cross-checked against a source before anything changes — an unverifiable correction is published as “reported by …, not cross-checked” rather than silently applied.
Reading is open to everyone; posting requires signing in with Discord. Reports from the wiki's declared reviewers are handled first; anyone else's are read too, but go through a human before anything is changed.