Sega New Versus City¶
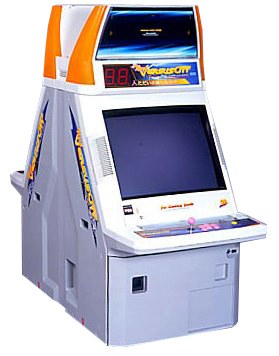
A 1996 revision of the Sega Versus City: a back-to-back candy cab where two players face each other, each with their own screen and controls, driven by a single PCB. This is the Japanese versus-fighting cabinet. Much of the detail is shared with the Versus City — see the cross-references.
Identification¶
| Field | Value |
|---|---|
| Manufacturer | Sega |
| Year | 1996 |
| Japanese name | ニューバーサスシティー (Nyū Bāsasu Shitī) |
| Type | Back-to-back candy cab, sitdown |
| Screen | 2 × 29″ CRT, 15/24 kHz, rotatable |
| Controls | 2 stations, one on each side |
| Power | 100 V (Japan), 277 W |
| PCB format | JAMMA |
| Dimensions | 750 × 1834 × 1678 mm |
| Weight | 224 kg |
⚡ Wiring & power¶
| Aspect | Value |
|---|---|
| PCB connector | JAMMA (56-pin edge) — one PCB drives both stations |
| Monitor sync | 15/24 kHz (2 × 29″ CRT, rotatable) |
| Mains | 100 V AC (Japan) |
| Consumption | 277 W — well above a single candy cab: two monitor stages |
| Dimensions | 750 × 1834 × 1678 mm (W×D×H) |
| Weight | 224 kg |
(Source: Arcade Otaku Wiki.)
Sources disagree
The Versus City page quoted 750 × 1840 × 1700 mm and ~210 kg for the New Versus City, citing Arcade Otaku and Highway Games. Arcade Otaku now gives 750 × 1834 × 1678 mm and 224 kg.
The width and depth difference is rounding to the centimetre. The height difference is not — 1678 against 1700, i.e. 22 mm — and neither is the weight: 14 kg. The figures used here are Arcade Otaku's, the only source verified directly. If you are sizing transport or checking a floor loading, take the higher value and weigh the cabinet yourself.
What sets it apart¶
- Two stations facing each other: each player gets a screen, buttons and a seat. The cabinet is therefore over 1.8 m long and weighs more than twice an Astro City.
- A single PCB drives both screens: the game itself handles the head-to-head output. The video/audio loom is duplicated, so more involved than a single candy cab.
- Rotatable monitors: horizontal/vertical, as on Sega's other candy cabs of the period.
- A factory topper exists, the Sega Versus Billboard Unit (illuminated sign). It is optional and frequently missing.
Shared with the Versus City¶
These topics are common to both models — see the Versus City page:
- Back-to-back principle and duplicated loom → Versus City § Specifics
- Technical notes (sync, candy PSU) → Versus City § Technical notes
Internal assemblies¶
- 🖥️ Monitors: two 29″ CRT chassis → CRT safety before doing anything. Two tubes means two discharges.
- ⚡ PSU (Sega candy) → Sega PSU repair. The load is higher than on a single candy cab, so the filter capacitors take more punishment.
Common mods¶
- Native RGB (JAMMA), supergun-friendly — but you have to feed two screens.
- 31 kHz / tri-sync: the original CRTs are 15/24 kHz; going to 31 kHz means replacing both chassis, not one.
- LCD conversion: possible, but the cabinet's balance and the depth of the monitor bays change — plan for brackets.
- → Modernising a cabinet (video/power/JVS/PC-in-cab).
Procedure — a cabinet that will not start ✅¶
There is a CRT in this cabinet
The tube stays charged with the cabinet unplugged, and the anode cap is the first thing your hand meets behind the monitor. Discharge it, work with one hand, and never alone if you can help it. → CRT safety
This cabinet is documented as 100 V
It does not go straight onto a European socket. It needs a step-down transformer rated for the whole cabinet, monitor included — not a travel adapter. Feeding 230 V to a cabinet built for 100 V destroys the supply, and usually the monitor with it. → Cabinet power
What this adds
Ordered for a cabinet, not for a board: mains, low-voltage supply, loom, monitor, then the game. The overwhelming majority of "dead cabinets" are dead for a reason that has nothing to do with the PCB — which is why the board comes last here.
1. Mains, and what sits between it and the cabinet. The switch, the fuse or breaker, the isolation transformer if there is one. A cabinet that shows no sign of life at all is almost never electronic.
2. The low-voltage supply — measured under load. Aim for +5 V where power reaches the board — the JAMMA edge, or the JVS power connector, depending on the cabinet — with the game running, not on an idle bench. If the supply has an adjustment (most candy and JVS bricks do; the ATX brick in a PC cabinet does not), do it then and not before: set off-load, it leaves a board that boots and then glitches. With no adjustment the measurement still earns its keep — it tells you whether the supply holds. Check +12 V too, and −5 V if the board uses it: many do not, and an ATX brick does not provide it. → Cabinet power
3. The loom and the connector. Reseat, and check the grounds — a cabinet with a poor ground gives rolling picture, phantom inputs and noise, all at once, and none of it looks like a wiring fault. Connector on this cabinet: JAMMA. → Wiring
4. The monitor. This page describes the monitor as: 2 × 29″ CRT, 15/24 kHz, rotatable. CRT: no picture but the tube is warm and there is EHT — that is sync or video, not the tube. No EHT at all — chassis. A picture that shrinks, wanders or shifts colour is a chassis recap, and on these monitors that is a scheduled job, not a repair.
5. Scan rate — the mismatch that breaks nothing. If the board's rate is not one the monitor accepts, you get no picture and nothing is faulty. Check what this cabinet takes against what the board puts out before opening anything. → Modernising a cabinet
6. The control panel. Microswitches and the loom, in that order. A single dead direction is a switch; a whole player dead is the loom or its ground. → Control panels
7. Coin mech and sound. Last, because they hide nothing: a mech that no longer registers is usually dirty or misadjusted, and silence with a good picture points at the amplifier and its supply rails.
Photos / assets¶
(To add: whole cabinet, player station, billboard topper, duplicated loom.)
Repair & maintenance
CRT monitors (HV discharge, twice) → CRT safety · Sega candy PSU → PSU repair · recap → Recap.
Handling
224 kg and 1.83 m long: this is not a two-person lift. Use a proper sack truck, and check the floor loading in an older upstairs room.
Sources & attribution¶
Text (synthesised here; sources listed for attribution):
- Arcade Otaku Wiki — Sega New Versus City (year, dimensions, weight, consumption, monitors) — https://wiki.arcadeotaku.com/w/Sega_New_Versus_City
Reported by a wiki reviewer on 2026-08-03: the New Versus City was listed in Other candy cabs but had no page of its own, unlike Sega's other cabinets.
Image:
-
new-versus-city-borne.jpg— catalogue view, source Hard*Candy (⚠️ no licence statement anywhere on the site) — https://www.hard--candy.com/wiki/candy/NewVersusCity
Review & corrections
How this space is used
Spotted a wrong value, an outdated procedure, a chip reference that does not match your board? Say so here, with what you observed (model, board revision, serial number, measurement). Every report is cross-checked against a source before anything changes — an unverifiable correction is published as “reported by …, not cross-checked” rather than silently applied.
Reading is open to everyone; posting requires signing in with Discord. Reports from the wiki's declared reviewers are handled first; anyone else's are read too, but go through a human before anything is changed.