Nintendo — arcade (VS. System, PlayChoice-10, Super System)
Nintendo turned its consoles into multi-game arcade cabinets: the VS. System (1984, NES-based), the PlayChoice-10 (1986, NES, ten games on a menu, dual screen) and the Nintendo Super System (1991, Super Famicom/SNES-based). Same idea every time: a console CPU plus arcade dressing (BIOS, menu, timer, protection).
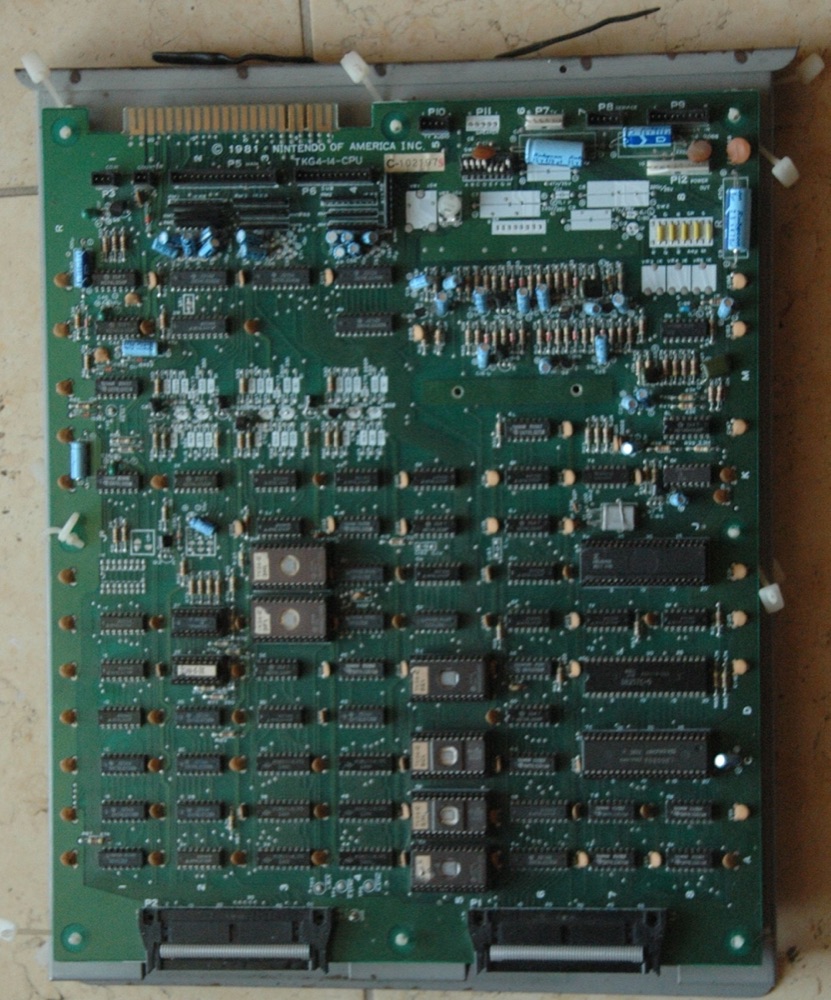
PCB Nintendo (Donkey Kong) — photo by Cyberjobe, domaine public (Wikimedia Commons).
Identification
| Field | Value |
|---|---|
| Manufacturer | Nintendo |
| Years | 1984 (VS.) · 1986 (PlayChoice-10) · 1991 (Super System) |
| Base | NES (VS., PC-10) · SNES (NSS) |
| Connector type | proprietary (dedicated cabinets) |
| Settings | DIP (timer, credits) |
The three platforms
| System | Year | CPU | Base | MAME driver |
|---|---|---|---|---|
| VS. System (UniSystem / DualSystem) | 1984 | Ricoh RP2A03 (6502) + RP2C0x PPU | NES | nintendo/vsnes.cpp |
| PlayChoice-10 | 1986 | RP2A03G (game) + Z80 (BIOS/menu) | NES | nintendo/playch10.cpp |
| Nintendo Super System (NSS) | 1991 | 65C816 (game) + Z80 (BIOS/menu) | SNES | nintendo/nss.cpp |
- VS. System: arcade NES in one or two screens. The UniSystem is single-screen; the DualSystem stacks two boards/two screens back to back (two independent players). Cartridges are swappable and the operator can remap the DIPs.
- PlayChoice-10: up to ten cartridges in the cabinet. Dual monitor: the top screen shows the menu/instructions, the bottom one the game. A Z80 drives the BIOS and the timer (time bought with coins, shared across the ten games). Each cartridge carries an RP5H01 (security chip) and a mapper (boards A→K).
- Nintendo Super System: the SNES equivalent of the PC-10 (cartridges, timer, menu overlay via Z80 + M50458 OSD). Single-screen.
Notable games
- VS. System: VS. Super Mario Bros., VS. Duck Hunt, VS. Excitebike, VS. Dr. Mario, VS. Ice Climber, VS. Castlevania, Tetris…
- PlayChoice-10: NES catalogue (Super Mario Bros., Mega Man, Metroid, Castlevania, Contra, Ninja Gaiden, Tetris…), grouped by ten.
- Nintendo Super System: Super Mario World, F-Zero, ActRaiser, Addams Family…
Security & protection
- VS. System: protection via PPU variants (RP2C03/04/05) with scrambled palettes and some swapped registers per game — a cartridge only runs correctly with the matching PPU. Wrong colours = wrong ROM/PPU pairing.
- PlayChoice-10: RP5H01 per cartridge (security), plus the Z80 BIOS.
- NSS: cartridges with a game key + BIOS.
None of these protections are reproduced here (chips named factually only).
Common faults
| Symptom | Likely cause | Lead |
|---|---|---|
| Wrong colours (VS.) | wrong RP2C0x PPU / wrong ROM-PPU pairing | Check the game's PPU variant |
| Frozen menu (PC-10 / NSS) | Z80 BIOS / menu ROM / cart contacts | BIOS diagnosis, reseat |
| One dead screen (DualSystem / PC-10) | board or monitor of that stage | Isolate the stage |
| Inconsistent timer | mis-set DIPs | Review the DIP bank |
| Cartridge not recognised | RP5H01 (PC-10) / contacts | Clean the connector |
| No picture | PSU, RP2A03/65C816, harness | Base diagnosis |
Modernisation & mods
The common ground for every JAMMA board
Video, power, control panel and upscalers depend on the cabinet rather than the board: everything is centralised in Modernising a cabinet. To run the board outside a cabinet (at home, on a display): supergun.
- Storage 🟢: a cartridge system — the modern route is a multi-game cart / flashcart rather than reprogramming, where one exists for the platform → PCB preservation hub.
- Scan rate 📺: ~15.87 kHz / 56.7 Hz — standard resolution, a classic 15 kHz chassis is fine — the most common JAMMA case → tri-sync and upscalers.
(Computed from the MAME sources —
nintendo/vsnes.cpp— pixel clock ÷ htotal.) - FPGA / emulation: see the Emulation & FPGA section below.
Repair (technician)
- VS. System: a variant PPU (RP2C03/04/05) + per-game palette/protection — wrong colours can come from the wrong PPU (swapped between variants).
- 6502/2A03 base (Famicom/NES-derived): NES-type diagnosis (PPU, RAM, cartridge contacts on PlayChoice/VS).
- Sound: 2A03 (APU) — diagnose the sound stage.
- Capacitors: recap. Sockets / contacts: clean.
→ Methods: PCB fault-finding · Recap · EPROM · Traces & vias
Archived original schematics ✅
Manufacturer schematics for games in this family, archived locally (so they do not depend on a third-party site staying up). They give the board's real functional breakdown: clock tree, address decoding, video stage, sound stage, power supply — exactly what you need to trace a missing signal back to its source.
- VS. System (MDS-02-CPU) — full schematic (PDF)
-
Donkey Kong (TKG-4 CPU) — full schematic (PDF)
-
Arm Wrestling — full schematic (PDF)
- Donkey Kong Jr. (English) — full schematic (PDF)
- Donkey Kong Jr. (Japanese) — full schematic (PDF)
- Donkey Kong (TKG-4, full) — full schematic (PDF)
- Mario Bros. — full schematic (PDF)
- PlayChoice-10 — full schematic (PDF)
- PlayChoice-10 (table model) — full schematic (PDF)
- Punch-Out!! (CHP1-02) — full schematic (PDF)
- Radar Scope — full schematic (PDF)
Scope and limits
A schematic applies to the game and revision named. Within one family the general breakdown (buses, decoding, sound/video stages) carries over from board to board, but component references and custom chip pinouts do not transpose between titles. Use it as a map of the logic, not as a cross-reference table.
Source: the Arcade Game Manuals collection on the Internet Archive. Manufacturer documents with no explicit licence, kept here for preservation (machines out of service for over 25 years).
Manufacturer service bulletins ✅
Fixes the manufacturer issued to its network: they document a factory-acknowledged fault, its symptom and the modification to apply.
- Donkey Kong service bulletin (11 Dec 1981) — PDF
→ Full catalogue: service manuals & wiring diagrams
Original manuals for games on this platform ✅
Manufacturer manuals for games running on this board. Beyond the instructions, they very often carry the full DIP settings, the connector pinout, the test procedure, the parts list and the expected voltages.
- VS. Castlevania — original manual (PDF)
- VS. Dr. Mario — original manual (PDF)
- VS. Duck Hunt — original manual (PDF)
- VS. Excitebike — original manual (PDF)
- VS. Super Mario Bros — original manual (PDF)
- VS. System — original manual (PDF)
→ Full catalogue: service manuals, wiring & game manuals
DIP settings ✅
35 games on this platform, settings extracted from the MAME sources (INPUT_PORTS_START blocks). The Position column gives the switch's physical reference on the board (SW2:!3,!4 = bank SW2, levers 3 and 4) — which is what lets you set it up without the paper manual. Games are sorted by MAME set name.
DIP settings — MAME set balonfgt
| Setting | Position | Options (default in bold) |
|---|---|---|
| Coinage | SW1:!1,!2,!3 | 4C 1C · 3C 1C · 2C 1C · 1C 1C · 1C 2C · 1C 3C · 1C 4C · Free Play |
| Lives | SW2:!1,!2 | 3 · 4 · 5 · 6 |
| Difficulty | SW2:!3,!4 | Easy · Normal · Medium · Hard |
| Enemy Regeneration | SW2:!5 | Low · High |
| Bonus Life | SW2:!6,!7 | 10,000 Pts · 20,000 Pts · 40,000 Pts · None |
DIP settings — MAME set bnglngby
| Setting | Position | Options (default in bold) |
|---|---|---|
| Coinage | SW1:!1,!2,!3 | 4C 1C · 3C 1C · 2C 1C · 1C 1C · 1C 2C · 1C 3C · 1C 4C · Free Play |
| Lives | SW1:!4 | 3 · 4 |
| Difficulty | SW1:!6,!7 | Easy · Normal · Medium · Hard |
DIP settings — MAME set btlecity
| Setting | Position | Options (default in bold) |
|---|---|---|
| Credits for 2 Players | SW1:!1 | 1 · 2 |
| Lives | SW1:!2 | 3 · 5 |
| Demo Sounds | SW1:!3 | Off · On |
| PPU Type | SW1:!7,!8 | RP2C04-0001 · RP2C04-0002 · RP2C04-0003 · RP2C04-0004 |
DIP settings — MAME set cluclu
| Setting | Position | Options (default in bold) |
|---|---|---|
| Coinage | SW1:!1,!2,!3 | 4C 1C · 3C 1C · 2C 1C · 1C 1C · 1C 2C · 1C 3C · 1C 4C · Free Play |
| Credits for 2 Players | SW1:!5 | 1 · 2 |
| Lives | SW1:!6,!7 | 2 · 3 · 4 · 5 |
DIP settings — MAME set cstlevna
| Setting | Position | Options (default in bold) |
|---|---|---|
| Coinage | SW1:!1,!2,!3 | 5C 1C · 4C 1C · 3C 1C · 2C 1C · 1C 1C · 1C 2C · 1C 3C · Free Play |
| Lives | SW1:!4 | 2 · 3 |
| Bonus points | SW1:!5,!6 | Timer x 4, Hearts x 40 · Timer x 6, Hearts x 60 · Timer x 8, Hearts x 80 · Timer x 9, Hearts x 90 |
| Difficulty | SW1:!7 | Easy · Hard |
DIP settings — MAME set drmario
| Setting | Position | Options (default in bold) |
|---|---|---|
| Drop Rate Increases After | SW1:!1,!2 | 7 Pills · 8 Pills · 9 Pills · 10 Pills |
| Virus Level | SW1:!3,!4 | 1 · 3 · 5 · 7 |
| Drop Speed Up | SW1:!5,!6 | Slow · Medium · Fast · Fastest |
| Free Play | SW1:!7 | Off · On |
| Demo Sounds | SW1:!8 | Off · On |
DIP settings — MAME set duckhunt
| Setting | Position | Options (default in bold) |
|---|---|---|
| Coinage | SW1:!1,!2,!3 | 5C 1C · 4C 1C · 3C 1C · 2C 1C · 1C 1C · 1C 2C · 1C 3C · Free Play |
| Difficulty | SW1:!4,!5 | Easy · Normal · Medium · Hard |
| Misses per game | SW1:!6 | 3 · 5 |
| Bonus Life | SW1:!7,!8 | 30000 · 50000 · 80000 · 100000 |
DIP settings — MAME set excitebk
| Setting | Position | Options (default in bold) |
|---|---|---|
| Coinage | SW1:!1,!2,!3 | 4C 1C · 3C 1C · 2C 1C · 1C 1C · 1C 2C · 1C 3C · 1C 4C · Free Play |
| Bonus Bike | SW1:!4,!5 | 100k and Every 50k · Every 100k · 100k Only · None |
| 1st Half Qualifying Time | SW1:!6 | Easy · Hard |
| 2nd Half Qualifying Time | SW1:!7 | Easy · Hard |
DIP settings — MAME set golfj
| Setting | Position | Options (default in bold) |
|---|---|---|
| Starting Points | SW1:!6,7 | 300 · 400 · 500 · 600 |
DIP settings — MAME set goonies
| Setting | Position | Options (default in bold) |
|---|---|---|
| Coinage | SW1:!1,!2,!3 | 5C 1C · 4C 1C · 3C 1C · 2C 1C · 1C 1C · 1C 2C · 1C 3C · Free Play |
| Lives | SW1:!4 | 4 · 3 |
| Bonus Life | SW1:!5,!6 | 40000 · 50000 · 60000 · 70000 |
| Timer | SW1:!7 | Slow · Fast |
| Demo Sounds | SW1:!8 | Off · On |
DIP settings — MAME set hogalley
| Setting | Position | Options (default in bold) |
|---|---|---|
| Coinage | SW1:!1,!2,!3 | 5C 1C · 4C 1C · 3C 1C · 2C 1C · 1C 1C · 1C 2C · 1C 3C · Free Play |
| Difficulty | SW1:!4,!5 | Easy · Normal · Medium · Hard |
| Misses per game | SW1:!6 | 3 · 5 |
| Bonus Life | SW1:!7,!8 | 30000 · 50000 · 80000 · 100000 |
DIP settings — MAME set iceclimb
| Setting | Position | Options (default in bold) |
|---|---|---|
| Coinage | SW1:!1,!2,!3 | 4C 1C · 3C 1C · 2C 1C · 1C 1C · 1C 2C · 1C 3C · 1C 4C · Free Play |
| Lives | SW1:!4,!5 | 3 · 4 · 5 · 7 |
| Difficulty | SW1:!6 | Easy · Hard |
| Time before bear appears | SW1:!7 | Long · Short |
DIP settings — MAME set iceclmrj
| Setting | Position | Options (default in bold) |
|---|---|---|
| Coinage (Left Side) | SW1:!1,!2,!3 | 4C 1C · 3C 1C · 2C 1C · 1C 1C · 1C 2C · 1C 3C · 1C 4C · Free Play |
| Lives (Left Side) | SW1:!4,!5 | 3 · 4 · 5 · 7 |
| Service Mode (Left Side) | SW1:!8 | Off · On |
| Coinage (Right Side) | SW2:!1,!2,!3 | 4C 1C · 3C 1C · 2C 1C · 1C 1C · 1C 2C · 1C 3C · 1C 4C · Free Play |
| Lives (Right Side) | SW2:!4,!5 | 3 · 4 · 5 · 7 |
| Service Mode (Right Side) | SW2:!8 | Off · On |
DIP settings — MAME set jajamaru
| Setting | Position | Options (default in bold) |
|---|---|---|
| Coinage | SW1:!1,!2,!3 | 4C 1C · 3C 1C · 2C 1C · 1C 1C · 1C 2C · 1C 3C · 1C 4C · Free Play |
| Lives | SW1:!4,!5 | 3 · 4 · 5 · 6 |
| Demo Sounds | SW1:!8 | Off · On |
DIP settings — MAME set machridj
| Setting | Position | Options (default in bold) |
|---|---|---|
| Coinage | SW1:!1,!2,!3 | 4C 1C · 3C 1C · 2C 1C · 1C 1C · 1C 2C · 1C 3C · 1C 4C · Free Play |
| Max Lives After Level 1 | SW1:!4,!5 | 3 · 4 · 5 · 6 |
| Enemies | SW1:!7 | More · Less |
DIP settings — MAME set machridr
| Setting | Position | Options (default in bold) |
|---|---|---|
| Coinage | SW1:!1,!2,!3 | 4C 1C · 3C 1C · 2C 1C · 1C 1C · 1C 2C · 1C 3C · 1C 4C · Free Play |
| Time | SW1:!4,!5 | 280 (Easy) · 250 · 220 · 200 (Hard) |
| Enemies | SW1:!7 | More · Less |
DIP settings — MAME set mightybj
| Setting | Position | Options (default in bold) |
|---|---|---|
| Coinage | SW1:!1,!2,!3 | 5C 1C · 4C 1C · 3C 1C · 2C 1C · 1C 1C · 1C 2C · 1C 3C · 1C 4C |
| Lives | SW1:!4,!5 | 2 · 3 · 4 · 5 |
DIP settings — MAME set rbibb
| Setting | Position | Options (default in bold) |
|---|---|---|
| Coinage | SW1:!1,!2 | 3C 1C · 2C 1C · 1C 1C · 1C 2C |
| 1p/inn, 2p/inn, Time/Min | SW1:!3,!4 | 2, 1, 3 · 2, 2, 4 · 3, 2, 6 · 4, 3, 7 |
| Demo Sounds | SW1:!5 | Off · On |
| PPU Type | SW1:!6,!7,!8 | RP2C04-0001 · RP2C03 · RP2C04-0002 · RP2C04-0003 · RP2C04-0004 |
DIP settings — MAME set starlstr
| Setting | Position | Options (default in bold) |
|---|---|---|
| Coinage | SW1:!1,!2 | 3C 1C · 2C 1C · 1C 1C · 1C 2C |
| PPU Type | SW1:!6,!7,!8 | RP2C03 · RP2C04-0001 · RP2C04-0002 · RP2C04-0003 · RP2C04-0004 |
DIP settings — MAME set suprmrio
| Setting | Position | Options (default in bold) |
|---|---|---|
| Coinage | SW1:!1,!2,!3 | 3C 1C · 2C 1C · 1C 1C · 1C 2C · 1C 3C · 1C 4C · 1C 5C · Free Play |
| Lives | SW1:!4 | 2 · 3 |
| Bonus Life | SW1:!5,!6 | 100 Coins · 150 Coins · 200 Coins · 250 Coins |
| Timer | SW1:!7 | Slow · Fast |
| Continue Lives | SW1:!8 | 3 · 4 |
DIP settings — MAME set supxevs
| Setting | Position | Options (default in bold) |
|---|---|---|
| Bonus Life | SW1:!1 | 50k, 150k, every 150k · 70k, 200k, every 200k |
| Lives | SW1:!2 | 3 · 5 |
| Hidden Password Screen | SW1:!4 | Yes · No |
| Coinage | SW1:!5,!6 | 3C 1C · 2C 1C · 1C 1C · 1C 2C |
| PPU Type | SW1:!7,!8 | RP2C04-0001 · RP2C04-0002 · RP2C04-0003 · RP2C04-0004 |
DIP settings — MAME set tkoboxng
| Setting | Position | Options (default in bold) |
|---|---|---|
| Coinage | SW1:!1,!2 | 3C 1C · 2C 1C · 1C 1C · 1C 2C |
| Difficulty | SW1:!3,!4 | Easy · Normal · Hard · Very Hard |
| PPU Type | SW1:!6,!7,!8 | RP2C04-0003 · RP2C03 |
DIP settings — MAME set vsbball
| Setting | Position | Options (default in bold) |
|---|---|---|
| Player Defense Strength | SW1:!1,!2 | Weak · Normal · Medium · Strong |
| Player Offense Strength | SW1:!3,!4 | Weak · Normal · Medium · Strong |
| Computer Defense Strength | SW1:!5,!6 | Weak · Normal · Medium · Strong |
| Computer Offense Strength | SW1:!7,!8 | Weak · Normal · Medium · Strong |
| Coinage | SW2:!2,!3 | 2C 1C · 1C 1C · 1C 2C · Free Play |
| Starting Points | SW2:!4,!5,!6 | 80 Pts · 100 Pts · 150 Pts · 200 Pts · 250 Pts · 300 Pts · 350 Pts · 400 Pts |
| Bonus Play | SW2:!7 | Off · On |
| Demo Sounds | SW2:!8 | Off · On |
DIP settings — MAME set vsfdf
| Setting | Position | Options (default in bold) |
|---|---|---|
| Coinage | SW1:!1,!2,!3 | 5C 1C · 4C 1C · 3C 1C · 2C 1C · 1C 1C · 1C 2C · 1C 3C · Free Play |
| Health Awarded At | SW1:!4,!5 | 20k/60k · 20k/60k/Every 60k · 10k/50k · 10k/50k/Every 50k |
| Difficulty (Damage) | SW1:!6,!7 | Easy · Normal · Hard · Hardest |
| Difficulty (Enemy) | SW1:!8 | Normal · Hard |
DIP settings — MAME set vsgradus
| Setting | Position | Options (default in bold) |
|---|---|---|
| Coinage | SW1:!1,!2,!3 | 5C 1C · 4C 1C · 3C 1C · 2C 1C · 1C 1C · 1C 2C · 1C 3C · Free Play |
| Lives | SW1:!4 | 3 · 4 |
| Bonus | SW1:!5,!6 | 100k · 200k · 300k · 400k |
| Difficulty | SW1:!7 | Easy · Hard |
| Demo Sounds | SW1:!8 | Off · On |
DIP settings — MAME set vsgshoe
| Setting | Position | Options (default in bold) |
|---|---|---|
| Coinage | SW1:!1,!2,!3 | 5C 1C · 4C 1C · 3C 1C · 2C 1C · 1C 1C · 1C 2C · 1C 3C · Free Play |
| Difficulty | SW1:!4,!5 | Easy · Normal · Hard · Hardest |
| Lives | SW1:!6 | 3 · 5 |
| Bullets per Balloon | SW1:!7 | 3 · 2 |
| Bonus Man Awarded | SW1:!8 | At 50000 · None |
DIP settings — MAME set vsmahjng
| Setting | Position | Options (default in bold) |
|---|---|---|
| Rules | SW1:!1 | Kansai · Kantou |
| Difficulty | SW1:!2,!3 | Easy · Normal · Hard · Hardest |
| Timer | SW1:!4 | Off · On |
| Initial Time | SW1:!5,!6 | 30 · 45 · 60 · 90 |
| Additional Time | SW1:!7,!8 | 8 · 12 · 15 · 20 |
| Coinage | SW2:!2,!3 | 2C 1C · 1C 1C · 1C 2C · Free Play |
| Mawashi | SW2:!4 | Tonnan · Tonton |
| Dora | SW2:!5 | Genbutsu · Next |
| Starting Points | SW2:!6,!7 | 15000 · 20000 · 25000 · 30000 |
| Demo Sounds | SW2:!8 | Off · On |
DIP settings — MAME set vspinbal
| Setting | Position | Options (default in bold) |
|---|---|---|
| Coinage | — | 4C 1C · 3C 1C · 2C 1C · 1C 1C · 1C 2C · 1C 3C · 1C 4C · Free Play |
| Side Drain Walls | SW1:!4 | High · Low |
| Bonus Life | SW1:!5 | 50000 · 70000 |
| Balls | SW1:!6,!7 | 2 · 3 · 4 · 5 |
| Ball speed | SW1:!8 | Slow · Fast |
DIP settings — MAME set vsskykid
| Setting | Position | Options (default in bold) |
|---|---|---|
| Difficulty | SW1:!1,!2 | Easy · Normal · Medium · Hard |
| Lives | SW1:!3 | 2 · 3 |
| Coinage | SW1:!4,!5 | 3C 1C · 2C 1C · 1C 1C · 1C 2C |
| PPU Type | SW1:!6,!7,!8 | RP2C04-0001 · RP2C03 · RP2C04-0002 · RP2C04-0003 · RP2C04-0004 |
DIP settings — MAME set vsslalom
| Setting | Position | Options (default in bold) |
|---|---|---|
| Coinage | SW1:!1,!2,!3 | 5C 1C · 4C 1C · 3C 1C · 2C 1C · 1C 1C · 1C 2C · 1C 3C · Free Play |
| Freestyle Points | SW1:!4 | Left / Right · Hold Time |
| Difficulty | SW1:!5,!6 | Easy · Normal · Medium · Hard |
| Allow Continue | SW1:!7 | No · Yes |
| Inverted input | SW1:!8 | Off · On |
DIP settings — MAME set vssoccer
| Setting | Position | Options (default in bold) |
|---|---|---|
| Coinage | SW1:!1,!2,!3 | 4C 1C · 3C 1C · 2C 1C · 1C 1C · 1C 2C · 1C 3C · 1C 4C · Free Play |
| Points Timer | SW1:!4,!5 | 1000 Pts · 1500 Pts · 2000 Pts · 600 Pts |
| Difficulty | SW1:!6,!7 | Easy · Normal · Medium · Hard |
DIP settings — MAME set vssoccera
| Setting | Position | Options (default in bold) |
|---|---|---|
| Points Timer | SW1:!4,!5 | 600 Pts · 800 Pts · 1000 Pts · 1200 Pts |
DIP settings — MAME set vstennis
| Setting | Position | Options (default in bold) |
|---|---|---|
| Difficulty Vs. Computer | SW1:!1,!2 | Easy · Normal · Medium · Hard |
| Difficulty Vs. Player | SW1:!3,!4 | Easy · Normal · Medium · Hard |
| Raquet Size | SW1:!5 | Large · Small |
| Extra Score | SW1:!6 | 1 Set · 1 Game |
| Court Color | SW1:!7 | Green · Blue |
| Copyright | SW1:!8 | Japan · USA |
| Coinage | SW2:!2,!3 | 2C 1C · 1C 1C · 1C 2C · Free Play |
| Game Mode - Credits: 1VsC/2VsC/1Vs1/2Vs2 | SW2:!4,!5 | A - 1/1/2/2 · B - 1/2/2/2 · C - 1/1/2/4 · D - 1/2/2/4 |
| Rackets Per Game | SW2:!6,!7 | 2 · 3 · 4 · 5 |
| Demo Sounds | SW2:!8 | Off · On |
DIP settings — MAME set vstetris
| Setting | Position | Options (default in bold) |
|---|---|---|
| Difficulty | SW1:!3,!4 | Easy · Normal · Medium · Hard |
| PPU Type | SW1:!6,!7,!8 | RP2C04-0001 · RP2C03 · RP2C04-0002 · RP2C04-0003 · RP2C04-0004 |
DIP settings — MAME set wrecking
| Setting | Position | Options (default in bold) |
|---|---|---|
| Lives | SW1:!1,!2 | 3 · 4 · 5 · 6 |
| 1st Bonus Life | SW1:!3,!4,!5, | 20,000 Pts · 30,000 Pts · 40,000 Pts · 50,000 Pts · 70,000 Pts · 80,000 Pts · 100,000 Pts · None |
| Additional Bonus Lives | SW1:!6,!7,!8 | 20,000 Pts · 30,000 Pts · 40,000 Pts · 50,000 Pts · 70,000 Pts · 80,000 Pts · 100,000 Pts · None |
| Coinage | SW2:!1,!2,!3 | 4C 1C · 3C 1C · 2C 1C · 1C 1C · 1C 2C · 1C 3C · 1C 4C · Free Play |
| Difficulty | SW2:!4,!5 | Easy · Normal · Medium · Hard |
| Copyright | SW2:!6 | Japan · USA |
Check against your own board
These settings apply to the game and revision described by MAME. One title may have several DIP sets depending on region or revision, and some systems use soft-dips (settings in memory, via the test menu) rather than physical switches. In case of a discrepancy, the board's silkscreen and the test menu are authoritative.
See also: DIP reference · game manuals
Procedure — a dead board, step by step ✅
What this adds
The general method lives in PCB diagnosis. This is its application to this platform: the same order, but with the values actually expected here, so you do not have to go back and forth.
Tools: multimeter, oscilloscope (or frequency counter), current-limited bench supply, desoldering braid. → Tooling
If the board is still in a cabinet
A CRT holds its charge with the machine unplugged. → CRT safety
1. Inspection, power off. Corrosion, cut tracks, oxidised EPROM legs, leaking SMD capacitors, dubious earlier repairs.
2. The connector, before anything else. A large share of "dead boards" are a contact problem, not a fault. Clean the contacts with isopropyl alcohol and reseat — not with an abrasive eraser on a gold edge, which takes the plating off and brings the problem back worse. It costs two minutes and settles the question.
3. Power, measured on the board. Aim for +5.0 V measured as close as possible to where power reaches the board — not at the PSU output: the drop is in the loom, and that is exactly what makes a board boot on the bench and not in the cabinet. Where you probe depends on this board's connector — JAMMA edge, JVS loom or a proprietary harness — plenty of makers kept one long after JAMMA arrived — see Identification above. → Wiring Check −5 V and +12 V too if the sound stage uses them. Suspected short: bring it up current-limited and find the hot spot.
4. /RESET. It must release after power-up. Held low = the CPU never starts. A 1–2 Hz loop is not the reset circuit, it is the watchdog: the CPU is crashing at boot, so look at the bus, not at the reset.
5. Clocks. There is no measurement table for this platform — MAME's sources yield nothing usable for it. Any frequency quoted under Architecture on this page serves as a marker; otherwise compare against a working board rather than against a number: an invented value condemns healthy parts. → PCB diagnosis
6. Bus. Activity on the main CPU's address lines tells you whether it is running or frozen. Frozen with good clocks and good reset → work RAM, bus buffers, ROMs.
7. It boots but the picture or the sound is wrong — that is another job: see Common faults on this page, then signal tracing.
Emulation & FPGA
- Emulation: MAME emulates VS. System (
nintendo/vsnes.cpp), PlayChoice-10 (nintendo/playch10.cpp) and NSS (nintendo/nss.cpp), including VS. palettes and BIOS. - FPGA / MiSTer: no verified dedicated arcade core for these wrappers; the MiSTer NES and SNES cores reproduce the console base but not the arcade BIOS/menu/timer.
Lineage
These cabinets recycle NES (1983) then Super Famicom/SNES (1990) hardware in arcade form. The "console + arcade dressing" pattern later appears elsewhere (Sega Mega-Tech/Mega-Play, Mega Drive-based).
Photos / assets
(To add: VS. UniSystem board, dual-screen PlayChoice-10 cabinet, NSS board.)
Sources & attribution
-
Photo PCB Nintendo (Donkey Kong) — Cyberjobe, domaine public, Wikimedia Commons — https://commons.wikimedia.org/wiki/File:Nintendo_Donkey_Kong_pcb1.jpg
-
MAME —
nintendo/vsnes.cpp,playch10.cpp,nss.cpp(CPU, PPU, Z80 BIOS, protection, games) — https://github.com/mamedev/mame - Wikipedia — Nintendo VS. System — CC-BY-SA — https://en.wikipedia.org/wiki/Nintendo_VS._System
- Wikipedia — PlayChoice-10 — CC-BY-SA — https://en.wikipedia.org/wiki/PlayChoice-10
- Wikipedia — Nintendo Super System — CC-BY-SA — https://en.wikipedia.org/wiki/Nintendo_Super_System

Review & corrections
How this space is used
Spotted a wrong value, an outdated procedure, a chip reference that does not match your board? Say so here, with what you observed (model, board revision, serial number, measurement). Every report is cross-checked against a source before anything changes — an unverifiable correction is published as “reported by …, not cross-checked” rather than silently applied.
Reading is open to everyone; posting requires signing in with Discord. Reports from the wiki's declared reviewers are handled first; anyone else's are read too, but go through a human before anything is changed.